
Girly Pumpkin Carving Ideas for a Cute and Spooky Look
It’s that time of year when I’m up to my elbows in pumpkin guts, and honestly, I wouldn’t have it any other way! As a mom of three wild little boys, I love finding girly pumpkin carving ideas that add just the right amount of sweet to our usual chaos!
If you’re looking to soften things up (while still keeping everything just a little bit spooky), you’re in the right place. These cute, charming ideas are perfect for anyone wanting a playful, stylish look that still fits the Halloween vibe. Get your pink paints, florals, and rhinestones ready—let’s make some pumpkins you’ll remember!

Why Girly Pumpkin Carving is So Much Fun for Moms and Kids

When I think about those crisp October weekends, I instantly picture my kitchen table covered in pumpkin seeds and paint pots, with three little boys making messes and me sneaking in some girly pumpkin carving ideas. It’s our special fall tradition. There’s just something about combining glitter, paint, and some pink accents on a pumpkin that makes the whole activity more magical for both moms and kids.
Making Memories Together
Pumpkin carving can feel like a sticky, messy job, but when you turn it into a creative family moment, it feels more like a mini holiday! I love watching my boys get excited about rhinestone eyes or a pastel bow. It doesn’t matter if you’re working with real carving tools or just a handful of sharpies and stickers. The point is making memories and laughing together.
- Everyone gets to join in. Little hands can help scoop seeds or stick on gems.
- There’s room for mistakes. If a cut goes sideways, just turn it into a funny face or add more decorations.
- Photos for days. A table full of pretty pumpkins screams for a family photo or two!
Creativity Without Limits
I like to think of our pumpkin as a blank canvas. Girly pumpkin carving ideas open up a world of possibilities. Do you want a soft pastel unicorn pumpkin? Great! Dreaming up a pumpkin princess with a glitter crown? Even better. This isn’t just about following a template, it’s about saying yes to every wild and playful idea that pops into your head.
Here are the things my boys and I do to keep things fresh and fun:
- Mix and match supplies. Don’t be afraid to use pom-poms, ribbons, feathers, or even buttons.
- Let the kids take the lead. I give them the okay to turn a pumpkin into anything (yes, even a pumpkin “robot ballerina” has happened).
- Paint first, carve later. Sometimes a layer of color changes everything and makes your cuts stand out.
A Sweet Spot Between Cute and Spooky

Every Halloween, I want our porch to feel friendly, not frightening. Girly pumpkin carving finds that sweet spot between cute and spooky. If you’re like me, you know a sweet-faced cat pumpkin or a pastel bat looks just as charming in the dark as the grinning jack-o’-lanterns of old. You don’t have to go over-the-top gothic for your display to feel festive.
- Pretty colors soften things up. Pink, lavender, even metallic gold. These colors catch little eyes and warm up the usual orange.
- Sweet faces make everyone smile. Heart-shaped eyes and rosy cheeks are always a hit.
- Spooky (but not scary). We add little plastic spiders, bats, or even just a hint of glittery web for that Halloween vibe.
Boosts Confidence and Skills
Kids light up when they see their own ideas brought to life. That little bit of pride sticks with them all season. As a mom, I get a front-row seat to every proud grin. Carving, painting, and decorating pumpkins together builds confidence, helps with coordination, and encourages everyone to try something new.
Some of the best benefits are:
- Learning by doing. Cutting, scooping seeds, or painting faces each builds different skills.
- Safe experimentation. With a little supervision, even the youngest can paint or stick decorations without worry.
- Confidence boost. When my boys spot their finished pumpkins on the front step, they beam with pride and can’t wait to show them off.
There’s a reason we keep coming back to girly pumpkin carving ideas every October. It brings our family together, lets us all show off our silly and creative sides, and sets the tone for a playful, memory-filled holiday.
Essential Tools and Supplies for Cute and Spooky Pumpkin Designs
If you’ve ever tried bringing your girly pumpkin carving ideas to life with the wrong kitchen knife or dried-out markers, you know just how quickly the dream can fizzle! Trust me, having the right tools and supplies makes all the difference between a “nailed it” pumpkin and one that makes you laugh (for all the wrong reasons). These days, I like to set out a tray with everything we need, so my little crew and I can just get right to the fun. The cutest pumpkins start with simple prep!
Must-Have Carving Tools for Parents and Kids
Let’s get real, those pumpkin kits from the store actually work. I used to be a skeptic, but now I’m a believer! The small, serrated saws and little scoops fit perfectly in tiny hands and keep things safer than the sharp kitchen knives collecting dust in the drawer.
Here’s what we always have on hand:
- Pumpkin carving kit: The ones with saws, scoops, and stencils are a lifesaver for little helpers (and nervous moms).
- Serrated knife: If you’re carving big designs or thick pumpkins, a sturdy bread knife can help out. I use it for the first big cuts.
- Spoons or ice cream scoops: These make scraping out all those seeds fast and painless, and my boys love this messy step!
- Dry-erase marker: To sketch your design before cutting. You can wipe away mistakes and start again if you change your mind.
Most of the time, we turn this part into a treasure hunt and see who can find the most strings or seeds inside their pumpkin. It’s simple, but it keeps everyone happy and busy.
The Best Girly Decorations for Cute and Spooky Magic
Once you have your carved pumpkin blank, the real magic starts. Decorations help you dial up the cute or sprinkle in some spooky. We like to go a little wild with our choices here! I find that a few “girly” touches can totally transform even the wonkiest pumpkin into something swoon-worthy.
Here’s what fills our decorating basket each year:
- Acrylic paints: Pink, lavender, gold, white and hot pink—mix and match!
- Glitter and glitter glue: For hearts, cheeks, or sparkly cat ears.
- Rhinestones and stick-on gems: Perfect for eyes, crowns, or just for glam.
- Ribbon, lace, or tulle: A quick bow or skirt turns a pumpkin into a princess.
- Googly eyes: Big, silly eyes are always a hit.
- Pom-poms: Nose, tail, or just for extra cute fluff.
- Stickers: Pastel bats, stars, ghosts, or whatever your kids pick out.
- Sequins: For shiny eyelashes or little accents.
- Tiny plastic spiders or bats: Adds spooky charm without making it too scary for younger kids.
Our rule is: if it sticks, glues, or paints on a pumpkin, it’s fair game!
Simple Supplies That Make Life Easier
Some must-have supplies fall into the not-so-glamorous category, but they make the process so much smoother (and less messy). Since I’m usually juggling coffee, a toddler, and a pile of seeds all at once, I always reach for a few basics.
Here’s what helps us keep our groove:
- Old newspapers or disposable tablecloth: Protects your workspace and makes cleanup fast.
- Baby wipes or wet paper towels: For sticky hands and spilled paint.
- Plastic cups or paint palettes: Keep your colors from mixing in a giant blob.
- Paintbrushes (small and medium): For details and big patches of color.
- White glue or glue dots: Making sure those gems and bows really stay put!
- Battery tea lights or fairy lights: Much safer than candles and perfect for lighting up cute and spooky faces.
I set all of these up before announcing “pumpkin time,” so the excitement doesn’t get lost in the search for a missing brush or a runaway scoop.
Organization Tips for Happy, Stress-Free Carving
A little planning goes a long way! Before we even touch a pumpkin, I lay out all our tools and let my boys pick the decorations they like best. This turns into a mini shopping spree right at home, letting everyone feel in charge of their masterpiece.
I like to set up our space like this:
- Cover the table and floor with newspapers or a plastic sheet.
- Put all sharp tools at the center, only handing them over when it’s time.
- Set up paint and decoration stations off to one side, so there’s less messy overlap.
- Put wipes and paper towels nearby for quick cleanups.
- Keep extra bowls for seeds, so nothing sticky lands on your favorite shirt.
Believe me, this helps keep the chaos to a minimum, and everyone knows where to grab what they need!
Quick List: My Can’t-Live-Without Pumpkin Supplies

If you’re just getting started, here’s the no-fuss list I come back to every fall. You don’t need everything fancy, just these basics for the best results:
- Pumpkin carving kit (with saws and scoopers)
- Serrated knife (for the big stuff)
- Dry-erase marker
- Paints and glitter
- Googly eyes, stick-on gems, and ribbon
- Old newspapers or plastic sheet for the table
- Wipes and paper towels
- Plastic cups for water or paint
- Glue or glue dots
- Battery-operated tea lights
With these tools and fun touches, our girly pumpkin carving ideas always go from great to unforgettable. Our house is covered in sparkles for days, and every single pumpkin ends up looking adorable (and just spooky enough) for the porch!
Step-by-Step Girly Pumpkin Carving Ideas to Try This Year
When I started adding more “girly pumpkin carving ideas” to our fall table, things got so much sweeter (and way more glittery)! With three boys in the house, you better believe I bring out all the sparkle, bright colors, flowers, and silly faces I can find. These step-by-step ideas are so easy—even kids can help with most of them. I’m sharing my favorite cute and spooky looks, from princess-worthy glitter to soft pastel pumpkins that brighten up any doorstep. Let’s take those pumpkins to the next level and make your porch the talk of the block!
Glitter Glam Pumpkins
Who says pumpkins can’t sparkle like a tiara? My own boys love helping with this one because it’s messy and magical, which is their favorite combo. Here’s how we make our pumpkins look like they belong at a royal ball instead of just the porch!
- Pick your pumpkin: Any size works, but smooth ones show off glitter best.
- Add some glue: Use white school glue, mod podge, or even a good craft glue. Brush it on in swirls, zigzags, or all over—no rules here.
- Time for sparkle: Sprinkle fine glitter over the glued spots. If you want extra shine, try a chunky glitter or mix colors for an ombre effect.
- Stick on the jewels: Peel-and-stick rhinestones and flat-back gems will stay put right on the pumpkin’s skin. Crowns, stars, hearts—the more shapes, the better.
- Seal it in: If you want it to last, spray a light coat of clear sealant (outside, away from little noses). This helps lock in all that shine so it doesn’t end up all over your carpet.
Tips for safe, easy fun:
- Let kids use glitter glue tubes instead of loose glitter. Less mess, easier cleanup.
- Use latex gloves if sticky fingers bother anyone.
- Keep a handheld vacuum close for any runaway sparkles!
These pumpkins look like something right out of a fairytale, and they shimmer beautifully when the porch lights hit them. Perfect for anyone wanting a princess-inspired porch, no magic wand needed.
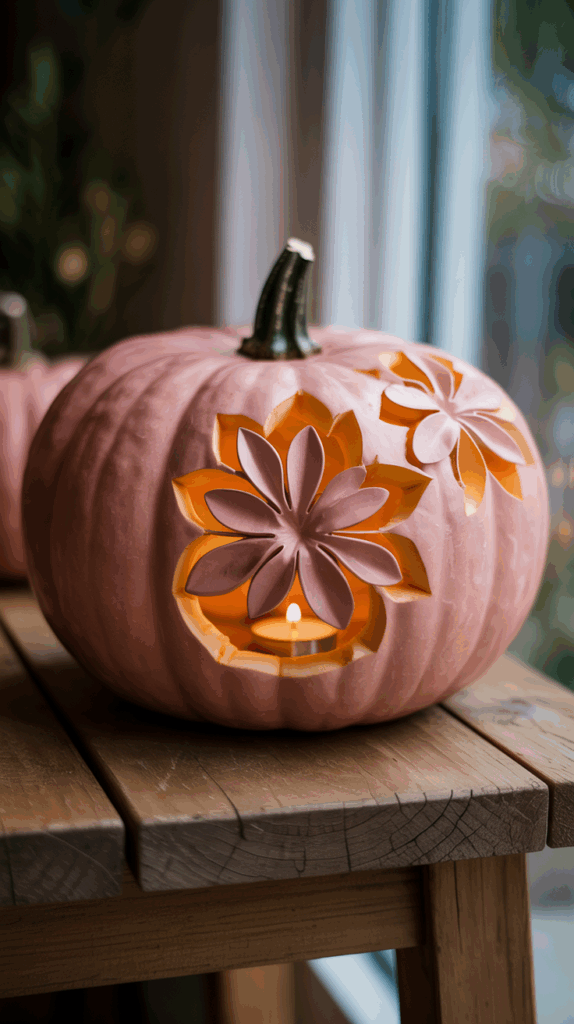
Floral Carved Pumpkins
Nothing says spring like fresh flowers, but when it’s Halloween, I go for floral pumpkins instead! This look is both sweet and whimsical, and you can get creative whether you love carving or just want to skip straight to flowers.
- For simple carved flowers: Draw easy petals, big daisies, or even tulips with a marker before carving. Big shapes work best—nothing too delicate. Use a kid-safe carving saw to cut out petals and centers. If you want color, paint the inside of the petals with a pink or yellow paint pen!
- Painted flower pumpkins: If carving sounds like too much work (no shame here), I like to paint on big flowers using acrylic paint. Use pastels for a softer vibe, or go bold with bright colors.
- Dress it up with faux florals: This is my favorite part. Tuck silk flowers or greenery around the pumpkin’s stem or right into the top. Hot glue works, but I usually poke small holes and wedge the stems right in for a totally kid-safe approach. Cluster a few pumpkins together for a “flower patch” look.
Easy ways to add whimsy:
- Layer small and big faux flowers for extra fun.
- Twist on a floral crown using wire and mini blooms.
- Add flower stickers or use pressed flowers, sealed with clear glue.
These girly pumpkin carving ideas bring the garden right to your front step. It always feels like a sweet surprise tucked into the fall leaves, and my boys love picking out which colors we use next.
Cute Face and Emoji Pumpkins
Sometimes, all you need is a big silly grin or some sweet lashes to bring a pumpkin to life. This is where my kids get the most hands-on, and it always turns into the silliest photo shoot.
- Start with simple faces: Use dry-erase markers or printable stencils for classic eyes, heart noses, and big smiles. If you feel bold, let your kids freehand—it guarantees lots of laughs.
- Go emoji: Draw the outline of your favorite emoji face onto your pumpkin. Classic heart-eyes, sleepy faces, or even the simple smiley are always hits.
- Carve or paint: For little carvers, cut big eyes and simple mouth shapes. If you’d rather skip the sharp tools, paint the features on or use stick-on googly eyes, pom-poms for noses, and felt for cheeks.
- Add girly touches: Stick on a bow, use glitter for cheeks, or add long glitter lashes with glue and sparkle.
Quick tips for younger helpers:
- Use triangle cookie cutters as a guide for shaped eyes.
- Let them paint eyelids or cheeks with pink and purple for a softer look.
- Print a sheet of favorite emoji faces for easy tracing and stick right to the pumpkin.
These designs are always a big hit at our house because they’re fast, easy, and make everyone smile. Even the wonkiest face is full of personality!
Pastel and Painted Pumpkins

If you think pumpkins only come in orange, you’re missing out! One of my favorite tricks is a basket of pastel pumpkins glowing on the porch. It feels cozy, cheerful, and a little bit magical. Even better, you don’t have to carve at all—just paint!
- Pick your palette: I reach for soft pinks, lilacs, mint, sky blue, and even metallic rose gold. Acrylic paints cover the orange best, but spray paint works for a quick fix.
- Go for ombre or patterns: Try light colors at the bottom of the pumpkin, blending into white on top. Or use painter’s tape to create stripes, polka dots, or a chevron look.
- No-carve ideas that kids love:
- Paint the whole pumpkin then stick on big eyes or rhinestones.
- Wrap the stem in glitter or wrap with lace.
- Add small bows or stickers for extra flair.
- Finishing touches: A spritz of clear spray protects the color from rain and sticky fingers. You can cluster small pastel pumpkins in a basket or line the porch steps for a soft, storybook look.
No carving needed means these pumpkins last longer (which is perfect when your kids want to decorate in September and you still need that porch space in November). Plus, the cleanup is a breeze!
These girly pumpkin carving ideas are sure to wow your friends and neighbors. The best part? Your kids will be so proud knowing they helped every step of the way. A little glitter, some goofy smiles, a floral crown here and there—it all adds up to the cutest Halloween display on the block!
Finishing Touches: Display and Decor Inspiration for a Girly Halloween
After you’ve carved or painted those adorable pumpkins with your little ones, it’s time to think about how to show them off. Adding the right display and decor brings all those girly pumpkin carving ideas together and makes your Halloween scene feel lively, warm, and inviting. I’ve learned that the secret isn’t just in the pumpkins themselves but how you arrange them and add those final playful touches that make people stop and smile.
Here’s how I like to create a cute and spooky vibe that keeps things fun, festive, and perfectly suited for a mom who loves style and a little sparkle!
Grouping Pumpkins for Maximum Impact
One of the simplest ways to make your pumpkins pop is by grouping them together. I find that a mix of sizes, colors, and styles creates a scene that feels lively and thoughtful, kind of like a little pumpkin family party on your porch.
- Vary heights by putting some pumpkins on small crates, boxes, or even upside-down buckets. This adds visual interest and keeps eyes moving.
- Mix carved faces with simple pastel-painted pumpkins to give your display a nice balance of cute and spooky.
- Include a few faux pumpkins or glittery pumpkins to add that extra wow factor without much effort.
I like to spread them across the steps, on window sills, and even along the walkway so guests get little bursts of charm everywhere they look.
Adding Soft Lighting That Feels Cozy

Lighting sets the mood in a big way but doesn’t have to be complicated or scary. I choose soft, warm glows that invite people to come closer rather than creep them out. Battery-operated tea lights and fairy lights are my go-to this year because they’re safe, easy, and fuss-free with kids around.
- Tuck small fairy lights inside hollow pumpkins to make faces glow softly.
- Wrap twinkling lights around planter boxes or railings for a gentle sparkle.
- Place a few flameless candles inside lanterns near the pumpkins for a cozy vibe that lasts after dark.
It feels just right—subtle and sweet—on those chilly October nights.
Girly Decor Elements That Tie Everything Together
Don’t stop at pumpkins! Adding a few girly decor touches helps pull your whole Halloween look together and keeps it playful. I use things that sparkle, shine, or add a bit of softness.
- Pastel ribbon garlands or tulle: Draped over the porch railing or around the pumpkins, these add texture and a whimsical flow.
- Mini chalkboards or signs: Write fun messages like “Boo-tiful” or “Pumpkin Kisses, Halloween Wishes” in soft colors.
- Floral touches: A handful of silk flowers tucked next to or on top of pumpkins, especially roses or baby’s breath, soften the scene and keep it sweet.
- Glittery bats and spiders: Plastic critters with a shimmer add just enough spooky without scaring the little ones.
- Ribbon bows: I tie small bows around pumpkin stems in pink or lavender for an instant girly upgrade.
Using Natural Accents for a Warm Feel

Adding natural elements makes the whole setup feel more inviting and seasonal. It’s like bringing the outdoors in—but on your porch!
- Scatter colorful fallen leaves or fake ones around the base of your pumpkins.
- Add pinecones, acorns, or cinnamon sticks for a little autumn texture.
- Place a cozy plaid blanket or burlap runner underneath your display to bring it all together.
These details make your Halloween display look both stylish and effortless, just like a little cozy storybook scene.
Putting together these finishing touches is my favorite part because it’s where all the hard work shines. The right display and decor make your girly pumpkin carving ideas feel complete and ready to charm every visitor. My boys love to help set up, too—it’s like giving our pumpkins their own stage to sparkle on!

Conclusion
Girly pumpkin carving ideas bring a fresh twist to Halloween that even a house full of boys can enjoy. Adding glitter, soft colors, and playful decorations doesn’t just make pumpkins cuter—it makes the whole carving experience more joyful and creative for moms and kids alike. It’s about making memories, embracing imperfections, and celebrating all the silly, sweet moments along the way.
If you’re ready to brighten your porch with a mix of cute and spooky, grab your supplies and dive in! I’d love to hear which ideas your family tried or what fun spins you put on your pumpkins this year. Share your photos and stories, and let’s keep the Halloween magic sparkling together!
This post may contain affiliate links. Read the full disclosure here.