I love high end luxury christmas decorations, but I also need them to survive three curious boys! I want pieces that sparkle, feel special, and still make our home warm and welcoming. If you want that same wow factor without the stress, you are in the right place!
Here, I share my best tips for a luxe look that actually works with kids. Expect simple swaps, smart materials, and stress-free sparkle!
We will set a theme and color palette, build a showstopper tree, dress the mantel and stairs, and pull together a chic tablescape with easy kitchen touches. I will also share kid-friendly tips, plus smart shopping and storage so it all lasts.
I focus on quality, not quantity. I invest in a few hero pieces like crystal garlands, weighted velvet stockings, and a standout tree topper, then fill in with supporting accents. With three boys, shatterproof ornaments, sturdy ribbons, and strong hooks are what truly hold up.
Keep reading for step-by-step plans and my shoppable criteria, all tested in a busy home. Let’s make it beautiful, welcoming, and totally doable!

How I Choose a Luxe Holiday Theme That Feels Warm and Cohesive

I want my home to glow, not shout. My secret is a warm, cohesive theme that holds up with kids, and still looks chic at night. I start with a clear color story, repeat a few key textures, and keep metals consistent across rooms. That is how I get high end luxury christmas decorations to feel inviting and still look pulled together in every photo.
Choose a Rich Color Palette That Shines Day and Night

Daylight can flatten pale tones. Whites, blush, and soft golds can look washed out by noon. I always anchor with one deeper tone for balance. It gives the tree, mantel, and table real depth, and it keeps the look rich after sunset.
Here are three ready-to-use palettes I love. Each one mixes a deep anchor with light supporting shades so it reads luxe in every light.
| Palette Name | Core Colors | Best For | Notes |
|---|---|---|---|
| Champagne Glow | Champagne, ivory, warm taupe | Soft glam, small spaces | Add a ribbon in satin or velvet champagne |
| Emerald Fireside | Emerald, champagne, charcoal | Cozy, wood tones, fireplaces | Emerald ornaments pop in evening photos |
| Cranberry Toast | Cranberry, antique gold, soft blush | Family rooms, kitchen nooks | Cranberry balances all the twinkle |
- Why it works: Champagne brightens, emerald grounds, cranberry warms.
- Easy swap: If you love silver, pair it with emerald, not blush, so it does not feel cold.
Tip I swear by: before buying more, test your colors together. Take one ribbon, one ornament, and one candle, then shoot them in the same photo near a window and again at dusk. If they still look rich in both shots, you picked a winner.
Mix Textures Like Velvet, Glass, and Faux Fur for Depth

Texture is how I get that layered, high-end look without overbuying. I mix four luxe textures, each with a job.
- Velvet: Rich matte that soaks up light and adds depth.
- Glass: Polished shine that catches twinkle lights.
- Crystal: Sparkle and clarity that feels expensive.
- Faux fur: Soft and cozy, perfect for stockings or a tree skirt.
For balance, I follow a 50-30-20 split across textures:
- 50 percent velvet or other matte pieces, like ribbon, stockings, or pillows.
- 30 percent glass or crystal, like ornaments and garlands.
- 20 percent faux fur accents, like tree skirts or throw blankets.
Kid tip: reserve glass for higher branches and tall shelves. Keep shatterproof ornaments and velvet bows at kid level. Everyone wins.
Keep Metals Consistent, Then Repeat Them in Every Room

I stick to one main metal and one accent, then I repeat them everywhere. This tiny rule keeps things calm and luxe, even with lots of decor.
- Main metal: the star you use most, like brushed brass.
- Accent metal: the backup, like antique gold.
Example I love: brushed brass cabinet hardware in the kitchen paired with antique gold ornaments and a brass bell garland. The tones are close, so it reads cohesive. Mixing too many metal tones can look messy, especially under warm lights.
Repeat your chosen metal in:
- Picture frames and mirror frames.
- Candleholders on the mantel and table.
- Bells on garlands and wreaths.
- Napkin rings and flatware if you set the table.
A quick polish makes everything glow. It takes five minutes and looks like you upgraded the whole room.
Make a Simple Mood Board and a Smart Shopping List

I keep it simple and use my phone. One shared album holds my color palette, ribbon options, ornaments, and garland ideas. I also photograph each room in evening light, since that is when we enjoy it most. This saves me from buying things that fight the space.
I split my list in two:
- Must-have list: investment pieces I plan to keep for years. Think velvet ribbon spools, a crystal garland, quality stockings, a tree topper.
- Nice-to-have list: fillers that round out the look. Think shatterproof ornament sets, extra candles, floral picks.
Before I check out, I do a quick sanity check:
- Do the colors match my album photos in day and night.
- Do the metals match my main and accent choice.
- Do I have the 50-30-20 texture split covered.
This routine cuts returns, trims overspending, and keeps the theme tight. It also makes decorating day faster, which is key with three boys bouncing around the living room!
Showstopper Christmas Tree Styling That Guests Will Talk About

This is the fun part, the tree that makes the whole room sparkle and still survives tiny hands. I build a tree that looks rich, photographs well, and feels cozy at night. I keep it kid-smart with safe materials and a clear plan. If you want high end luxury christmas decorations without the stress, this is how I do it.
Start With a Full, Realistic Tree and Layer Warm White Lights

A full, realistic tree gives you instant polish. Even if you use a slim profile, you can get that lush look with good fluffing and thoughtful lighting.
Here is my quick start routine:
- Set up the tree, then fluff from the trunk outward. Start at the bottom, work branch by branch, and spread each tip in a star shape. Think inside, then out, so there are no holes.
- Step back every few minutes. If you see a gap, go back to the trunk and pull a branch forward to meet it.
For lights, I use warm white for a soft glow. My rule of thumb is 100 lights per foot of tree height. A 7 foot tree gets about 700 lights. I wrap the trunk first for depth, then spiral up the branches.
- Photo tip: plug lights into a dimmer or a smart plug with dim settings. Lower the brightness a touch for photos, then bring it back up for evening glow.
- Safety first: tuck cords deep into the branches, use indoor-rated extension cords, and avoid overloading outlets.
- Set and forget: put lights on timers for a consistent schedule. Mine click on before dinner and shut off at bedtime.
Kid note I swear by: I secure the lower light strands behind branches with small clips so little hands cannot tug them free.
Use Wide Velvet Ribbon For Easy Cascades and Bows

Ribbon is the quickest way to make a tree look designer. I reach for 2.5 to 4 inch velvet. It drapes beautifully and hides any gaps My boys help pass the rolls, which is sweet and slightly chaotic, but it still works.
Here is how I shape it:
- Cut 3 to 4 foot strips. Short strips are easier to control and look more natural.
- Tuck the top end into the tree with a twist of floral wire. Hide the wire deep so it disappears.
- Angle the strip down in soft S shapes, tucking every 10 to 12 inches. Let the ribbon dip and rise, like a gentle wave.
For bows that take minutes:
- Cut two strips, each about 24 inches.
- Make two loops, cross them like bunny ears, and tie a simple knot.
- Fluff the loops, trim tails on a diagonal, and wire the bow into the tree.
I like to mix two ribbon styles in the same palette for depth. Velvet plus satin is a pretty combo. Keep the pattern simple, like a solid velvet with a narrow metallic edge ribbon. I run one ribbon in cascades, then add three or four bows across the front for balance.
Mom trick: I keep extra pre-tied bows in a bag. If a kiddo bumps the tree, I can fix a spot in seconds.
Hang Ornaments by Size, Finish, and Zones

Ornaments build the story. I hang in layers so the tree reads full and rich, without looking busy.
Use this simple order:
- Large matte ornaments first, tucked near the trunk. Matte finishes add depth and soak up light in a pretty way.
- Medium shiny ornaments next, a bit further out. They bounce the light and pull the eye.
- Small sparkle or crystal pieces last, on the tips. These are the jewels that make the tree twinkle.
I also divide the tree into zones:
- Eye level: place statement pieces here, like a glass finial, a crystal drop, or a special family ornament.
- Upper third: lighter items, smaller picks, and extra ribbon tails so the top does not feel heavy.
- Lower third: shatterproof ornaments and sturdy hooks. This is where little hands explore, so I choose safe, strong pieces.
To fill gaps like a pro, add clip-on florals or picks:
- Tuck three at a time in a triangle shape for balance.
- Use textures that match your theme, like frosted pine, metallic laurel, or velvet magnolia.
- Keep the picks angled slightly downward so they feel natural.
Two quick checks as you go:
- Step back and squint. If one spot glows too bright, move a shiny piece to the other side.
- Spin the tree if it is in a corner. I still decorate the back with larger matte pieces so the whole shape looks even.
Finish With a Statement Topper and a Plush Tree Skirt

The topper and base are the bookends of your tree. They should match your motif and finish the look cleanly.
Topper ideas that fit classic motifs:
- Star: clean and timeless. Choose brushed brass for warmth or glass for sparkle.
- Laurel: a ring or spray of laurel feels elegant and layered. Great with velvet ribbon.
- Bells: a small cluster tied with ribbon is charming and easy to secure.
Anchor the tree with a plush base:
- Velvet or faux fur skirt: soft, full, and great for hiding stands and cords.
- Sleek collar: metal or woven, modern and impossible for kids to pull. I like a brushed brass collar with deep green velvet ribbon.
Before you call it done, do a polish pass:
- Straighten ornaments so they face forward.
- Tuck any visible wires.
- Fluff ribbon loops and snip stray threads.
- Adjust the timer so lights greet you right when the sun drops.
That is it. A full, glowing tree that looks luxe, photographs beautifully, and still holds up to family life. My boys love to stand back for the final countdown, then we all cheer when it clicks on. It is simple, it is special, and it feels like home!
Mantel, Entryway, and Staircase Moments That Say Luxury Without Clutter

I want our home to feel calm and special, not crowded. These little moments carry a lot of weight, so I keep them clean, full, and smart with kids. My trick is to build pretty layers that look luxe, then edit. That balance gives me the look of high end luxury christmas decorations without the chaos my three boys can create!
Full, Real-Touch Garland With Asymmetry and Velvet Tails
A lush garland sets the tone. I start with a sturdy base, then layer greens for depth and movement. It looks rich, takes a beating, and still photographs beautifully.
Here is how I build it:
- Anchor a base garland along the mantel or banister. I like real-touch pine for a natural look. Secure with clear hooks or floral wire.
- Layer fullness with stems. I weave in eucalyptus for soft shape, cedar for texture, and magnolia for those glossy leaves. Tuck stems in clusters so it looks natural.
- Create asymmetry. Let one side drop lower than the other, about 12 to 18 inches. That sweep adds drama without clutter.
- Fluff and shape. Pull some tips forward and some back. You want shadow and light, not a flat line.
For the finish, I add two long velvet tails. I cut 2 to 3 yard lengths, tie a loose knot near the center of the garland, then let the tails fall with a gentle curve. I clip on a small set of brass bells near the knot. The bells add soft movement and a pretty sound, but they are still safe if little hands tap them.
Kid tip I love:
- Use wired velvet ribbon. It holds shape, so it stays out of reach.
- Keep bells higher than three feet. My boys notice them, but they cannot yank them.
Layer Candlelight Safely With Hurricanes and LED Tapers
Candlelight sells the magic, but I keep it safe and simple. I mix real candles in sturdy glass with flameless tapers where kids move.
What works for me:
- Unscented near food, like the mantel and table. Everything smells like dinner, not perfume.
- Scented diffusers away from the table, tucked on a console or shelf. I go light with pine or cedar.
For placement and safety:
- Choose weighted hurricanes for real candles. The base should be heavy and wide. I set them at least three inches from greens.
- Use LED tapers near traffic paths and on stair ledges. They look pretty and cannot tip.
- Hide cords and batteries. I tape cords along the back edge of the mantel, then tuck battery packs behind a frame or garland pocket.
Quick checklist:
- Trim wicks on real candles to a quarter inch.
- Keep kids’ paths clear. My boys run laps, so everything fragile sits high.
- Set timers on flameless candles for a nightly glow, no extra work.
Style an Entry Console With One Bold Moment
The entry should feel welcoming and calm. I use the rule of three to keep it tidy and pretty. One bold piece, then two simple helpers.
My layout:
- Tall item: a statement wreath hung on a mirror or a big vase of winter greens. Height pulls the eye up and makes the space feel grand.
- Medium catchall: a tray or bowl. This holds keys and mail so they do not scatter.
- Small personal touch: a framed photo, a tiny bell cluster, or a handmade ornament. It adds heart without clutter.
I add a small lamp with a warm bulb for that evening glow. It softens the space and helps during school-night drop zones. I keep the cord clipped along the back so it stays safe.
To keep it useful:
- Sort mail into the tray daily.
- Empty the bowl at night. Quick reset, zero mess.
- Stick to one color story that matches the rest of the house. Mine is emerald, brass, and ivory, so it all reads calm.
Example that always works:
- Brass mirror with a green wreath.
- Oval marble tray with keys and a pen.
- Small photo of the kids in cozy sweaters. Done and sweet.
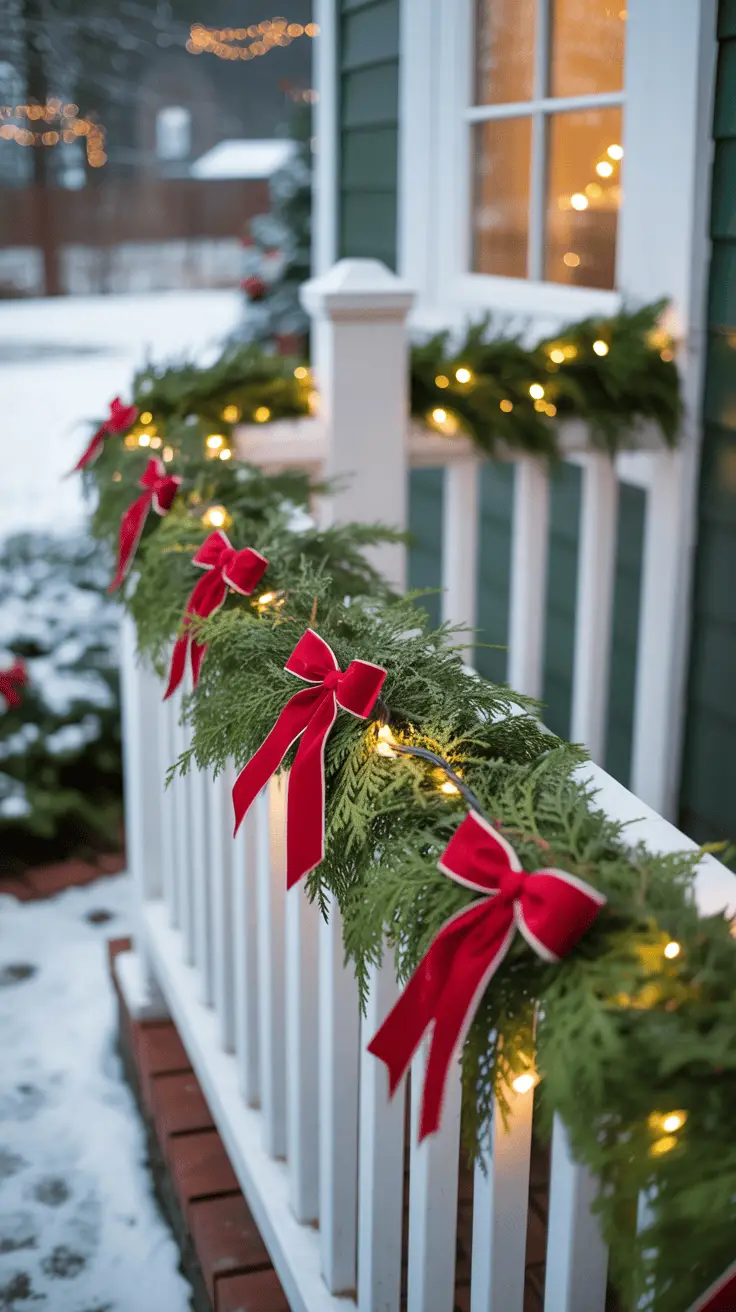
Drape the Staircase With Swags, Bows, and Hidden Hooks
The staircase is a focal point, so I keep it tailored and sturdy. Swags look fancy, but they are easy with the right spacing and hardware.
My method:
- Attach clear command hooks under the rail every 3 to 4 balusters. Press and let them set before you add weight.
- Drape the garland in soft swags. Hook, dip, hook, repeat. Stand back and adjust so each dip matches.
- Tie with wired ribbon. I use 2.5 to 4 inch velvet for a plush look and strong hold.
For kid-smart styling:
- Keep bows higher than little hands, about four feet and up. The ribbon stays crisp and safe.
- Swap glass accents for shatterproof bells or wood beads. They still sparkle, without the worry.
- Tuck any extra greenery wire deep inside the garland so it does not scratch.
Finishing touches I love:
- Add a few eucalyptus stems where the swags dip. It softens corners and adds movement.
- Place LED tapers in wall sconces nearby, not on the stairs.
- Clip battery packs behind the garland with small cable ties.
This setup looks rich and tidy, with zero clutter. It holds through December, even with my boys running up and down all day. Simple, pretty, and solid.
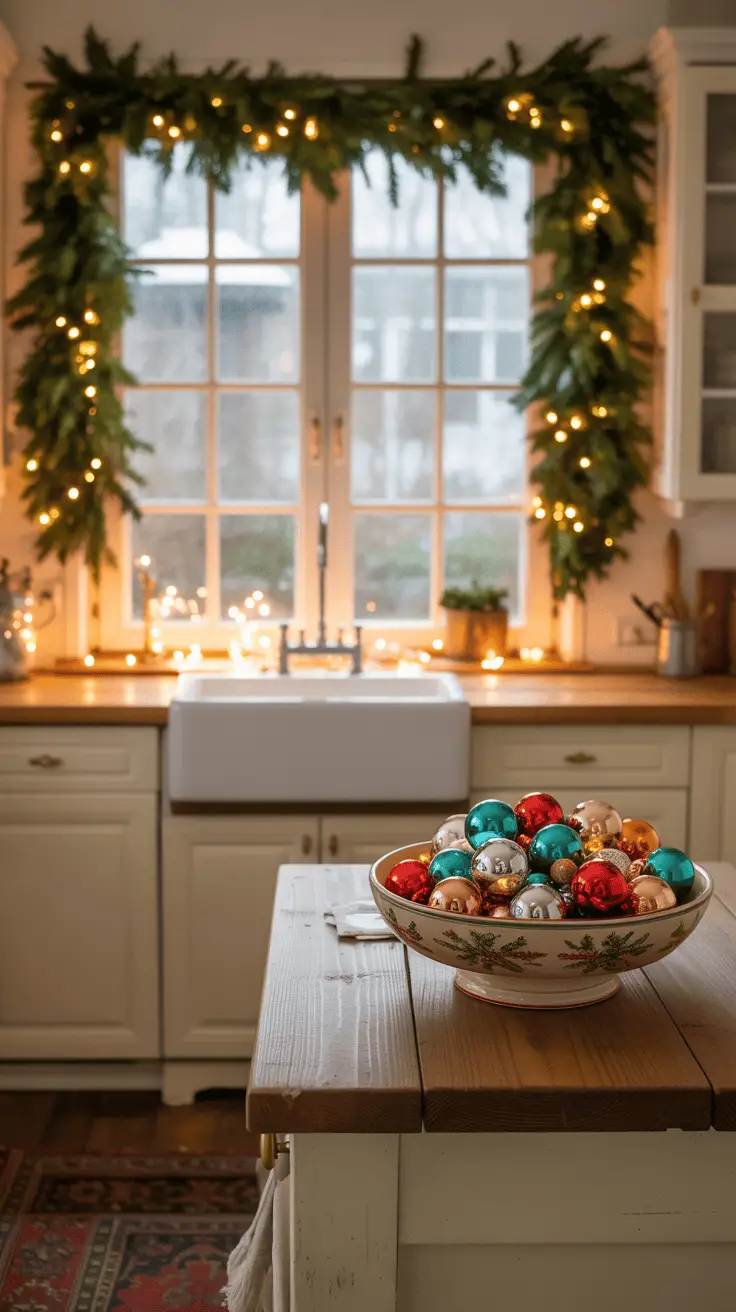
Five-Star Dining Table and Kitchen Touches for Holiday Dinners at Home
I want dinner to feel fancy, but still kid-friendly and stress-free. My secret is a clear setup, warm glow, and tiny details that feel personal. It ties right in with my high end luxury christmas decorations, and it works on a Tuesday or a big holiday. If it looks beautiful, I am more relaxed, and the kids feel the magic too!
Start With Luxe Linens, Chargers, and a Low Centerpiece
I keep the layers simple and in the same order every time. It looks polished and saves time when little helpers jump in.
- Runner
- Chargers
- Plates
- Napkins
- Flatware
- Glassware
I use a textured linen or velvet runner as the base. Chargers add that hotel moment. Stack the dinner plate, then a salad plate if you need it. Napkins sit on top with a ring, or folded under the salad plate for a clean line.
Keep the centerpiece low, so everyone can chat. I love a bowl of winter citrus, mixed greens, and a few pinecones. It smells fresh and looks full. Add unscented candles at the table. Save scented candles for the kitchen counter, so they do not fight the food.
Quick kid tip:
- Swap crystal goblets for acrylic lookalikes at kid seats. They still sparkle, and no one stresses.
Mix Crystal, Brass, and Candlelight for a Warm Glow
Crystal, brass, and candlelight are a dream trio. They bounce light and warm up the whole room.
- Use pairs and trios of candlesticks to create rhythm. Two on one side, three on the other. It looks balanced and lush.
- Anchor them on a mirrored or stone tray. The tray reflects light, corrals the pieces, and protects the table. Easy wipe, no wax drama.
- Choose dripless tapers or LED tapers. I use dripless on the buffet and LED on the table when the kids get wiggly.
- Add non-slip pads under holders. No sliding, no clinks, fewer mom reflexes mid-meal.
For sparkle, I tuck a few crystal whiskey tumblers near the candles with sprigs of cedar. They catch the light and tie into the tree without adding clutter.
Add Place Cards and Tiny Take-Home Favors
Place cards solve the where-do-I-sit dance and make everyone smile. I keep them sweet and simple.
- Handwritten tags tied with velvet ribbon on each napkin.
- Mini bell ornaments with a name tag looped through the top.
- A wrapped truffle or chocolate coin at each setting.
It feels thoughtful, and it helps me seat chatty cousins near the patient aunt. I pre-write the cards during nap time, then the kids help tie ribbons. It looks fancy and takes minutes.
Pro move:
- Keep a few blank tags and a pen for last-minute guests. No stress, just a quick scribble and a bow.
Set Up a Chic Hot Cocoa or Coffee Bar the Kids Can Use
A little drink station turns dinner into a cozy event. I keep it tight and tidy.
- Lidded jars for cocoa, marshmallows, and sprinkles, so nothing goes stale or spills.
- A tray for mugs and spoons, with a small bowl for stir sticks. The tray keeps everything in one spot.
- Labels for clarity. I write Cocoa, Peppermint Sprinkles, and Mini Mallows. The kids read, then pour, which I love.
- Add a small wreath or a strand of garland on the back wall or shelf. It ties into the main decor and looks intentional.
If you want to go extra:
- Include cinnamon sticks, candy canes, and chocolate shavings in small jars.
- Set out a thermal carafe of coffee for grown-ups and a kettle of hot water for cocoa. Safe and simple.
At cleanup time, lids go on, tray lifts off, and the counter is clear. It is pretty, practical, and a big hit with my boys every time!
Kid-Friendly Luxury, Smart Shopping, and Storage So It Lasts for Years
I want a home that sparkles and still feels safe for my boys. I mix beauty with practical decisions, so the magic stays and the stress goes down. I love high end luxury christmas decorations, but I buy and place them with a kid-smart plan. Think safe zones, quality checks, smart sourcing, and storage that keeps everything looking new.
Create Safe Zones and Use Shatterproof Swaps Where It Matters
I map by height to protect little hands and pretty pieces. Everything delicate lives above 4 feet, and everything durable sits below 4 feet. Simple, clear, and easy to stick with when the kids help.
Here is how I set it up:
- Upper shelves and high branches: glass finials, crystal drops, and fragile heirlooms.
- Lower tree and staircase: shatterproof bulbs that look like glass. I choose high-shine finishes with a subtle tint so they reflect nicely in photos.
- Coffee table and end tables: weighty decor that cannot tip, like a low bowl of pinecones or a lidded jar.
I also soften the play zones. It looks cozy and it buys me peace.
- Plush pillows and throws near the tree base, by the TV, and on window seats.
- Velvet bows on lower branches, since ribbon is safe and pretty.
- Soft stockings hung above four feet with hidden safety pins under the mantle ties.
For stairs, I run shatterproof ornaments along the lower swag and keep breakables near the newel post and higher rail. On the tree, I hang the same color story top to bottom, but I swap glass for shatterproof lookalikes down low. No one notices the difference, which is amazing.
How I Vet Quality: Materials, Weight, and Finish
Before I buy, I run a few quick tests. These tiny checks save money and storage space, and they keep the look luxe for years.
- Wired ribbon test: Bend a 4 inch section into an S. If it holds shape without sagging, it will cascade well on the tree and garlands.
- Greenery tips: Look for PE molded tips on the outer layer. They feel like real needles. PVC can sit inside for fullness, but it should not be the star.
- Ornament weight: A good piece has some heft, but not so heavy that it drags the branch. I hold two in my palm and choose the one that feels solid and balanced.
- Caps and hardware: Check for clean solder or seamless caps. Tug the loop lightly. If it wiggles, it will fail on day three.
- Paint and plating: Metals should have even coverage. No streaking, no sharp edges. For glass ornaments, the mercury finish should look cloudy and deep, not speckled and thin.
- Garland construction: Twist the spine gently. If the wire springs back and the tips stay put, it will hang nicely and not shed.
Two fast store checks:
- Roll a ribbon spool across your hand. If the velvet sheds badly, skip it.
- Shake an ornament lightly. If the cap rattles or the glitter dumps, keep walking.
Where I Find Heirloom Pieces and Artisan Finds
I mix sources to get the best of both worlds. Trusted retailers for basics, artisans for heart, and fresh finds to keep it alive.
- Retailers for staples: I buy shatterproof sets, velvet ribbon spools, wreath frames, and extension cords. The quality is consistent and returns are easy.
- Etsy artisans: I love custom tree toppers, hand-dyed silk ribbons, and monogrammed tags for stockings. Small makers obsess over detail, which shows in photos.
- Local garden centers: Fresh cedar bundles, magnolia stems, and paperwhites. I tuck them into faux garlands for a real look and that fresh scent.
My rule that keeps the budget sane:
- Buy fewer, better items, then add one investment piece each year. One year it was a hand-blown glass star. Another year it was a brass bell garland that I now use everywhere.
I also save favorites in a wish list and wait for November sales. If it is still in stock and still fits my palette, I buy with zero guilt.
Store Like a Pro With Labeled Bins and Ornament Trays
Good storage keeps everything gorgeous for the next season. I set it up like a little system, and it saves hours.
What I use:
- Rigid ornament trays with adjustable dividers for fragile and special pieces.
- Acid-free tissue for glass and painted metal, so finishes do not tarnish or stick.
- Wreath bags that zip and hang, with a name tag on the handle.
- Ribbon spools on dowels or rolled tight and pinned, so there are no creases.
- Silica packs in each bin to control moisture.
- Zip pouches for hooks, spare bulbs, floral wire, and batteries.
How I label and file:
- Label bins by room: Tree, Mantel, Stairs, Dining, Entry. This makes set up fast since each space has its own kit.
- Add a contents card inside the lid with a short list. I snap a photo for my phone, which helps when shopping.
- Keep a repair pouch with glue dots, a mini hot glue gun, cap replacements, and ribbon scraps.
My maintenance routine:
- Set a calendar reminder for early November. I check bins, declutter fillers I no longer use, and repair anything loose.
- During pack-up, I clean each piece with a soft cloth. Glitter gets a quick lint roller pass.
- Lights go in coiled loops around cardboard, not tangled piles. My future self thanks me.
This system keeps the sparkle strong, the chaos low, and the holidays happy. It looks luxe, it feels safe, and it lasts for years, even with three boys zooming through the living room!

Conclusion
Here is the simple system I live by for high end luxury christmas decorations that actually hold up with kids. Pick a tight palette, then style a showstopper tree with warm lights and velvet ribbon. Layer the mantel and stairs with full garlands, safe candles, and a few brass accents. Set a cozy table that glows, then protect your investment with smart storage and shatterproof swaps. Easy to remember, so satisfying to see every night.
I would love to hear your theme this year, and the one investment piece you will add. A crystal garland, a brass bell strand, or a hand-blown star. Tell me in the comments so we can cheer each other on.
Save or print the checklist, then start with your theme this weekend. I will be right there with you, three boys underfoot, music on, and the timer lights ready to click on. We can make real magic with our kids, and keep the luxe look all season long!
This post may contain affiliate links. Read the full disclosure here.