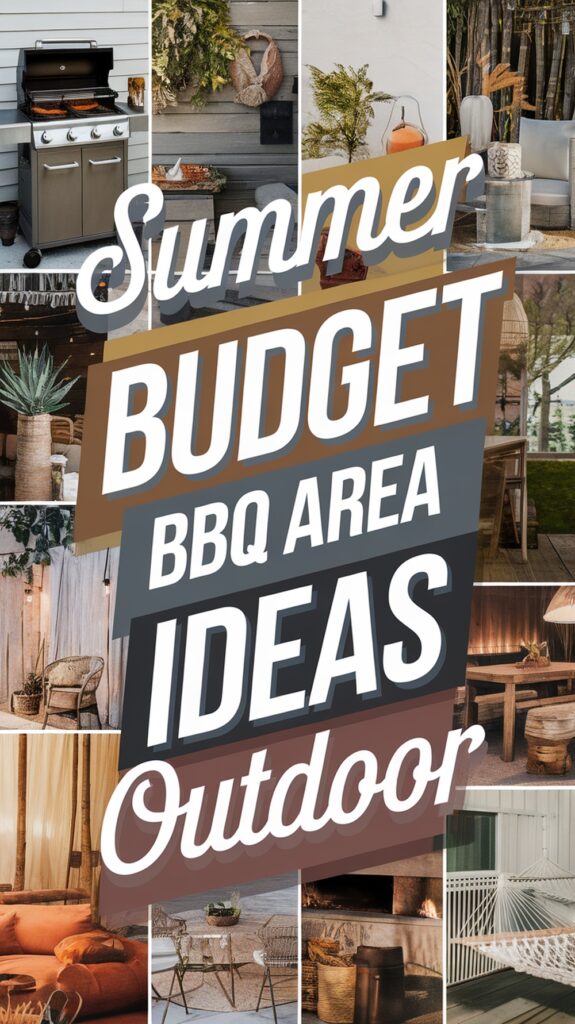
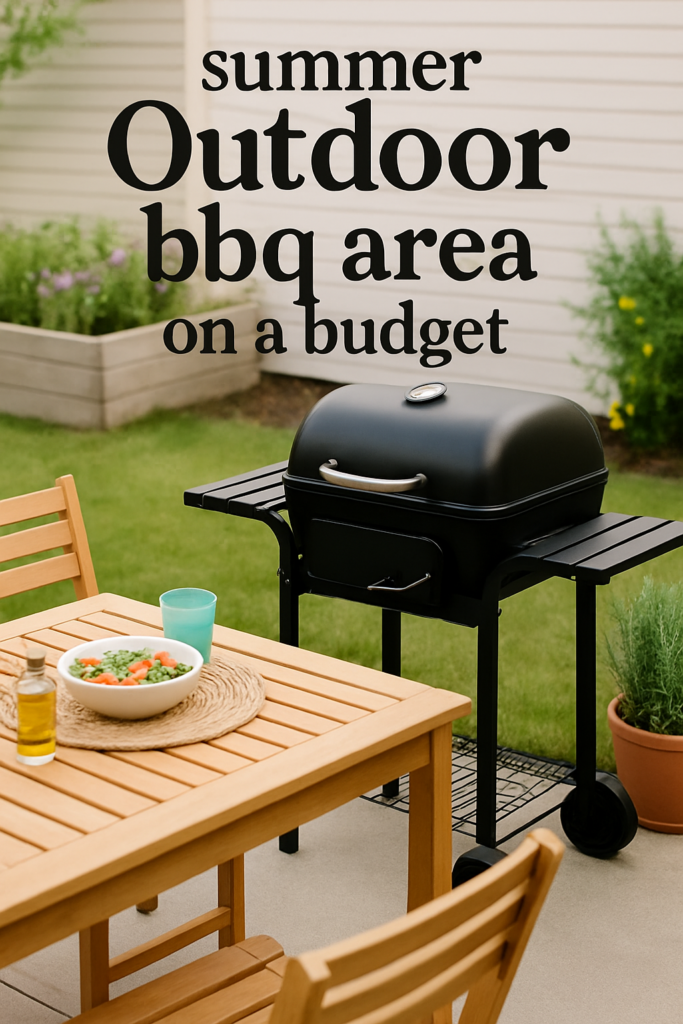
Hey, can we talk about how much I LOVE summer BBQs?! There’s something so special about gathering everyone outside, firing up the grill, and watching the kids run around while burgers sizzle away. But here’s the thing – creating that perfect outdoor BBQ area doesn’t mean you need to spend a fortune! As a mom of three energetic boys, I’ve learned that with a little creativity and elbow grease, you can create an absolutely amazing grilling space without breaking the bank.
I’ve pulled together 18 fantastic ideas for an outdoor bbq area on a budget that’ll make your backyard the neighborhood hangout spot! These ideas are practical, family-friendly, and totally doable even if you’re juggling soccer practice, homework help, and endless loads of laundry. Let’s dive into these budget-savvy transformations that’ll have you hosting cookouts all summer long!
Repurpose Old Pallets Into a Grill Station
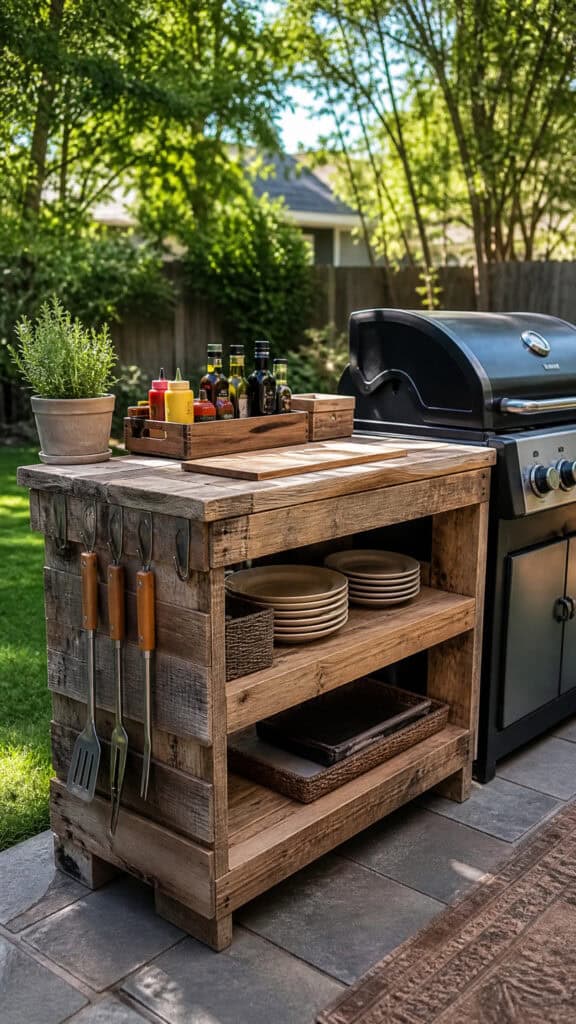
Okay, this is seriously one of my favorite discoveries! Wooden pallets are often FREE from local businesses or incredibly cheap, and they make the most amazing grill stations. You can stack and secure them to create shelving for your grilling tools, spices, and plates. I sanded ours down (while the boys were at school – peace and quiet!), gave it a coat of weather-resistant stain, and now it looks like something from a fancy home magazine!
The best part? You can customize it however you want! Add hooks on the sides for hanging utensils, create little cubbies for condiments, or even attach a paper towel holder. My middle son loves being the “grill helper” and having everything organized at kid-height makes it so much easier for him to grab what we need. Plus, this project took me just one weekend and cost under $30!
- Sand pallets thoroughly to avoid splinters
- Use outdoor wood stain or sealant for weather protection
- Add casters to make it mobile
- Install hooks and small shelves for maximum organization
Create a DIY Concrete Block Serving Counter
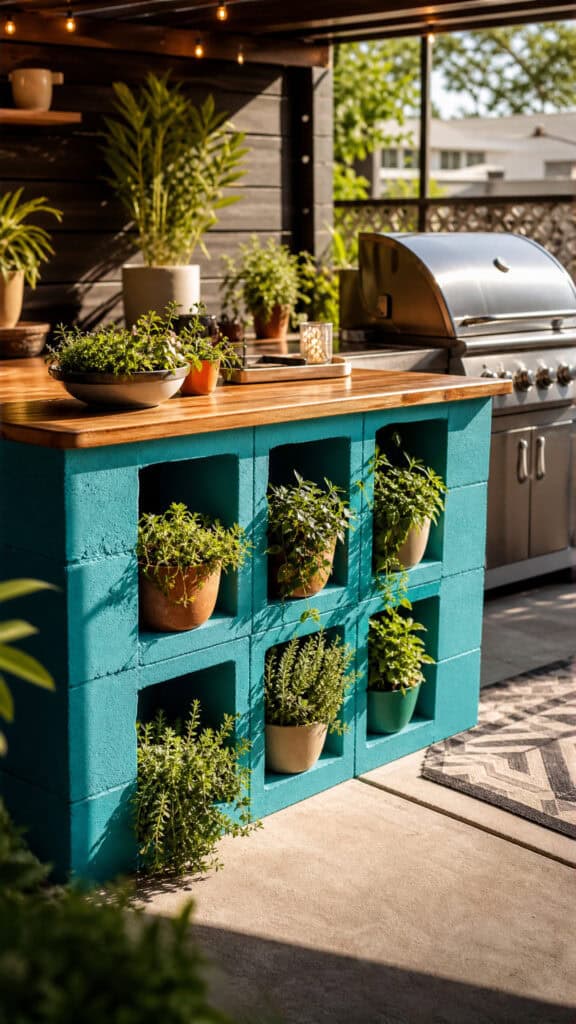
When I first saw this idea on Pinterest, I thought “there’s NO WAY that’ll look good!” But wow, was I wrong! Concrete blocks (cinder blocks) are super inexpensive – we’re talking just a few dollars each – and when you stack them creatively with wooden boards on top, they create the perfect serving counter for your outdoor bbq area on a budget. I made a long counter next to our grill, and it’s become the command center for all our cookouts!
The beauty of this setup is that you don’t need any special skills or tools. Literally just stack the blocks in whatever configuration works for your space, lay boards across the top, and you’re done! I painted our blocks a cheerful turquoise color to match our patio cushions, and it adds such a fun pop of color. The boys think it’s like building with giant Legos, and honestly, they’re not wrong! You can even use the hollow centers of the blocks to store things or add potted herbs.
- No mortar needed – just stack and go!
- Paint blocks for a custom look
- Use treated lumber for the countertop
- Fill block holes with plants or storage containers
Hang String Lights for Instant Ambiance
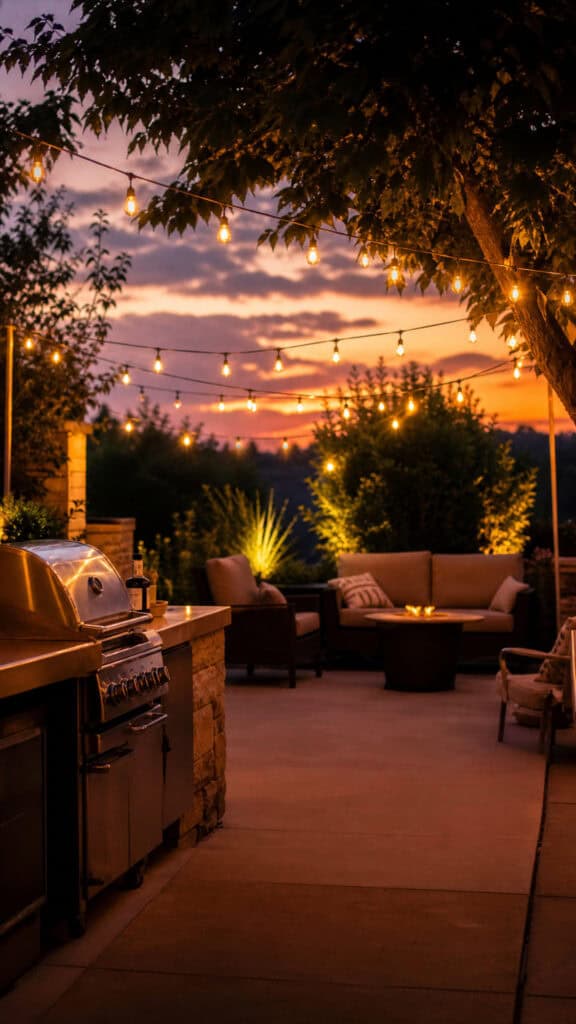
Can I just say that string lights are pure MAGIC?! They instantly transform any space from basic to absolutely enchanting, and they’re one of the most budget-friendly upgrades you can make! I strung lights across our BBQ area using shepherd’s hooks stuck in the ground (genius and portable!), and now we can grill well into the evening while the boys catch fireflies. The warm glow makes everything feel so cozy and special!
You can find affordable string lights at discount stores, online, or even dollar stores if you’re lucky! I’ve collected ours over time, grabbing them on clearance after summer ends. Pro tip: solar-powered string lights save you from dealing with extension cords and outdoor outlets, which is HUGE when you’ve got kids running around. We’ve had ours for three years now, and they still work perfectly!
- Solar-powered options eliminate electrical hassles
- Use shepherd’s hooks or existing structures for hanging
- LED bulbs last longer and use less energy
- Look for end-of-season sales for major savings
Build a Simple Pergola with Basic Lumber
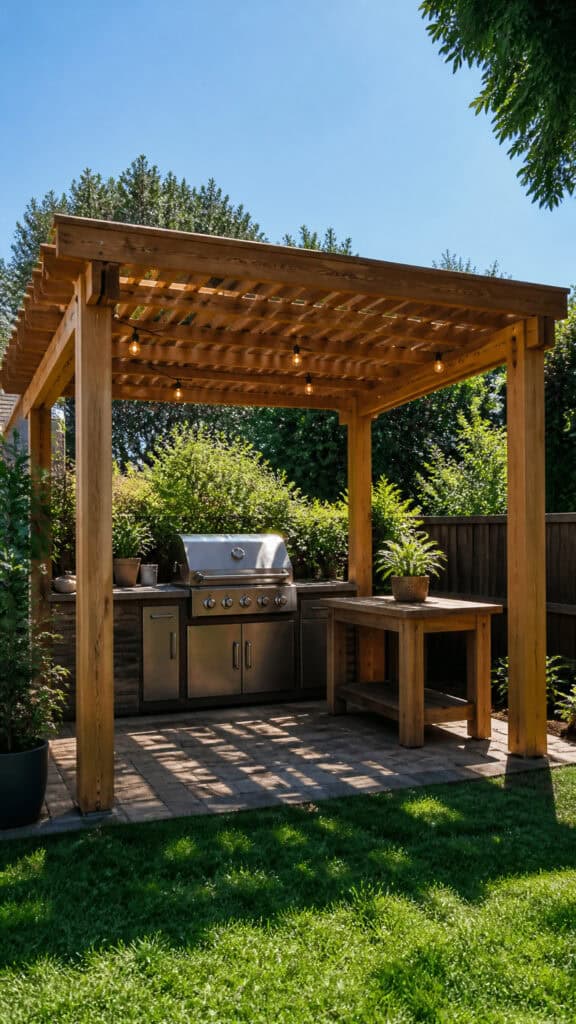
Now, I know “building a pergola” sounds intimidating, but hear me out! A basic pergola frame is actually pretty straightforward, and it makes SUCH a difference in defining your BBQ space. My husband and I tackled this project over two weekends (between baseball games and birthday parties, naturally!), and it cost us around $150 in lumber. There are tons of free plans online, and honestly, if we could do it while managing three boys, anyone can!
The pergola gives you a designated BBQ zone and provides some shade during those scorching afternoon cookouts. We left ours open on top, but you could add a shade cloth or even train climbing plants over it for natural coverage. The boys helped paint it (which added character in the form of tiny handprints we decided to keep!), and now it’s truly the heart of our backyard. It makes our outdoor bbq area on a budget look intentional and put-together!
- Start with a simple 4-post design
- Use pressure-treated lumber for longevity
- Free building plans available online
- Add shade cloth or plants for coverage
Use Gravel for an Affordable Patio Base
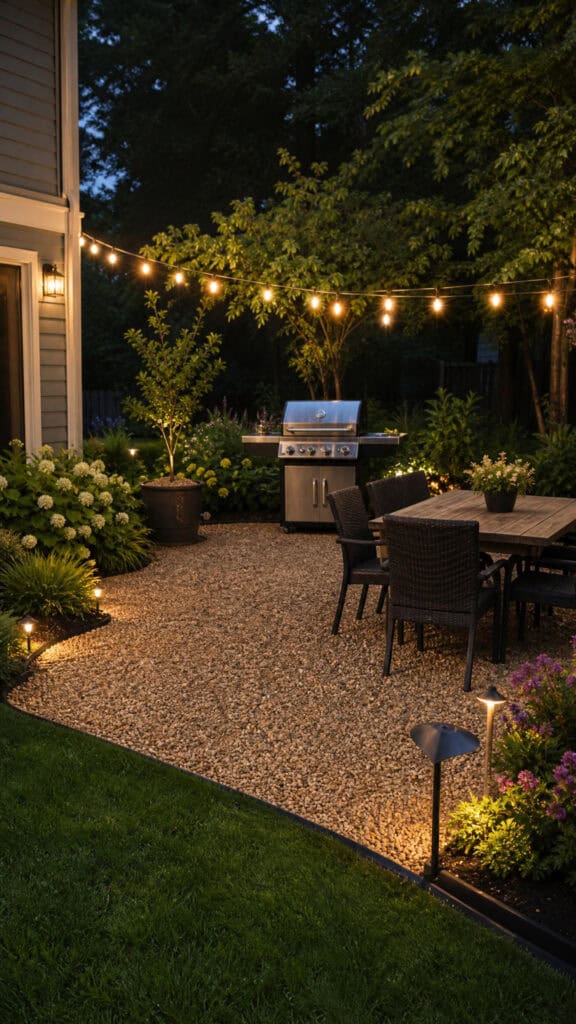
Before we added gravel, our BBQ area was just a muddy mess every time it rained – not fun with three boys who somehow find every puddle! Gravel is incredibly affordable compared to concrete or pavers, and it creates a clean, defined space for your grill setup. We did a 10×10 foot area for about $75, including the landscape fabric underneath to prevent weeds (because who has time for weeding?!).
The installation is totally doable as a DIY project! We spent one Saturday morning laying down landscape fabric, then spreading pea gravel over it. The boys actually helped with this one – they thought it was hilarious to rake gravel around! It drains beautifully, so no more mud tracked into the house, and it gives our outdoor bbq area on a budget a finished, intentional look. Plus, if you drop food while grilling, cleanup is way easier than on grass!
- Pea gravel is comfortable underfoot
- Use landscape fabric to prevent weed growth
- Calculate square footage before buying
- Rake smooth for even coverage
Repaint Old Furniture for Outdoor Seating
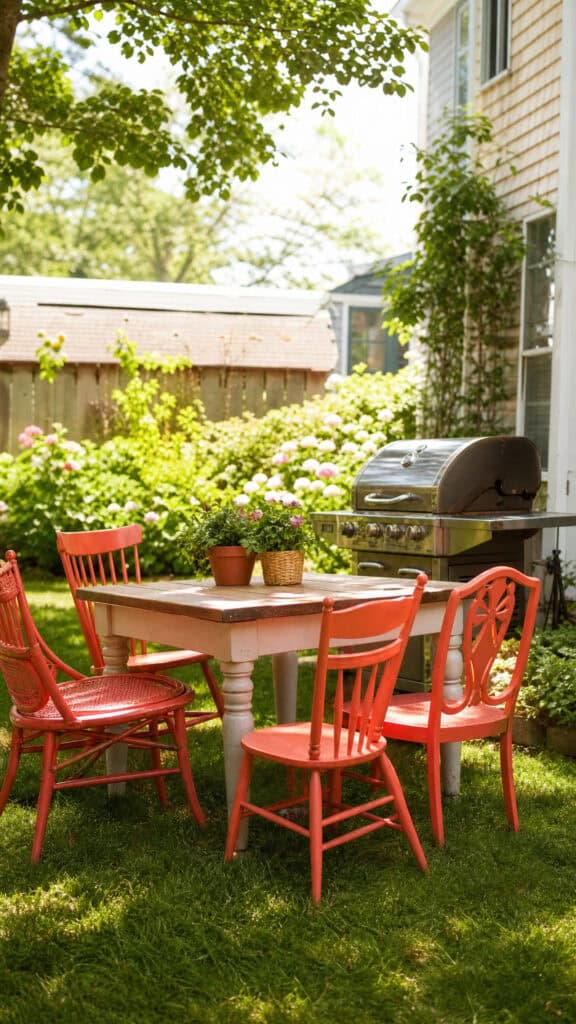
You guys, don’t throw away that old furniture! I’ve rescued so many pieces from the curb or bought them for next-to-nothing at garage sales, and with some outdoor spray paint, they become amazing seating for our BBQ area! I found four mismatched chairs for $2 each at an estate sale, spray-painted them all a bright coral color, and now they’re my favorite seating around our outdoor table. The boys love them too – especially because they’re not precious, so we don’t stress about spills!
Spray paint designed for outdoor use is your best friend here! It adheres to almost any surface and comes in so many fun colors. I’ve done chairs, side tables, even an old metal plant stand that now holds our grilling supplies. A $5 can of spray paint can completely transform a piece, and it’s honestly therapeutic to see something old become beautiful again. Just make sure to do the painting while the kids are occupied – learned that lesson when my youngest decided to “help” and we had coral footprints across the patio!
- Look for solid furniture at garage sales and thrift stores
- Use outdoor-specific spray paint for durability
- Apply multiple thin coats for best coverage
- Seal with clear outdoor sealant for extra protection
Install a DIY Brick or Stone Border
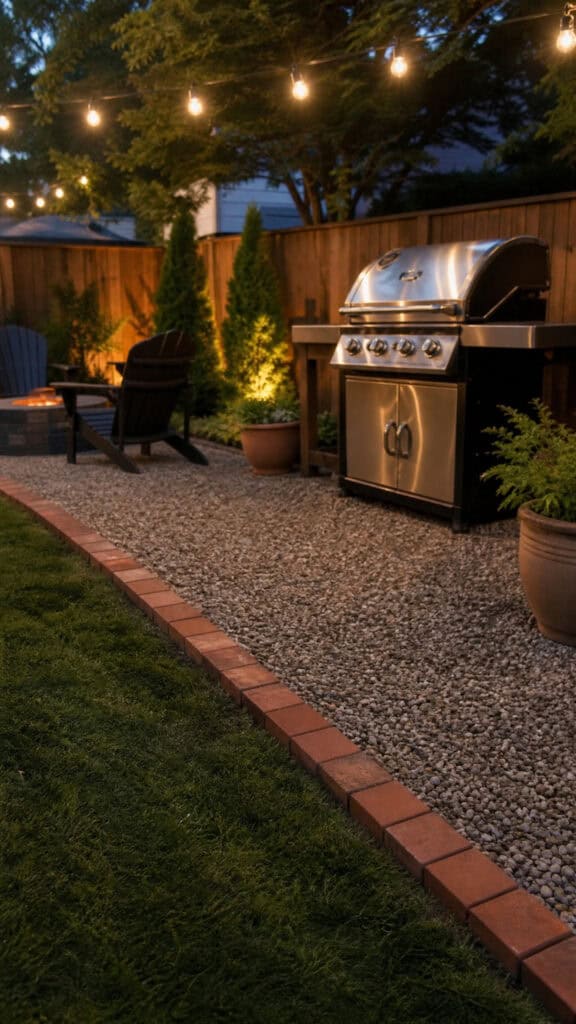
Adding a border around your BBQ area is like putting a frame on a picture – it just makes everything look SO much more polished! I used leftover bricks from a neighbor’s renovation project (free is my favorite price!), and laid them in a simple border around our gravel patio. It took maybe two hours and zero special skills, but the impact is incredible! It clearly defines the space and keeps the gravel contained.
You can use bricks, pavers, stones, or even landscape timber depending on what’s available and affordable in your area. I’ve seen beautiful borders made from river rocks, reclaimed bricks, and even broken concrete pieces arranged artistically. The key is just creating that visual boundary that says “this is our BBQ zone!” My kids actually love walking along the border like a balance beam, so it’s become a play feature too. Win-win!
- Check Craigslist or Facebook Marketplace for free materials
- No mortar needed for a simple border
- Dig a shallow trench for stability
- Mix different materials for unique character
Create Shade with a Budget-Friendly Umbrella
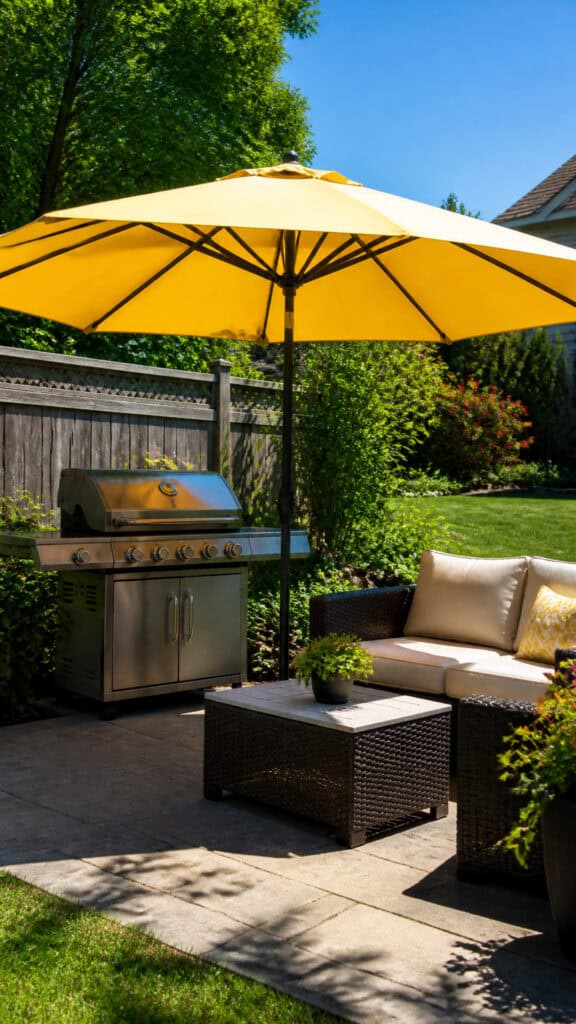
Summer sun is wonderful until you’re standing over a hot grill in 90-degree heat! A large patio umbrella is such an affordable way to add shade to your outdoor bbq area on a budget. I found ours on clearance at the end of last summer for $40 (regular price was $120!), and it’s been a total game-changer! Now I can actually grill during the afternoon without melting, and we have a shaded spot for the boys to eat their hot dogs.
The trick is shopping off-season or looking for sales at big-box stores. You can also find umbrella bases super cheap – I filled a large planter with concrete and stuck the umbrella pole in before it dried, and it’s been rock-solid ever since! If you’re crafty, you can even make a cover for a basic umbrella using outdoor fabric to match your color scheme. We went with a bright yellow one that makes me smile every time I see it!
- Shop end-of-season clearance sales
- DIY umbrella base with concrete and a bucket
- Choose UV-resistant fabric for longevity
- Position to shade both grill and seating areas
Make a Fire Pit from a Metal Ring
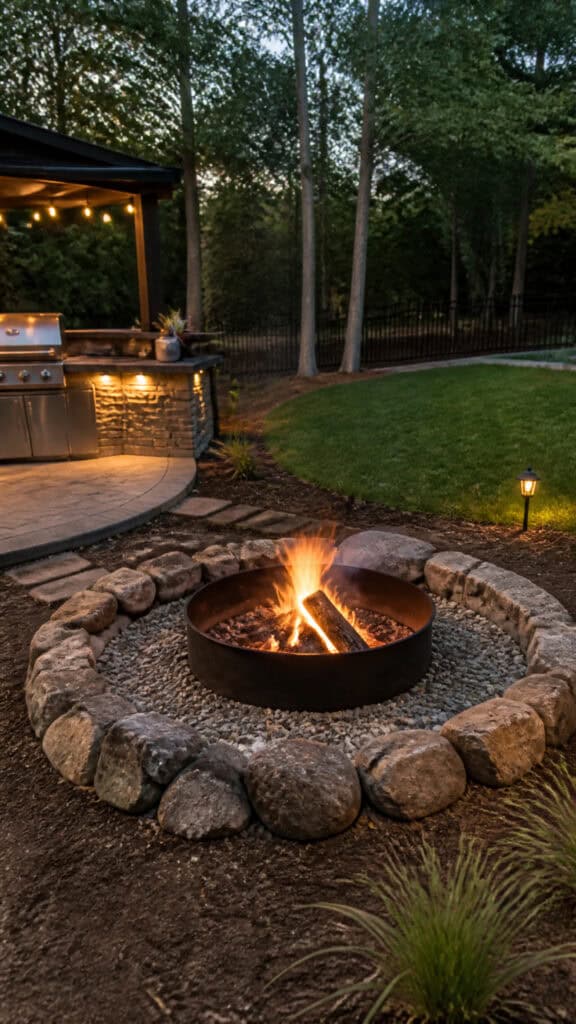
Okay, so this isn’t directly for grilling, but having a fire pit near your BBQ area extends the outdoor fun into the evening! You can buy an inexpensive metal fire ring for around $30-40, dig a shallow pit, and surround it with stones or bricks. We did ours in an afternoon, and now the boys beg to roast marshmallows after dinner almost every night! It’s become our favorite family time.
The setup is super simple and totally safe when done properly. Clear a circular area away from any structures or overhanging branches, dig down about 6 inches, place your metal ring, and arrange rocks around it. We used free stones from a local creek (checked that it was allowed first!), and it looks like we hired a landscaper! Pro tip: keep a bucket of sand nearby for easy fire extinguishing, especially important with curious kiddos around. This addition makes our outdoor bbq area on a budget feel like a complete outdoor living space!
- Place fire pit at least 10 feet from structures
- Use a metal ring for safety and durability
- Surround with non-flammable materials like stone or brick
- Check local regulations before building
Add Potted Herbs for Function and Beauty
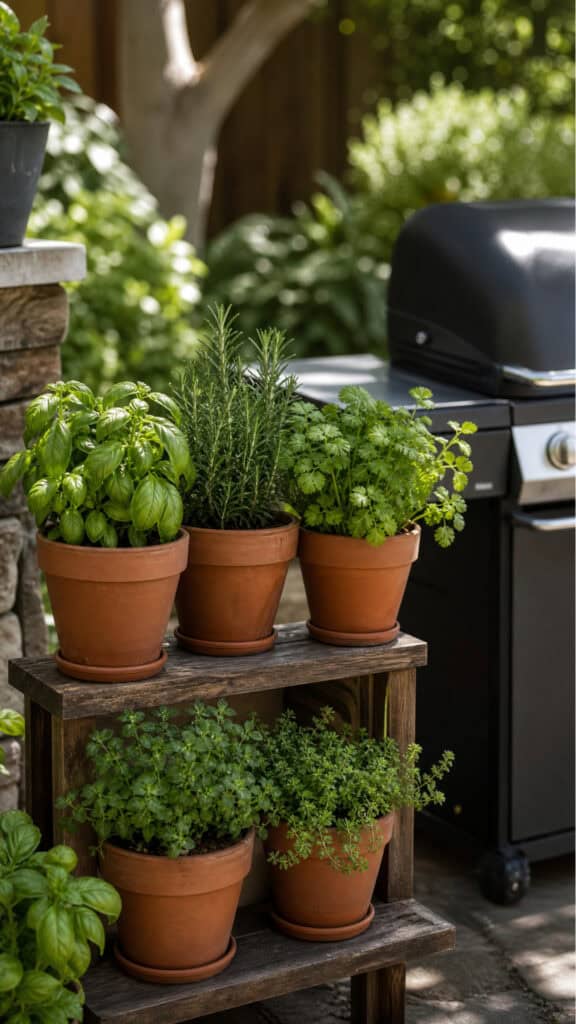
This is probably my favorite budget tip because it’s useful AND pretty! Growing herbs in pots near your grill means you can literally grab fresh basil, rosemary, or cilantro while you’re cooking – so convenient! I started with just three pots from the dollar store and some herb seedlings, and now we have a whole collection. The boys love picking the herbs (sometimes a little too enthusiastically!), and it’s taught them about where food comes from!
Herbs are super forgiving and easy to grow, even if you’re a plant-killing expert like I used to be! They smell amazing, look beautiful, and make your BBQ area feel like a fancy outdoor kitchen. Plus, fresh herbs elevate even the simplest burgers and grilled veggies! I arranged ours on a small plant stand near the grill, and it adds such a nice touch of green. You can even paint your pots to match your outdoor decor – we did ours in blues and greens for a beachy vibe!
- Start with easy herbs like basil, rosemary, and mint
- Use any containers with drainage holes
- Place within easy reach of the grill
- Paint pots for coordinated color scheme
Build Simple Bench Seating with Cinder Blocks
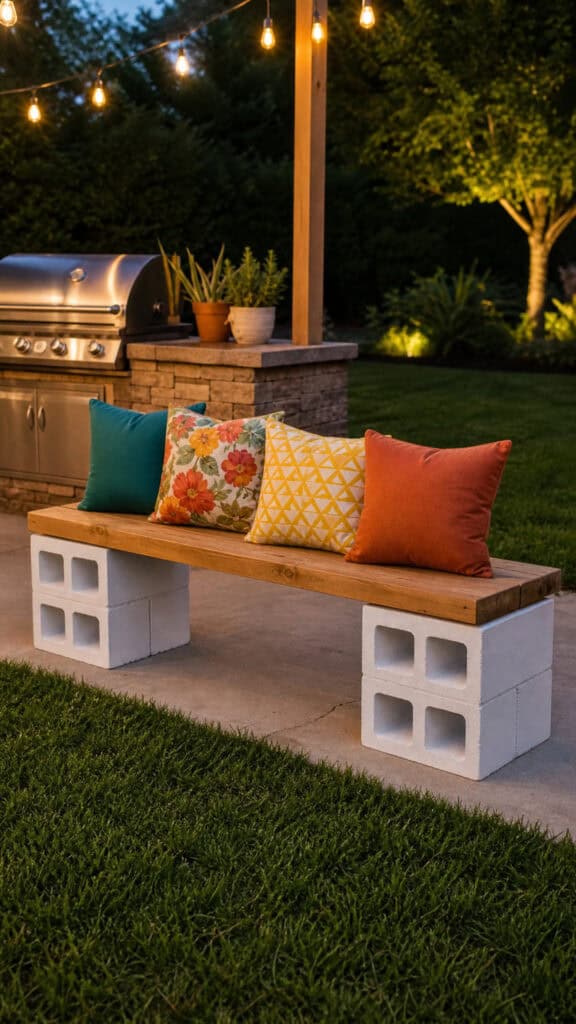
More cinder blocks, I know! But seriously, they’re so versatile and cheap! We made bench seating along one side of our BBQ area using cinder blocks as the base and 4×4 wooden beams as the seats. Total cost was under $60, and it seats about six people! I added some colorful outdoor cushions (clearance finds, naturally!), and now it’s everyone’s favorite spot to sit and chat while I’m grilling.
The construction is ridiculously easy – even easier than the serving counter! Just stack the blocks on their sides in groups of two or three, lay your wooden beam across, and you’re done! No tools required beyond maybe a saw to cut the wood to length. The boys helped me paint the blocks bright white, and it really brightened up the space. You can make these benches any length you want, and they’re sturdy enough that my husband and I can both sit on them without worry!
- Stack blocks on their sides for built-in storage
- Use 4×4 treated lumber for seats
- Paint or stain for custom look
- Add cushions for comfort
Hang a Chalkboard for Menus and Messages

This is such a fun and practical addition! I mounted an inexpensive chalkboard (found one for $8 at a craft store!) on our pergola post, and now I write the menu for each cookout on it. The boys think it’s hilarious and love drawing pictures on it between BBQs. It adds such a cute, restaurant-vibe to our outdoor bbq area on a budget, and guests always comment on it!
You can also use it to keep track of who wants their burger cooked how (medium-rare for dad, well-done for the picky eater!), or let the kids draw while you’re cooking. I’ve even used it for party games during birthday BBQs! You could make your own chalkboard super cheaply by painting any board with chalkboard paint, or even paint directly on a fence or wall. It’s one of those small touches that makes your space feel special and personalized!
- Mount securely to withstand wind
- Keep chalk in a small bucket nearby
- Use for menus, games, or kids’ art
- DIY with chalkboard paint on any surface
Use Outdoor Rugs to Define the Space
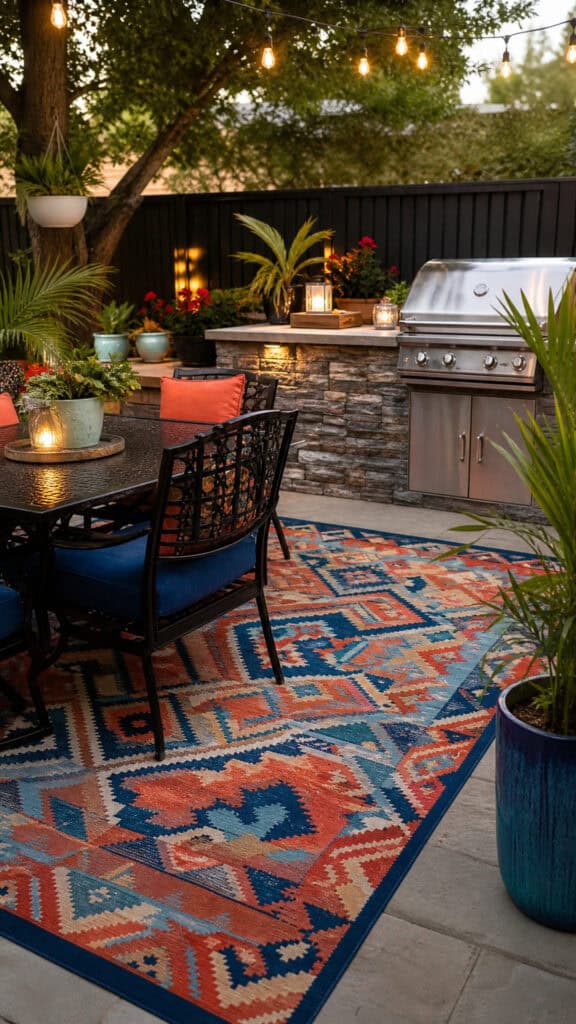
I never realized how much difference an outdoor rug makes until I got one! It instantly makes your BBQ area feel like an actual outdoor room rather than just a grill plopped in the yard. I found ours at a discount store for $25, and it ties everything together so nicely! Plus, it’s softer underfoot than gravel or concrete, which the boys appreciate when they’re running around barefoot (which is always!).
Look for outdoor rugs that are specifically designed to withstand weather and moisture – they’re made from materials that resist mold and fading. I shake ours out weekly and hose it down occasionally, and it still looks great after two summers! The pattern hides any inevitable BBQ sauce drips too, which is definitely important in our house! An outdoor rug is one of those budget upgrades that makes your space look way more expensive than it actually was!
- Choose weather-resistant materials
- Select patterns that hide stains
- Secure corners to prevent tripping
- Shake out regularly to maintain appearance
Repurpose Gutters as Herb Planters
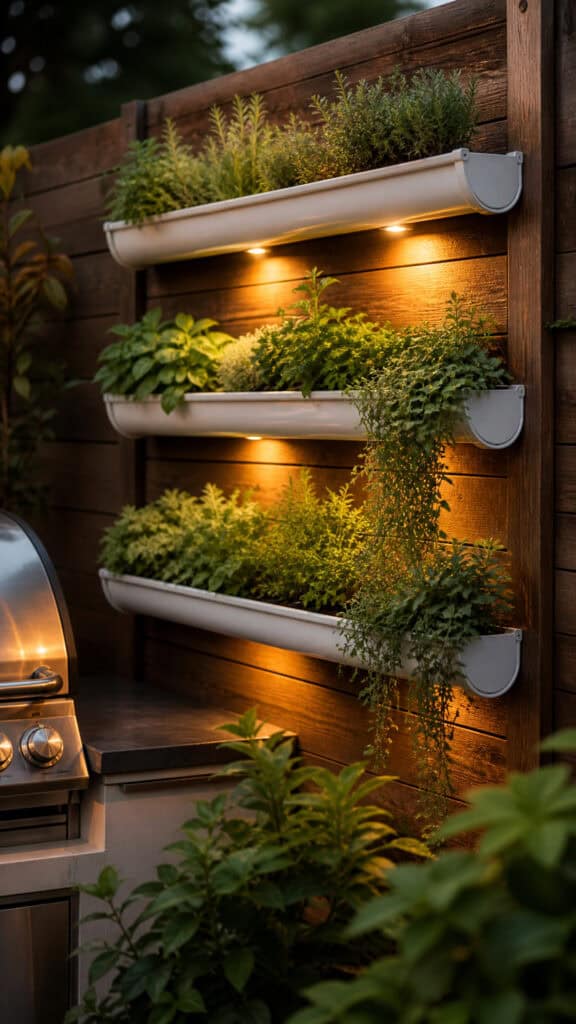
This idea is SO clever and practically free if you have leftover gutters from a home project! You can mount sections of gutter to a fence or wall near your grill and plant herbs or flowers in them. It’s like a hanging garden that takes up zero floor space – perfect for smaller yards! I did this along our back fence, and it adds such a cool, modern look to our outdoor bbq area on a budget!
Just cap the ends, drill drainage holes in the bottom, fill with potting soil, and plant away! I did three rows of gutters at different heights, and it creates this amazing vertical garden effect. The boys can easily see and reach the herbs, which makes them more likely to help with picking them for dinner. You can paint the gutters any color you want – we did ours in a bright lime green that pops against the fence. It’s definitely a conversation starter at every BBQ!
- Use leftover gutters or buy inexpensive vinyl sections
- Drill drainage holes every 6 inches
- Mount securely to fence or wall
- Paint to match your outdoor decor
Create a Beverage Station from a Vintage Cooler
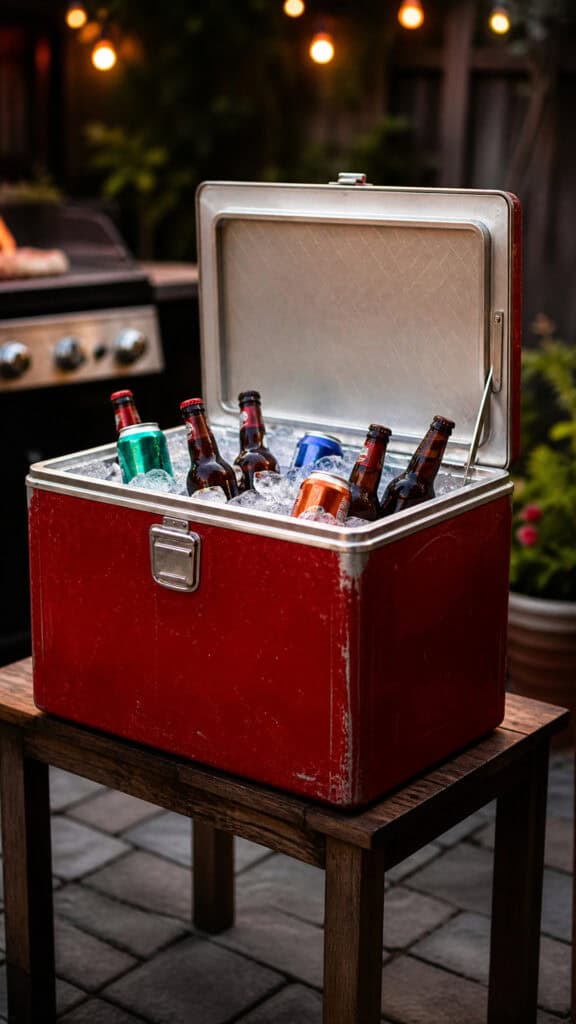
Keeping drinks cold and accessible during a BBQ is essential, especially when you’re juggling tongs, plates, and keeping an eye on three boys! I found an old metal cooler at a garage sale for $5, gave it a good cleaning, and now it’s our dedicated beverage station. I filled it with ice and drinks, and it sits on a little side table near the seating area. No more running inside every five minutes for drinks!
The vintage cooler look is so charming and adds character to the space! You could also use a galvanized tub, a large planter, or even a cleaned-out wheelbarrow for the same effect. I added a cute hand-painted sign that says “Drinks” (my artistic attempt!), and it’s become a focal point of our setup. Pro tip: freeze water bottles to use as ice – they keep things cold AND provide cold drinks as they melt! This little addition makes hosting so much easier!
- Look for vintage coolers at garage sales or thrift stores
- Clean thoroughly before use
- Place on a stable table or stand
- Add signage for a polished look
Install Solar Lights Along Pathways

Safety first, especially with kids running around after dark! Solar pathway lights are super affordable (you can get a set for under $20!), and they make navigating your BBQ area so much easier once the sun goes down. I lined the path from our back door to the grill area, and now nobody trips over toys or stumbles in the dark. Plus, they add such a pretty ambiance!
Installation is literally just sticking them in the ground – no wiring, no electricity, no hassle! They charge during the day and automatically turn on at dusk. I love that they’re eco-friendly and don’t add to our electric bill. The boys think they look like a fairy path, which makes evening BBQs feel even more magical! Some sets even come in fun shapes like flowers or lanterns, so you can match your outdoor style. This is definitely one of the easiest ways to upgrade your outdoor bbq area on a budget!
- Choose solar lights with good reviews for brightness
- Place in areas that receive full sun during the day
- Space evenly along pathways
- Replace batteries every few years for continued performance
Make a DIY Pizza Oven from Bricks
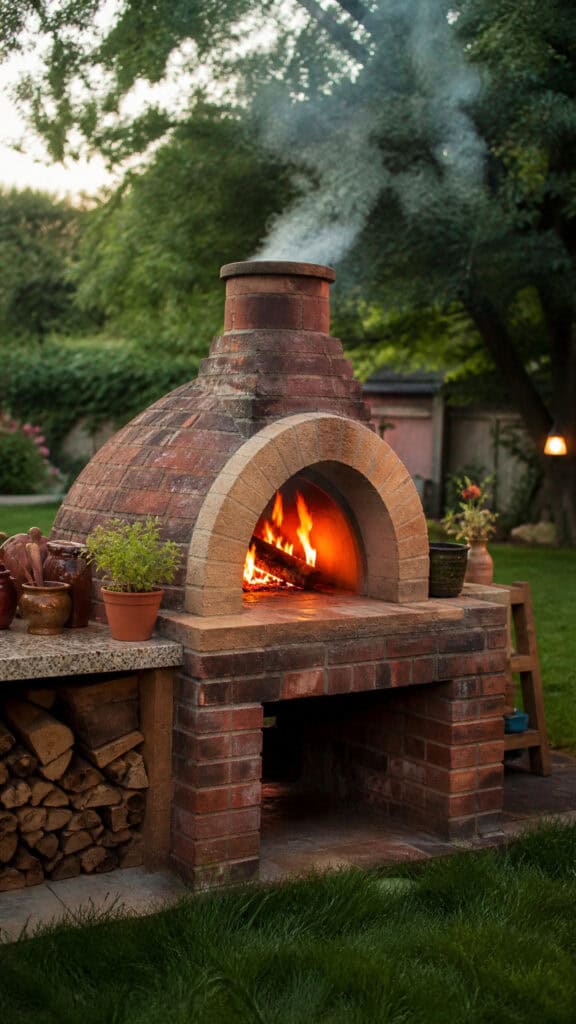
Okay, this one is a bit more ambitious, but still totally budget-friendly and SO worth it! You can build a simple outdoor pizza oven using firebricks and regular bricks for around $100-150. My husband and I watched YouTube tutorials and built ours over a couple of weekends, and now we have pizza night outside almost every Friday! The boys absolutely love it, and honestly, so do all the neighborhood kids who mysteriously appear when they smell pizza cooking!
It doesn’t have to be fancy or permanent – ours is basically a horseshoe shape of bricks with a metal sheet on top for the cooking surface. It gets hot enough to cook amazing pizzas in just a few minutes! Even if you never make pizza, you can use it for baking bread, roasting vegetables, or anything else you’d normally do in an oven. It’s become a centerpiece of our BBQ area and makes us feel like we’re on vacation in Italy (well, Italy with three rowdy boys running around!).
- Use firebricks for the cooking chamber
- Start with simple designs before attempting complex builds
- Cure the oven properly before first use
- Keep a pizza peel and infrared thermometer handy
Add Privacy with Bamboo Screening
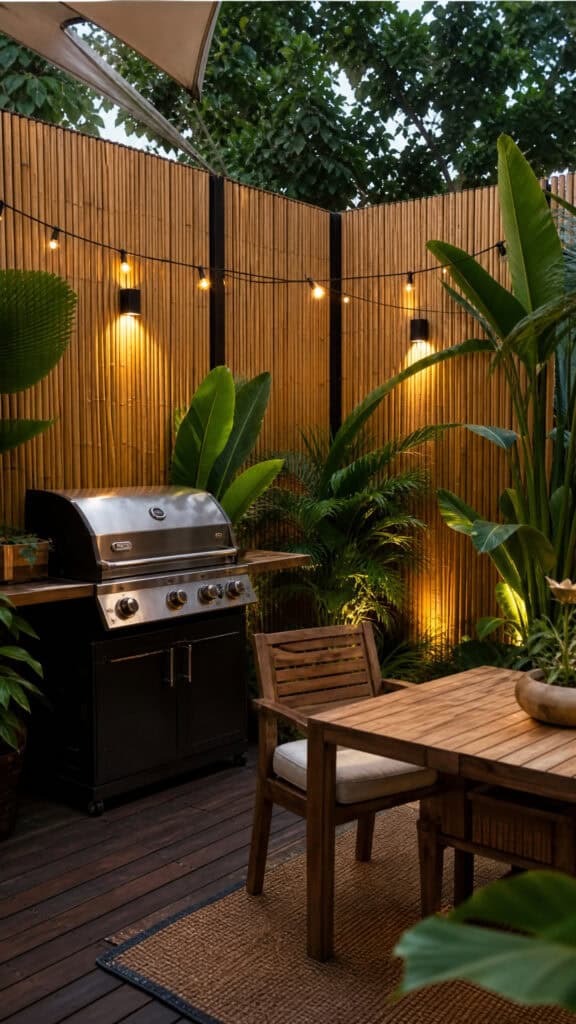
Privacy makes your BBQ area feel so much more like an outdoor room! Bamboo screening is incredibly affordable (we got a 6-foot roll for about $30), and it instantly creates a cozy, enclosed feeling. I attached it to our chain-link fence, and suddenly our yard feels like a private retreat instead of being totally exposed to the neighbors. Not that we don’t love our neighbors, but sometimes you want to grill in your pajamas, you know?!
Installation is super easy – just use zip ties or wire to attach it to an existing fence, or build a simple frame from 2x4s if you don’t have a fence. It also helps block wind, which is great for keeping the grill temperature steady! The natural bamboo look adds such a nice texture and tropical vibe to our outdoor bbq area on a budget. Plus, it’s held up really well through rain, sun, and even the occasional soccer ball impact. The boys love that it makes our yard feel like a secret hideaway!
- Measure your space before purchasing
- Secure with zip ties or outdoor wire
- Trim to fit using sharp scissors or pruners
- Replace every few years as it weathers
Time to Fire Up Your Budget-Friendly BBQ Paradise!
There you have it – 18 amazing ways to create an outdoor bbq area on a budget that looks absolutely fantastic! I hope these ideas have inspired you to transform your backyard into the ultimate grilling and gathering space without spending a fortune. The best part is that you can tackle these projects one at a time, spreading out the cost and effort over several weekends (or months, because life with kids is unpredictable!).
Remember, the most important thing isn’t having a perfect, magazine-worthy BBQ area – it’s creating a space where your family makes memories together! Some of our best moments have happened around that grill, from celebrating birthdays to simple Tuesday night dinners under the string lights. So grab some supplies, maybe bribe the kids with popsicles to help out, and start building your dream outdoor space! Your backyard BBQ paradise is waiting, and it’s going to be amazing!

This post may contain affiliate links. Read the full disclosure here.