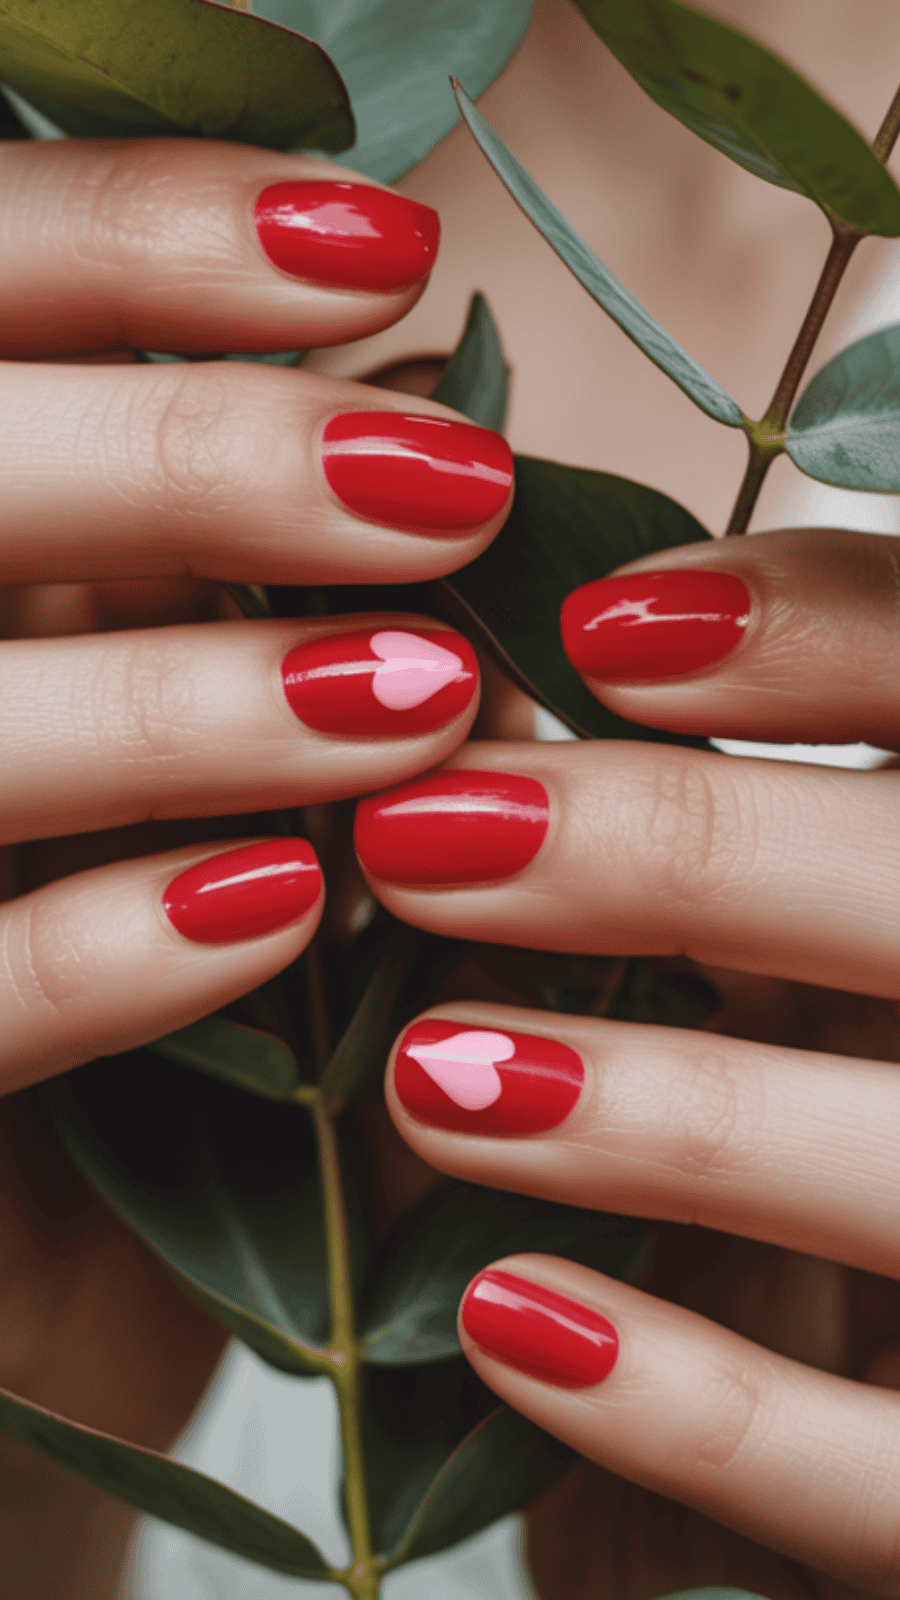
Why I Love Red Nails With Pink Hearts That Say Sweet and Sassy
Most days I’m wiping peanut butter off the counter with one hand and breaking up a Lego argument with the other, so when my nails look cute, it feels like a tiny miracle. That’s why I’m so obsessed with red nails with pink hearts right now. There’s something about red nails with pink hearts that say sweet and sassy that makes me feel playful, a little romantic, and just bold enough, even if I’m in leggings and a messy bun. I love that this look works for date night, Valentine’s Day, school events, or just a quick pick-me-up while I’m doing all the mom things.
As a mom of three busy boys, I don’t have time for fussy designs or three-hour salon visits, so I need pretty nails that fit real life. In this post, I’ll share simple design ideas, easy step-by-step tips, and at-home options you can do during nap time or after bedtime. I’ll also chat about salon ideas if you want something extra special, plus how to make your polish last through dishes, homework, and endless snack refills. If you’re a tired mom who still loves a little sparkle and sass, you’re in the right place!

Why I Love Red Nails With Pink Hearts That Say Sweet and Sassy

There is something so fun about glancing down at my hands in the middle of the chaos and seeing red nails with pink hearts sparkling back at me. It feels like this tiny secret reminder that yes, I am still a woman who loves pretty things, even while I am refereeing wrestling matches in the living room and wiping jelly off the dog.
A fun way to feel feminine in a house full of boys

As a mom of three young boys, my life is a mix of grass stains, mystery smells, and nonstop sound effects. My days are packed with Nerf wars, muddy shoes, and someone yelling, “Watch this!” every five minutes. So my nail art has become my little pocket of girly joy.
The red base feels strong and classic, almost like lipstick for my hands. It gives me that confident, put-together vibe, even when my hair is in a messy bun and I am wearing yesterday’s sweatshirt. Then those tiny pink hearts come in with that sweet, soft touch that makes me feel extra feminine without trying too hard.
I notice it in the smallest moments:
- When I grab the snack bin and my boys are arguing over who saw the last granola bar first, I catch a glimpse of those bright red tips and soft hearts and it makes me smile.
- When I am buckling car seats and someone is yelling that his brother is “breathing his air,” my nails look like they belong to a woman who at least pretends to have it together.
- When I pack three lunches in a row and cut sandwiches into crooked rectangles, the pink hearts feel like my own little reminder that cute things still exist in this house.
Sometimes one of the boys will notice and say something like, “Mom, your nails look like candy,” which is pretty much the highest compliment in kid language. Another time, my youngest asked if I had “stickers for fingers.” I took that as proof that my nails are fun, not fussy.
I love that this nail look feels girly without being delicate. The red says, “I am strong, I handle a lot,” and the pink hearts whisper, “but I am still soft and sweet.” In a house full of boys, loud toys, and dirty socks, that little mix of sweet and strong feels very needed.
Red and pink nails that work for real life, not just Instagram

I do not have time for nails that only look cute in staged photos. My nails need to survive snack pouring, carpool, and the occasional sticky high-five. This red and pink combo checks all the boxes. It is bold enough to feel special, but simple enough for real life.
The style I love is very wearable:
- A solid red base that looks classic and grown-up.
- Tiny pink hearts near the cuticle or on one or two accent nails.
- Clean, simple lines, nothing huge or cartoonish.
The hearts are not big, loud designs that scream for attention. They are small, sweet details that you notice when I reach for my keys or hand over a permission slip. That is what I love most. The look feels fun, but not over the top.
It works with almost everything I throw on during the week:
- Jeans and a tee: The red nails instantly dress up a basic outfit.
- Black leggings and an oversized hoodie: The hearts add just enough cute to make me feel less like a tired blob and more like a person who tried.
- School spirit wear: The red even matches a lot of school colors, so I look festive without planning it.
I wear this nail look to school pickup, PTA meetings, work calls, grocery runs, and birthday parties. It fits all of it. I do not feel like I need a special outfit or occasion to “match” my nails. They just slide into my life like they belong there.
And the compliments are such a bright spot in my day. Teachers notice at drop-off and say, “Oh, I love your nails!” Other moms in the pickup line ask where I got them done. Even cashiers at the store sometimes smile and say, “Those are so cute.” It is never in a “wow, you really tried” kind of way. It is more like, “You look fun and put-together,” which feels so nice when I am on my third coffee of the day.
The best part is that the look feels low-pressure. I am not sitting there worried about smudging some huge detailed design. It is just pretty, simple, and easy to wear while I live my normal, busy-mom life.
Mood boosting nails that make everyday chores feel cuter

There are days when I feel like my whole life is made of chores. Dishes, laundry, homework, repeat. That is exactly where these “sweet and sassy” nails earn their keep.
When my hands are in a sink full of dishes and I am scrubbing dried cheese off a plate, those bright red nails peek through the bubbles and I feel a tiny lift. It sounds silly, but it is real. When I am folding what feels like the 500th tiny sock of the week, those little pink hearts make the pile of laundry look a bit less tragic.
For me, “sweet and sassy” nails are a mood in themselves:
- Sweet: They remind me to stay kind and gentle with my kids, even when I am tired. The pink hearts feel soft, playful, and loving, like a little hug on my hands.
- Sassy: The red gives me that confident, bold spark. It reminds me that I am more than the housework, the carpool, and the to-do list.
When I sit down to help with homework and my child is melting down over fractions, I catch a glimpse of my nails and think, “Okay, I can handle this.” They do not fix the math problem, but they give me a tiny boost of patience and humor.
This nail look has also become a small form of self-care that actually fits into my life. I do not always have the time or budget for big spa days. But a quick polish change at home or a simple salon visit every few weeks feels doable.
Nails can be:
- Tiny: They do not take over your schedule.
- Affordable: You can do them at home with a couple of polishes and a dotting tool or toothpick.
- Flexible: You can refresh them during nap time, after bedtime, or while the kids finish a movie.
It feels good to have one thing that is just for me, even if it is painted on the same hands that unclog toilets and cut up chicken nuggets. When I look down and see that sweet red and pink combo, everyday chores feel just a little lighter and a lot cuter.
And honestly, anything that makes late-night laundry, endless dishes, and back-to-back practices feel more fun is a win in my book.
Cute Design Ideas for Red Nails With Pink Hearts That Say Sweet and Sassy

When I want my nails to feel fun but still mom-friendly, I always come back to red nails with pink hearts. They look playful, flirty, and a little bold, without turning my hands into a full-on art project. I can switch up tiny details and get a fresh look every time, while still keeping that same sweet and sassy vibe that makes me smile when I grab a juice box or buckle a car seat.
Classic red nails with tiny pink heart accents

If you are new to nail art, this is the perfect starting point. I love a simple set where most of my nails are solid red, and then I add one or two tiny pink hearts on an accent nail. Usually that is my ring finger or middle finger. It feels cute but not too loud, which is great for school pickup, work, or family photos.
You can play with the shades to fit your style:
- Bright cherry red looks fresh and playful. It pops in photos and works so well if you have warm or neutral skin tones.
- Deeper wine red feels a little more grown-up and cozy. I like this in fall or winter, especially if I am living in sweaters.
- For the hearts, soft baby pink keeps it sweet and subtle.
- Bubblegum pink gives more of a fun, candy look. My kids always say it looks like strawberry frosting.
I like to think of it like lipstick and blush. The red is your lipstick, bold and strong. The tiny hearts are your blush, soft and sweet, just a hint of color.
This classic layout is perfect for:
- First-time nail art if you feel nervous about patterns.
- Work-friendly days when you want something polished and not distracting.
- Busy moms who need something quick in the salon chair or at home.
A tiny heart on just one nail per hand still sends that sweet and sassy message. It keeps things simple, fast, and easy to touch up. I often ask for a tiny heart near the cuticle on my ring finger, so if it chips at the tip, the heart still looks cute.
Mismatched “sweet and sassy” nails with playful details

On weeks when I feel a little extra, I love doing a mismatched set with more personality. Some nails stay solid red, some get pink hearts, and then I add small words like “sweet” and “sassy” on two nails.
The trick is to keep it from looking too busy. I stick to the same two or three colors across all my nails:
- One red shade for the base.
- One or two pinks for hearts and details.
- Simple white or black for the lettering.
I like putting “sweet” on my left ring finger and “sassy” on my right ring finger. It feels like a tiny story on my hands. Sweet on one side, sassy on the other. Very mom life, right?
To tie everything together, I add small, easy details:
- Tiny dots near the cuticle in pink or white.
- Thin stripes on one nail, like a candy stripe or little border at the tip.
- A single nail filled with scattered small hearts, while the others stay clean.
This kind of mismatched set still feels coordinated, because all the nails share the same colors and vibe. It looks playful without turning into chaos.
When I am standing in line at the grocery store with three hungry boys and someone compliments my nails, it makes me feel like I put effort into something fun, even if I got dressed in five minutes.
Short mom-friendly nails that still look romantic and bold

Long nails look gorgeous, but with three boys, a sink full of dishes, and a toddler who loves to grab my hands, short nails are my reality most days. The good news is, short square or squoval nails can still look chic and romantic with red polish and a few pink hearts.
Short nails are:
- Safer for babies and toddlers, especially when I am changing diapers or helping with shoes.
- Easier to clean, which matters when I am digging Play-Doh out of tiny crevices.
- Harder to break, so I am not snapping a nail while wrestling open a snack pouch.
On short nails, placement matters a lot. I like to move the hearts around to keep things interesting:
- Near the cuticle, like a tiny charm sitting at the base.
- At the tip, almost like a soft twist on a French tip.
- Off to one side, which looks modern and a little artsy.
If I am really pressed for time, I will do one tiny heart on just one hand. It sounds funny, but it still feels special when I glance down. One simple heart, one coat of top coat, and I am done. I can go back to math homework and snack plates without spending half an hour on designs.
Short nails painted red with a few pink accents feel like the perfect mix: practical for mom life, but still bold enough to make me feel put-together and a tiny bit flirty.
Holiday and date night twists on red and pink heart nails

Once I have a basic red and pink heart look that I love, it is so easy to tweak it for holidays or special nights. I do not change the whole design. I just add a little sparkle here, a deeper color there, and it instantly feels new.
For Valentine’s Day, I like to:
- Add more hearts on a couple of nails.
- Use a fine glitter top coat on one or two nails for extra sparkle.
- Mix in two pink shades, like baby pink and a richer rose pink, so it looks a bit more fun.
For a romantic date night, I usually soften things a bit:
- Pick a deeper red, like merlot or garnet.
- Use a muted, soft pink for the hearts, so the look feels more grown-up.
- Keep the hearts tiny and simple, maybe just on my ring fingers.
For anniversaries or girls’ night, I sometimes go with one special nail:
- A glitter heart nail, where the heart is filled in with pink or red glitter.
- A thumb heart that only I really notice during the day. It feels like a secret little treat just for me.
I also love adding small personal touches:
- Tiny initials inside or near a heart.
- A small heart on the thumb that peeks out when I hold my coffee or scroll on my phone.
Little changes like that keep my nails fun all year without starting from scratch every time. The sweet and sassy red and pink theme stays the same, but the mood shifts with just a few extra dots, a bit of glitter, or a deeper shade of red. It is an easy way to fit a tiny bit of romance and fun into a very full, very real mom schedule.
How I Get Red Nails With Pink Hearts at Home in Just a Little Mom Time

When I want a small mood boost without leaving the house, I pull out my polish and give myself red nails with pink hearts right at my kitchen table. I do it in short bursts of “mom time,” usually between bedtime stories and loading the dishwasher, and it still looks cute and intentional. It does not need to be perfect, just pretty and fun enough that I smile every time I grab a snack cup.
Quick prep so polish lasts through dishes and bath time

If you are a mom, you know our hands live in water. Dishes, baths, constant handwashing, cleaning up spills, all of it. A tiny bit of prep makes a huge difference so your polish does not peel off by the next snack break.
Here is how I prep my nails in about 10 to 15 minutes:
- Wash and dry your hands.
I start with soap and warm water to get rid of lotion, peanut butter, mystery stickiness, all the fun mom stuff. Then I dry my hands really well, including between my fingers and around my nails. Polish sticks so much better to dry skin. - Shape with a light file.
I like my nails short and simple, so they do not scratch kids or snap while I open snack bags. I use a gentle nail file and smooth the edges into a soft square or squoval shape. Quick little strokes in one direction keep the tips from splitting. - Gently push back cuticles.
I am not a fan of cutting my cuticles at home. Instead, I use a wooden stick or a soft cuticle pusher after my shower, when my skin is softer. I lightly push the cuticles back so I have more nail space for color. It makes the polish look neater, even if I rush a bit. - Swipe nails with remover or alcohol.
This step is the secret that keeps my polish from sliding right off during dish duty. I take a cotton pad, put a little polish remover or rubbing alcohol on it, and wipe each nail. It removes oils, soap, and lotion so the base coat can really grip.
I usually do this quick prep while:
- The kids watch a show.
- They eat a snack at the table.
- Or right after they go to bed, when the house is finally quiet.
Once my nails are clean, dry, and shaped, I know I have a better shot at making my polish last through bath time, car seat buckles, and the million times I wash my hands in one day.
Easy base color: picking the right red and applying it fast

The red base is what makes this look feel strong and sassy, even if the rest of my outfit is yoga pants and a mom bun. I do not have time for fancy formulas, so I pick reds that are known to be chip-resistant and look good with my daily clothes.
Here are a few types of reds that work well:
- Bright cherry red: Happy and playful. Great with jeans, leggings, and basic tees.
- Blue-toned red: Classic and polished. Looks nice if you dress up for work or date night.
- Deeper berry red: Cozy and pretty. Perfect for fall, winter, and sweater weather.
I like creamy, non-sheer polishes, because they give good color in 2 thin coats. Sheer reds can look streaky if I am in a rush, and I usually am.
Here is how I apply my red base without losing my mind:
- One thin coat first.
I start in the middle of the nail, then gently swipe to each side. I keep a tiny gap near the cuticle so the polish does not flood into my skin. It grows out nicer and looks almost salon-done. - Let it dry for a few minutes.
I give it 3 to 5 minutes. During that time, I might pack lunches, wipe the counter, or switch the laundry. Short tasks only, nothing wet. - Second thin coat.
I repeat the same steps, still keeping layers thin. Thick coats take forever to dry and smudge with one quick grab of a milk cup.
To keep it mom-friendly:
- I often paint one hand at a time, so I still have a free hand for snack emergencies.
- I keep a tiny brush or cotton swab dipped in remover nearby to clean up slips.
- I do not stress about absolute perfection. From a normal distance, tiny goofs disappear.
Once the red base is done, my nails already look polished and pretty. If someone yells “Mom, I need help,” I can stop there and add hearts later.
Simple ways to paint small pink hearts without a steady hand
Hearts look complicated, but they are really just two dots and a little V. If my kids are running laps around the living room, I do not trust myself with fancy nail art, so I keep it very simple.
These are the tools I use for hearts:
- A dotting tool if you have one.
- The rounded tip of a bobby pin.
- A toothpick for tiny details.
- A small nail brush if I feel brave.
Or, if drawing anything sounds stressful, nail stickers or wraps are amazing. I have used pink heart stickers on top of red polish and sealed them with top coat. Fast and cute, no art skills needed.
For hand-painted hearts, this is my easy method:
- Put a little pink polish on foil or a bottle cap.
I like soft bubblegum or baby pink. I pour a tiny puddle to dip into. - Make two dots.
Using my dotting tool or bobby pin, I place two small dots right next to each other on the nail. This is the top of the heart. - Drag the dots down into a V.
With a toothpick or tiny brush, I gently pull each dot down toward the same point, so they meet in a V shape. That is the bottom of the heart. - Fill in the middle.
I add a little more pink to fill in any empty space.
I always remind myself that hearts do not have to be perfect or perfectly even. Once the top coat goes on, small wobbles sort of melt away.
A few tricks that help:
- Practice on paper first. I do a couple of hearts on a scrap of paper or a sticky note so I get the feel of it.
- Start with just one heart per hand. I usually put it on my ring finger. That way, I still get the sweet detail without feeling like I have to decorate every nail.
- Keep hearts small. Tiny hearts look cute even if they are a little lopsided.
If I am extra tired, I reach for pink heart stickers and call it a night. The goal is fun, not stress.
Top coat tricks so sweet and sassy nails survive mom life
A good top coat is my best friend. It is the difference between pretty nails for one day and pretty nails for almost a week, even with mom life happening at full speed.
Here is how I use top coat so my red and pink nails last:
- Seal the edges.
I brush top coat over the nail, then lightly run the brush across the very tip of the nail. This “wraps” the edge and helps protect against chips from toys, keys, and constant handwashing. - Let each layer dry.
I use a quick-dry top coat if I can, and I still give it at least 10 minutes of calm time. This is when I sit on the couch, scroll my phone, or watch part of a show. Hands off everything. - Reapply every few days.
Every 2 to 3 days, I add a fresh thin layer of top coat. It brings back the shine and smooths over tiny scratches from car seat buckles and kitchen chores.
A few timing tips that help so much:
- I try to do my nails after the kids are fully in bed, not while someone is still calling my name every 30 seconds.
- I like painting after my shower, so my hands stay dry longer and my skin is already soft.
- I keep a fast-dry top coat on hand, so I am not waving my fingers in the air forever.
With a little prep, a strong red base, simple pink hearts, and a shiny top coat, my “sweet and sassy” nails actually survive dishes, bath time, and all the daily chaos. It feels like a tiny piece of pretty that I get to carry around, right on my busy, hard-working mom hands.
Salon Tips: What to Ask For So Your Sweet and Sassy Nails Look Just Right
When I sit in that salon chair, I want my nails to feel fun, cute, and still mom-friendly, especially if I am getting red nails with pink hearts for a special week or event. Clear communication with my nail tech is everything. A few simple details can be the difference between a design I kind of like and a design I absolutely love every time I reach for the diaper bag.
How I explain the red and pink heart design to my nail tech
I have learned that nail techs are talented, but they are not mind readers. So I always walk in with a plan. I usually bring 2 or 3 photos or screenshots on my phone. Even if they are not perfect, they give my tech a visual idea of my style.
Here is what I make sure to mention:
- Base color: I say I want a solid red base on all or most nails. If I care about the shade, I say things like “bright cherry red” or “deep wine red.”
- Heart color: I tell them if I want soft pastel pink hearts or bright bubblegum pink hearts. That tiny detail changes the whole mood.
- Words or no words: I mention if I want the words “sweet” and “sassy” on one or two nails, usually my ring fingers.
- Art level: I say if I want simple hearts only or if I am open to extra details, like dots or a tiny outline.
- Placement: I mention if I prefer hearts near the cuticle, on the tip, or off to the side.
I also bring up real-life stuff. If I know my partner is watching the kids and I only have about an hour, I tell my tech right away. Something like, “I love nail art, but I have about an hour before my husband has to leave with the boys, so let’s keep it simple.” It helps them pick designs that fit my time and still look cute.
Here is an example of what I might say in normal, everyday language:
“I am thinking red nails with small pink hearts. I like a bright red base and soft pink hearts, nothing too big. Maybe one heart on each ring finger, and on one of them can we add the word ‘sweet’ and on the other ‘sassy’ in small lettering? I want it cute but simple and not super detailed, because I only have about an hour while my husband hangs with the kids.”
That little script covers color, design, and timing. After that, I let my tech suggest what will look best on my nails. It feels like we are a team, instead of me hoping they guess what I mean.
Choosing nail shape and length that work with diapers, dishes, and soccer cleats
The design is fun, but the shape and length decide if my nails survive our actual life. With three boys, I am snapping car seat buckles, tying cleats, grabbing snacks, and wrestling open toy packaging. I need nails that look pretty and still let me function.
Here are a few shapes I talk about with my tech:
- Short square: Straight across the top, with sharper corners.
- Short squoval: A square shape with soft, rounded corners.
- Short almond: Tapered sides with a softly rounded point at the tip.
For busy moms, I have found that shorter is usually easier. Long claws and diaper changes do not mix. Here is how these shapes work in my daily life:
- Short square: Looks clean and polished. Great for simple designs and tiny hearts. It can feel a little “sharp” if I am handling babies or toddlers a lot.
- Short squoval: This is my personal favorite. It has the clean look of a square but with rounded edges, so it snags less on clothes and does not poke my kids.
- Short almond: So pretty and feminine. I like this shape when my kids are a bit older or during seasons when I am not doing as many messy projects.
I almost always ask for short squoval. It feels like the perfect mix of cute and practical. The red polish still looks bold, and the pink hearts stand out, but my nails do not get in the way when I am washing dishes or tying tiny cleats in the parking lot.
I also remind myself that it is perfectly fine to go shorter than the photos I bring in. Those Instagram nails look amazing, but they are not scooping Goldfish off the floor or pulling wet laundry out of the washer every day. I tell my tech, “I love this style, but let’s keep the length practical. I am with kids all day and need to be able to move.”
If you feel torn, here are a few quick things to mention:
- If you change diapers, say you want short, rounded edges.
- If you type a lot, say you want a shape that does not click too much.
- If your kids play sports, mention that you carry gear and tie laces.
A few honest details like that help your tech shape your nails for real life, not just photos.
Little upgrades that make salon nails feel extra special
Once the main design is set, I like to ask about tiny upgrades that make my nails feel special without keeping me in the chair forever. I do not always have time for full-blown art on every nail, but small details can make my sweet and sassy design pop.
Some of my favorite quick add-ons:
- Glitter top coat on one heart nail:
I pick one nail per hand, usually my ring finger, and ask for a fine glitter top coat just over the nail with the heart. It catches the light but does not look overdone. - One tiny crystal near a heart:
I ask for a small crystal placed at the base or side of one heart. It looks like a little twinkle on my hand, and my boys always notice it. - A gradient pink heart on one finger:
Instead of flat pink, I ask for a heart that goes from light pink to darker pink. I usually do this on just one accent nail. It feels special without taking much extra time.
These upgrades are quick, but they make me feel like I am getting a mini treat, not just a basic color change. I also like to ask about gel polish when I know I have a busy stretch ahead, like:
- Family vacations.
- Holiday weeks.
- Birthday parties or school events.
I simply say, “Can we do this with gel so it lasts longer? I have a lot going on the next couple of weeks with the kids.” Gel holds up so much better to constant handwashing, dish duty, and all the sticky moments that come with mom life.
And here is the part I remind myself of every time. It is okay to enjoy it. It is okay to sit there, let someone pamper you for an hour, and walk out with nails that make you smile when you grab a pack of wipes from your bag.
You are not being selfish by asking for cute details. You are allowed to feel pretty while you do school runs and grocery trips. A little sparkle on one heart, a tiny crystal, or that shiny gel top feels like a small love note to yourself, right on your hands.
How to Make Red Nails With Pink Hearts Last in Busy Mom Life
When I get a fresh set of red nails with pink hearts, I want them to survive more than one round of dishes and a slime explosion in the playroom. I do not have time for a full redo every time someone spills juice or needs help with a Lego tower, so I focus on small habits that keep my nails cute while real life stays messy and loud.
Simple habits that protect polish during chores and playtime
I learned very quickly that pretty nails and mom life can get along, but only if I help them out a little. It is not about being perfect. It is about tiny habits that fit into what you are already doing.
Here are the simple things that make the biggest difference for me.
Wear gloves for wet chores.
If my hands will be in water for more than a minute, I grab gloves. Dishes, cleaning the sink, scrubbing the tub, rinsing paint brushes from kid crafts, all of it. Hot water and soap are so hard on polish. When I skip gloves, I see chips by day two. When I use them, my sweet little pink hearts survive the week, even with spaghetti night.
Use gentle hand soap.
With three boys, I feel like I wash my hands every five minutes. I switched to a gentle, moisturizing hand soap, and my nails last longer. The skin around my nails does not crack as much, and the polish looks smoother. I keep harsh, super-strong soaps for really messy jobs only.
Keep nails short and mom-friendly.
I love the look of long nails, but my boys love wrestling, slime, kinetic sand, and anything sticky. Long nails do not last here. Short, squoval nails are my best friend. They snag less on blankets, clothes, and toy bins, and they are way harder to break when I am snapping car-seat buckles or opening snack packs.
Short nails are perfect for:
- Building Lego sets without scratching pieces.
- Wiping down the kitchen after a pancake disaster.
- Washing tiny hair in the tub without poking anyone.
They still look bold and pretty with red polish, just without all the drama and breakage.
Stop using nails as tools.
This one was hard for me, but it changed everything. I try not to:
- Pop open soda cans with my nails.
- Pry tiny toy batteries out of their slots.
- Scrape stickers off new water bottles.
- Peel dried slime off the floor or the table.
If something needs prying or scraping, I grab a butter knife, scissors, or an actual scraper. It takes a little more effort in the moment, but it saves my polish and my nail tips. I remind myself that my nails are for looking cute and picking up my kids, not for fighting with stubborn packaging.
Dry hands completely after water.
After bath time or cleaning up a sticky sink, I dry my hands well. I get between my fingers and around my nails. Then I give my hands a tiny break before I go back to another wet task. Constant dampness makes polish peel faster, especially near the tips.
Moisturize, but not right before chores.
I keep a small hand cream or cuticle oil by my bed and in the kitchen. At night, after the kids are down, I rub a bit into my cuticles. Hydrated skin holds polish better and chips less. I just avoid heavy lotion right before doing anything messy or wet, because slick nails plus chores usually equals smudges.
Plan “wet work” around fresh polish.
If I know I need to deep-clean the bathroom, scrub pots, or wash a mountain of dishes, I do those jobs before I paint my nails. Then I paint them after bedtime, when the house slows down. That way, they get a full night to dry and harden before the chaos starts again.
These tiny tweaks fit into my normal days. I still clean the kitchen, play slime shop on the floor, and build Lego cities. I just treat my nails a little more gently, so my sweet and sassy design sticks around instead of peeling off after one busy day.
Quick fixes for chips so nails still look cute in photos

Even with the best habits, chips happen. Kids do not care that you just painted your nails before they hand you a sticky juice box or ask you to peel off a stubborn sticker from a toy. I used to feel annoyed when my fresh manicure chipped. Now I just fix the little spots and move on.
Here is how I keep my nails photo-ready without starting over.
Keep a tiny “rescue kit” handy.
I keep a small stash in the bathroom or kitchen drawer:
- My red polish.
- My pink polish for hearts.
- A clear top coat.
- A few cotton swabs.
If I notice a chip, I do not wait. I fix it that night or during a quiet moment, before it spreads and looks worse.
Patch small chips with red polish.
For tiny chips on the tips, I do not repaint the whole nail.
I do this instead:
- Make sure the nail is clean and dry.
- Tap a tiny bit of red polish just on the chipped spot.
- Feather it slightly into the rest of the nail so it blends.
- Let it dry for a few minutes.
- Add a thin layer of top coat over the whole nail.
Once the top coat dries, it all evens out. The chip pretty much disappears unless you put your face an inch from my fingers, which no one is doing in the school pickup line.
Hide a chip with a new pink heart.
If a chip hits near a heart or right at the tip, I sometimes turn it into part of the design. This is my favorite trick when I do not have time to be fussy.
- If the chip is near the tip, I paint a tiny pink heart right over or near the chipped area.
- If the chip is on the side of the nail, I add a heart slightly off-center and make it look intentional.
Then I seal the nail with top coat. The chip is covered, and it looks like I meant to add an extra heart. My boys just say, “Oh cool, more hearts, Mom,” and they have no idea it was a repair job.
Use top coat as your magic eraser.
A fresh layer of top coat can hide:
- Light scratches from toys and keys.
- Dull spots from cleaning.
- Slight unevenness from quick touch-ups.
Every couple of days, I sit down for two minutes and swipe a thin coat over my nails. It refreshes the shine and smooths out little flaws. This helps so much when I know there are photos coming, like school events, birthday parties, or family dinners.
Let go of tiny imperfections.
This might be the most important part for me. I remind myself often:
- Most people are not staring at my hands.
- No one is zooming in on that one tiny chip near my thumb.
- My kids just think my nails look fun and “like candy.”
Nails are meant to be enjoyed, not stressed over. I would rather have a slightly chipped but fun, sweet and sassy manicure than bare nails all the time because I am afraid they will not stay perfect. Life with kids is messy. It is okay if my nails tell a bit of that story.
So I fix the easy chips, cover what I can, swipe on top coat, then go right back to snacks, soccer practice, and slime clean-up. When I look back at photos and see my red nails with little pink hearts holding a chubby toddler hand or passing out cupcakes, I never see the tiny flaws. I only see joy, color, and a mom who let herself have a little fun.

Conclusion
When my day is loud, sticky, and nonstop, red nails with pink hearts feel like this tiny, happy secret I carry on my hands. They are bold enough to make me feel awake and sassy, but soft enough to match all the sweet parts of mom life, like chubby hugs and bedtime stories.
This look works so well for moms because it fits real life. Simple designs that are easy to wear with leggings, school tees, and date-night dresses. Quick at-home steps that can happen at the kitchen table after bedtime. Smart salon tips that keep the shape short, strong, and mom-friendly. Plus a few easy tricks to help that manicure survive dishes, bath time, and soccer cleats.
If you feel too tired for “fancy” nails, start tiny. On your next red manicure, try one little pink heart on a ring finger or thumb. Let it be your quiet reminder that you’re both sweet and sassy, soft and strong, all at once.
Self-care does not have to be big or expensive. It can be small, fun, and totally mom-friendly. A few minutes of polish, a couple of pink hearts, and you get to feel just a bit more like you in the middle of all the chaos.
This post may contain affiliate links. Read the full disclosure here.