
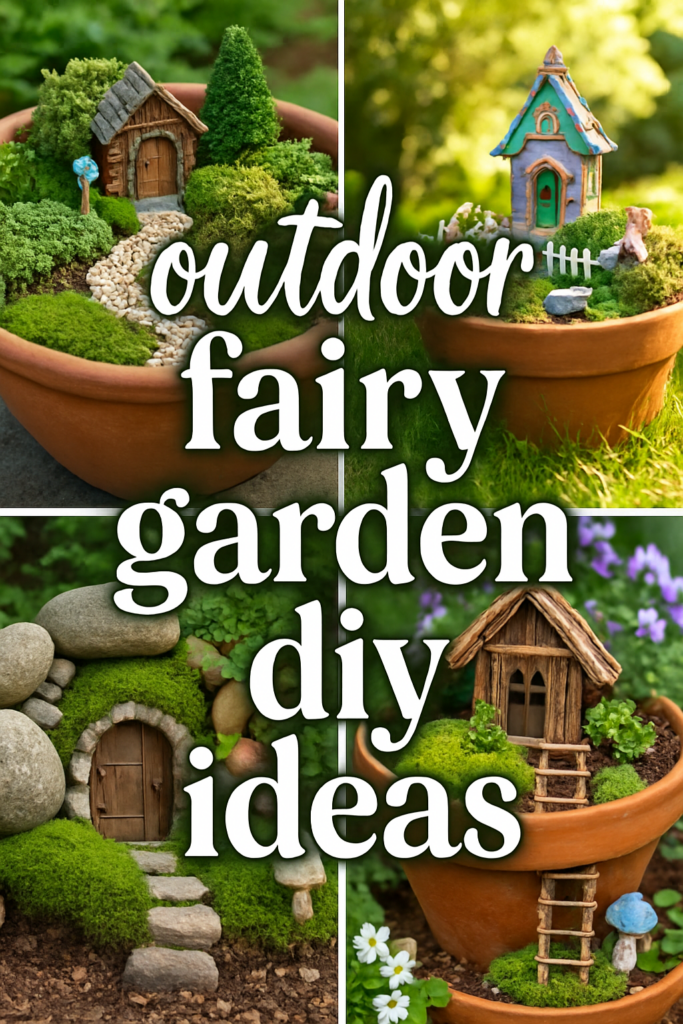
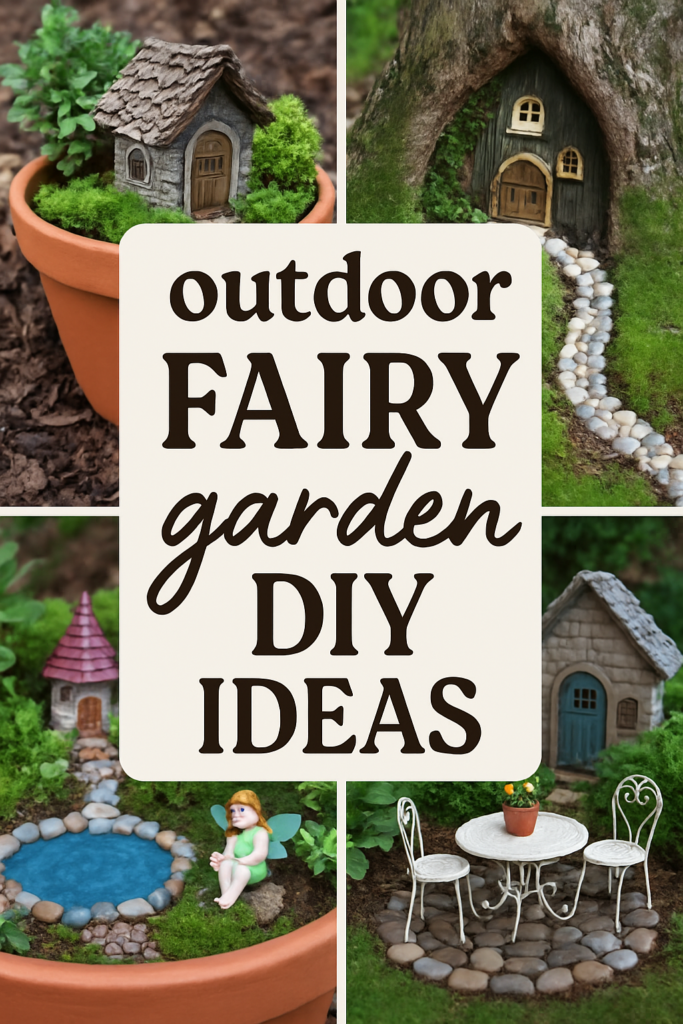
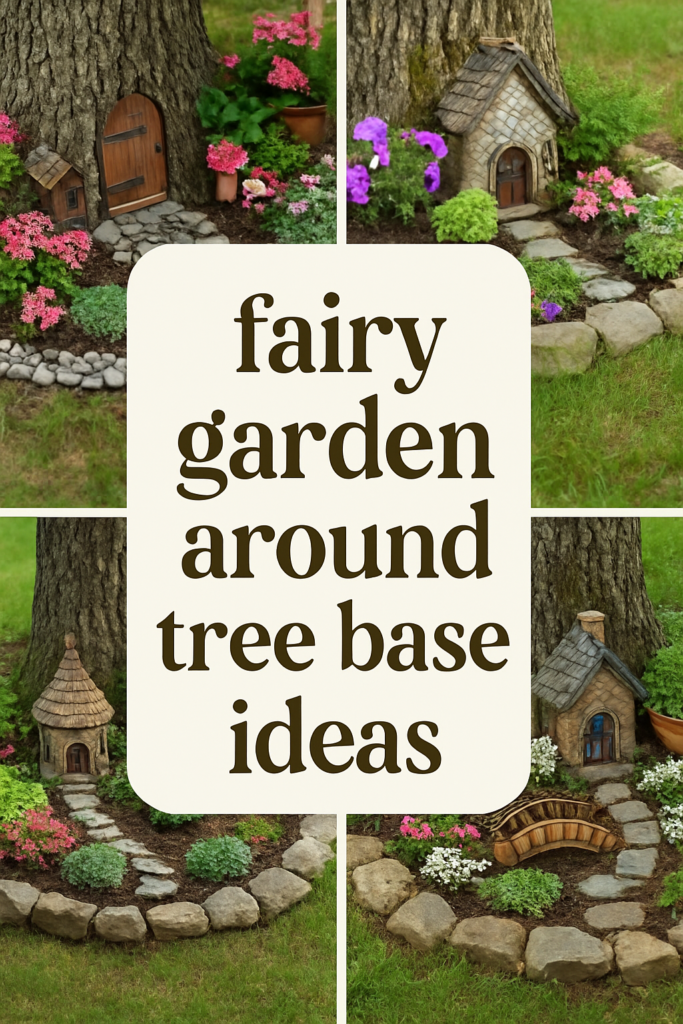
18 Fairy Garden Around Tree Ideas Full Of Enchanting Details
If you’re looking for a fun outdoor project that’ll have your kids absolutely mesmerized, let me tell you about fairy gardens around trees! As a mom of three energetic boys, I’m always searching for creative ways to get them excited about spending time in the backyard, and creating a fairy garden around tree bases has been an absolute game-changer for us. There’s something so magical about transforming an ordinary tree into a whimsical fairy dwelling that sparks imagination and creativity!
The best part about fairy garden around tree ideas is that they work with any size yard and any type of tree! Whether you have a massive oak or a small ornamental tree, you can create an enchanting little world that’ll have neighborhood kids peeking over your fence. Plus, these projects are perfect for getting the whole family involved – my boys love helping me arrange the tiny furniture and create miniature pathways. Let’s dive into these absolutely adorable ideas that’ll transform your outdoor space into a magical fairy realm!
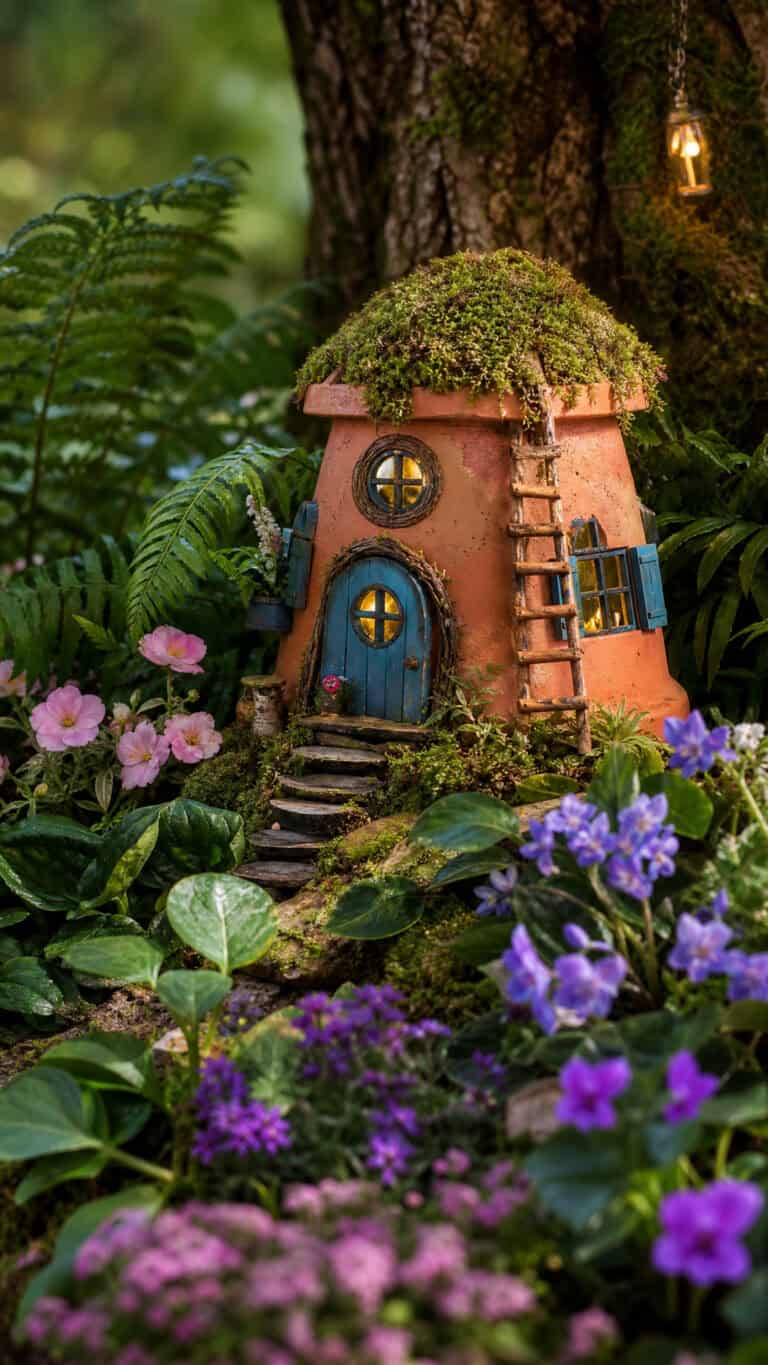
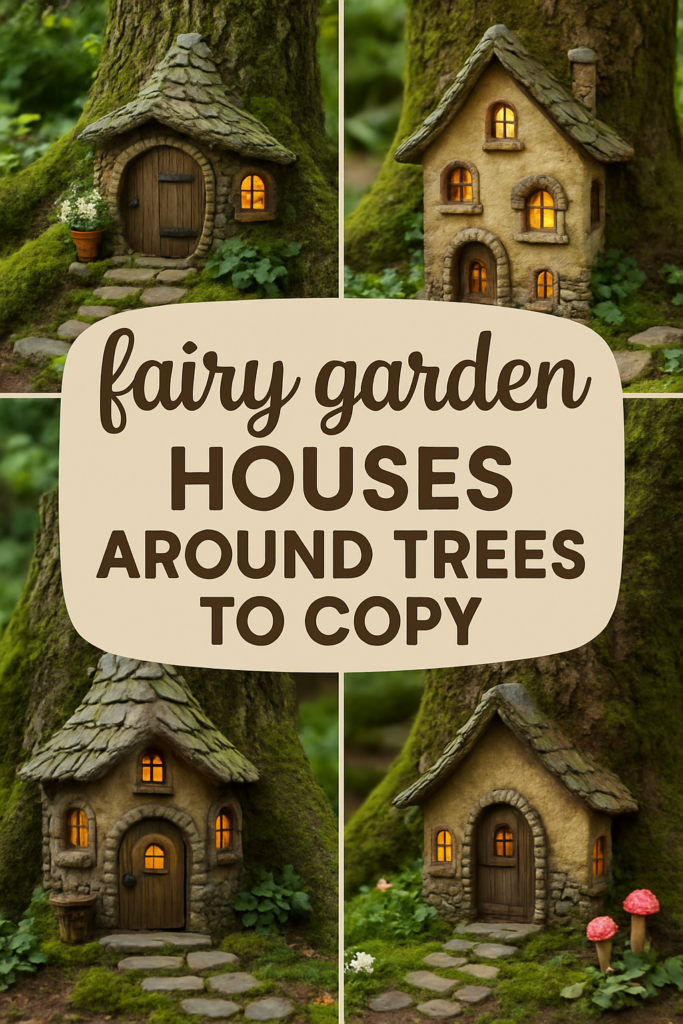
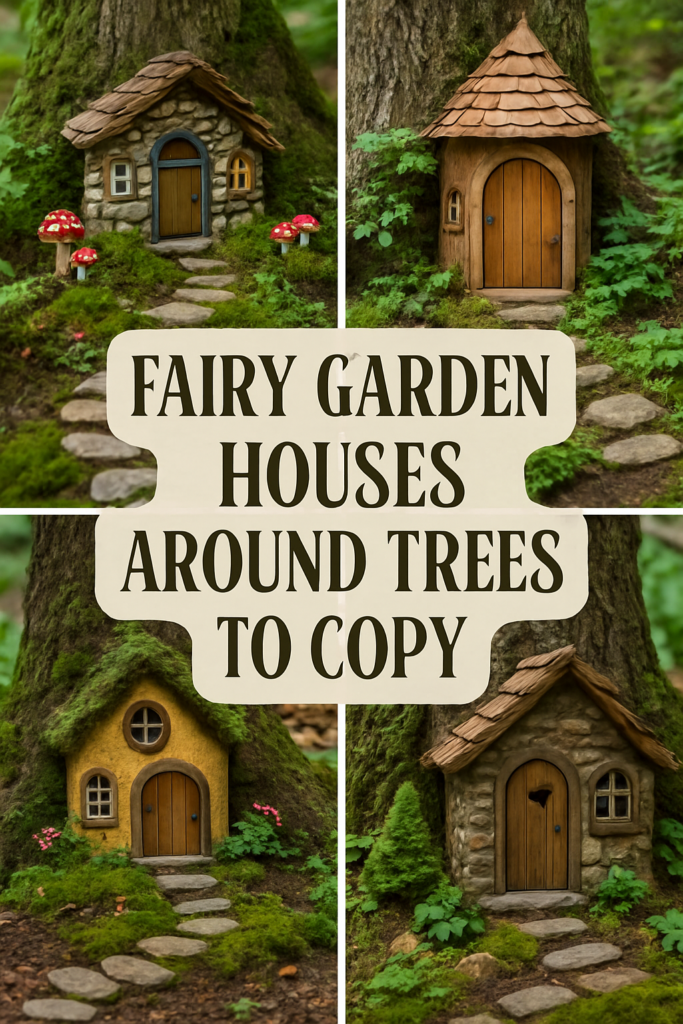
Rustic Fairy Door Welcome
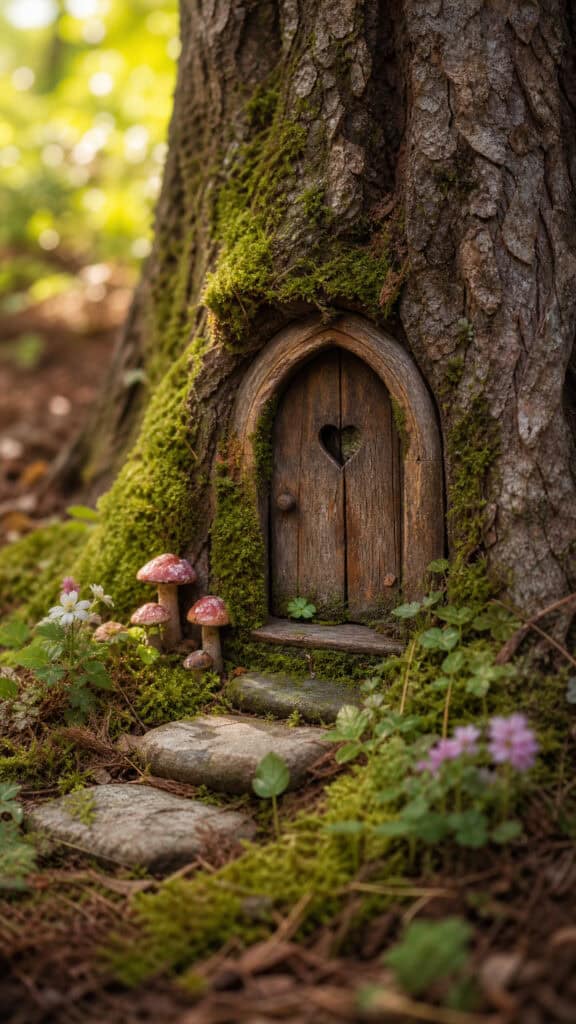
Creating a fairy garden around tree starts with the most important element – the door! Installing a charming little fairy door at the base of your tree instantly transforms it into a magical dwelling. I absolutely love using weathered wood doors with tiny brass handles because they look like they’ve been there forever! You can find these adorable doors at craft stores or make your own with popsicle sticks and a little paint.
Position your fairy door between the tree roots for the most natural look, and add some moss around the edges to help it blend seamlessly. My boys get such a kick out of checking the door every morning to see if any fairies have visited overnight! You can even leave tiny notes or sprinkle a bit of glitter nearby to keep the magic alive. Add some miniature stepping stones leading up to the door, and maybe a teeny tiny welcome mat – these little details really bring the whole scene to life!
For extra enchantment, consider installing a small solar light above the door so it glows at dusk. Trust me, watching your fairy garden around tree light up in the evening is absolutely breathtaking! You can also swap out seasonal decorations around the door – tiny pumpkins in fall, miniature wreaths in winter, and fresh flowers in spring!
Spiral Staircase Magic
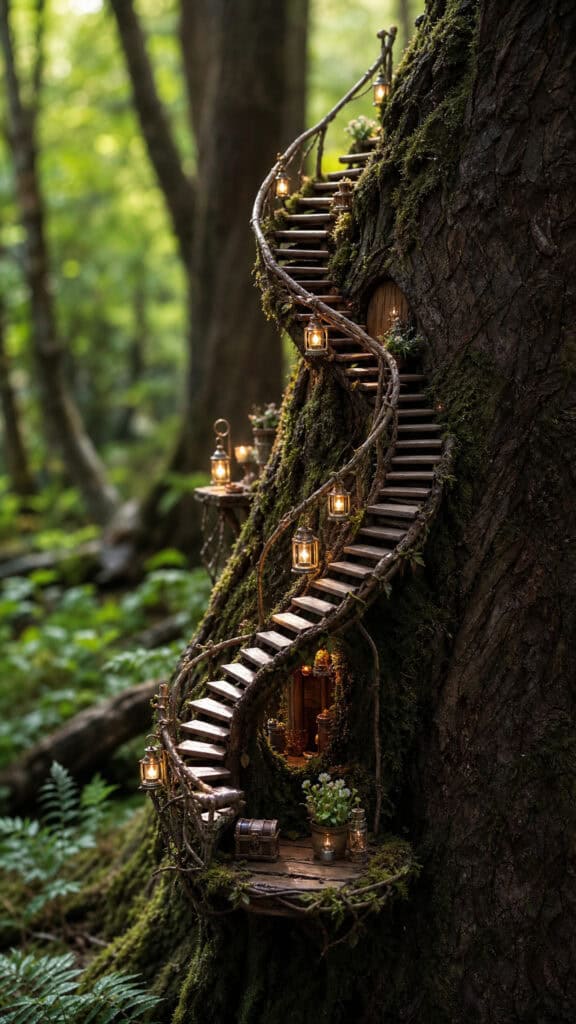
One of my absolute favorite fairy garden around tree ideas is adding a spiral staircase that winds up the trunk! This creates such a whimsical effect and makes it look like fairies are living in a multi-level treehouse. You can purchase pre-made miniature staircases or create your own using twigs, wire, and a hot glue gun. My middle son spent an entire afternoon helping me position ours just right!
The key to making a spiral staircase look natural is securing it properly without damaging your tree. I use small Command strips or gentle wire that won’t harm the bark. Start at the base near your fairy door and wind the staircase upward, maybe adding a tiny landing or two along the way. You can even place miniature lanterns on the steps for added charm!
Don’t forget to add little details along the staircase path – maybe a tiny broom leaning against one step, or a miniature watering can on a landing. These small touches make your fairy garden around tree feel lived-in and loved! My boys enjoy rearranging these accessories, which keeps them engaged with the garden all season long.
Mushroom Village Cluster
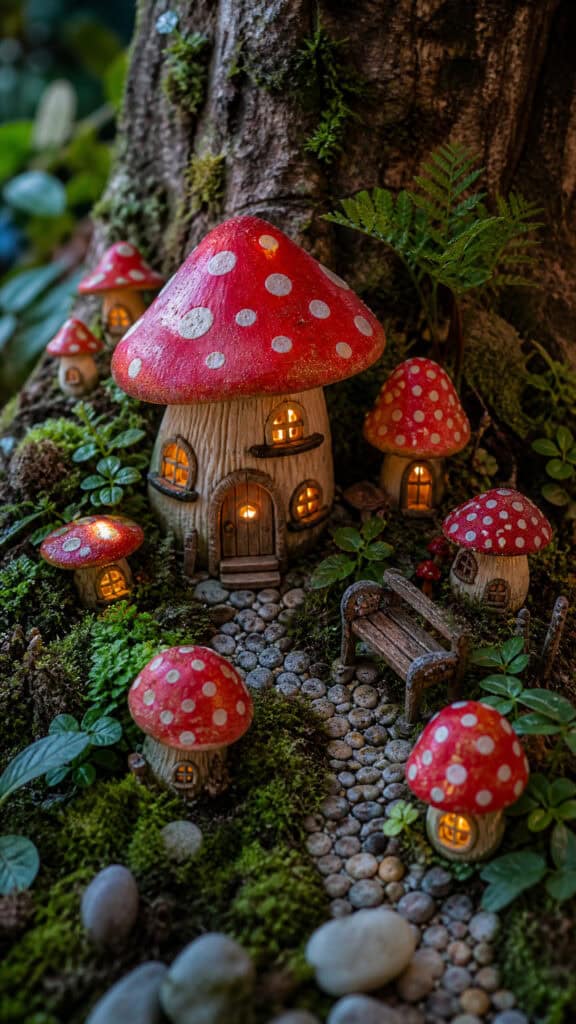
Creating a mushroom village around your tree base is such an adorable way to expand your fairy garden around tree! I’m talking about those cute spotted toadstools in various sizes clustered together like a little fairy neighborhood. You can buy ceramic or resin mushrooms, or get crafty and make your own using painted rocks and bowls. My boys think these look like fairy houses, and honestly, I’m not correcting them because it’s too cute!
Arrange your mushrooms in groups of odd numbers – three or five looks most natural – and vary the heights for visual interest. Tuck them between tree roots and nestle them into moss for that authentic woodland feel. Some mushrooms can be tall and skinny while others are short and stout, creating a diverse little community!
I love adding tiny windows and doors to some of the larger mushrooms to make them look inhabited. You can paint these details on or attach miniature accessories. Place some pebbles around the mushrooms to create little pathways between them, and maybe add a miniature bench or two where fairies can rest. This setup creates such a charming fairy garden around tree that even adults can’t help but smile when they see it!
Miniature Garden Bed Borders
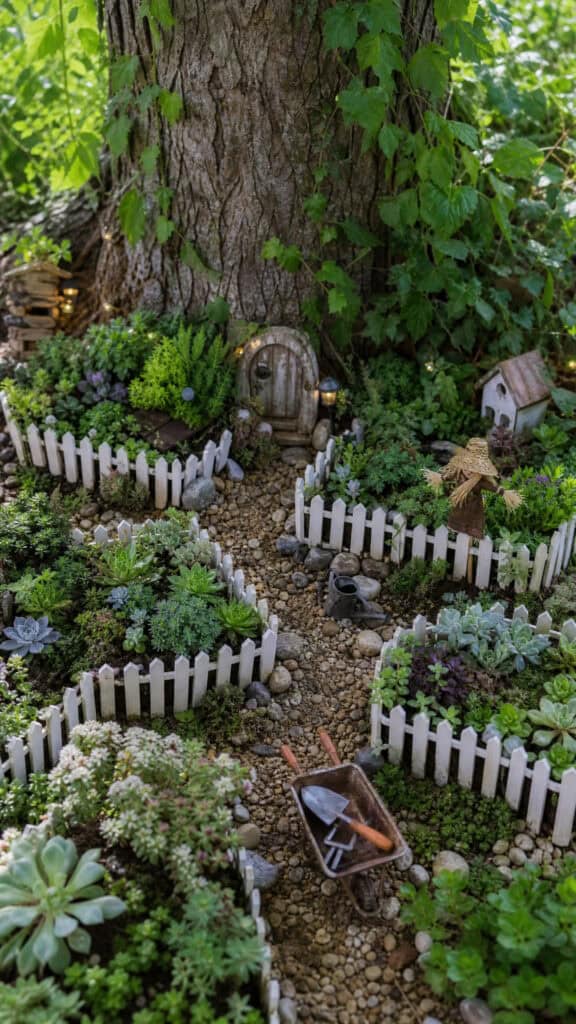
Oh, this idea is just precious! Creating actual miniature garden beds around your fairy garden around tree adds so much dimension and realism. Use tiny picket fences, small stones, or even twigs tied together to create borders for these itty-bitty gardens. I’ve found that using low-growing plants like baby tears, miniature sedums, or tiny succulents works perfectly for fairy-sized gardens!
Plant your miniature garden beds in sections around the tree base, leaving space for pathways and other fairy accessories. You can create a vegetable garden with tiny clay vegetables, a flower garden with the smallest blooms you can find, or even an herb garden with mini rosemary or thyme plants. My boys love helping water these tiny gardens with their own miniature watering cans!
Add teensy garden tools leaning against the fence, maybe a small wheelbarrow filled with moss, and definitely include a scarecrow no bigger than your thumb! These details make your fairy garden around tree look like a working homestead. I change out the seasonal plantings too – pansies in spring, petunias in summer, and mums in fall. It keeps the garden looking fresh and gives us a fun project every few months!
Twinkling Fairy Light Canopy
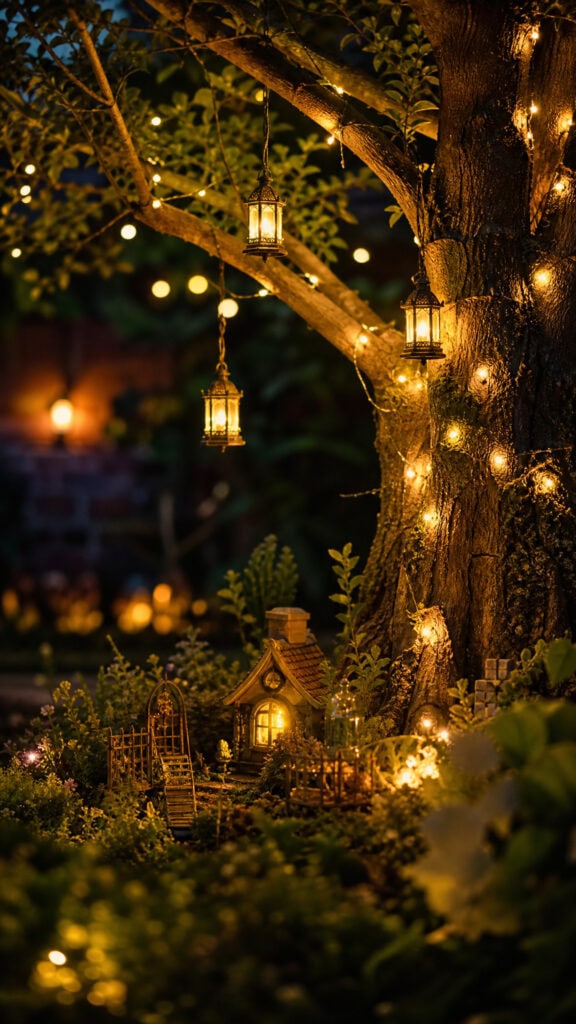
Let me tell you, adding lights to your fairy garden around tree takes it from adorable to absolutely magical! String some battery-operated fairy lights around the lower branches and down the trunk to create an enchanting glow at night. Solar-powered options are even better because you don’t have to remember to turn them on – they just automatically light up at dusk!
I like to weave the lights through the branches in a natural way, not too structured or perfect. Let them drape and dangle a bit for that organic, whimsical look. You can also add tiny lanterns hanging from branches using fishing line so they appear to float. My boys absolutely insist on checking the fairy garden every evening once the lights come on – it’s become our little family ritual!
For extra sparkle, consider adding some reflective elements like small mirrors or glass beads that’ll catch and reflect the light. You can even place tiny LED tea lights inside miniature lanterns positioned around the base. The combination of all these twinkling elements makes your fairy garden around tree look absolutely enchanted, especially on warm summer evenings when we’re all outside enjoying the backyard!
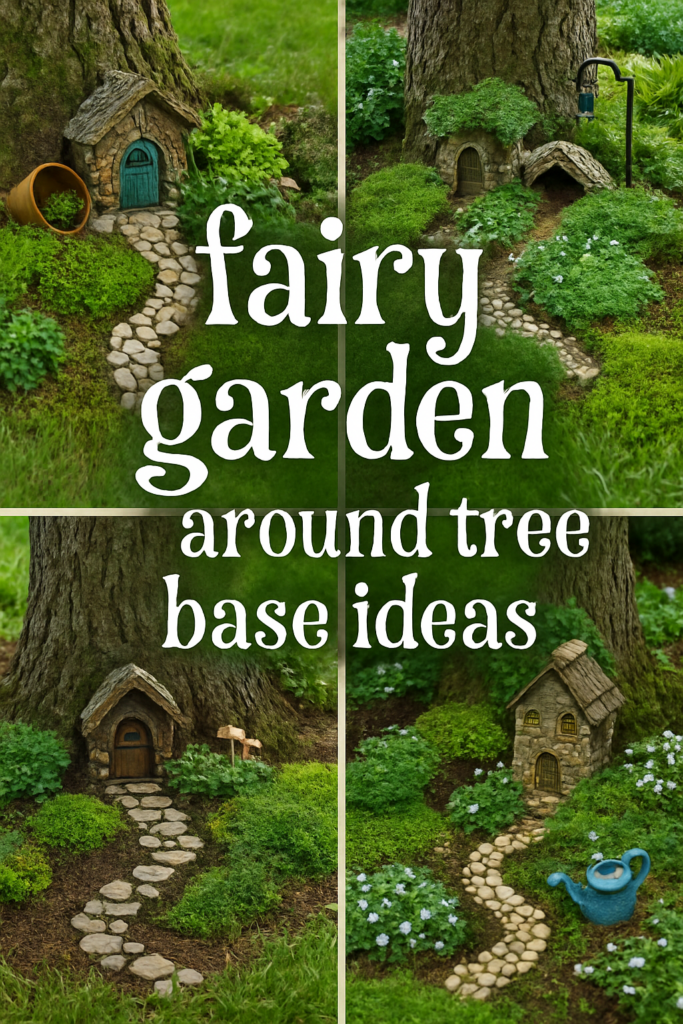
Pebble Pathway Paradise
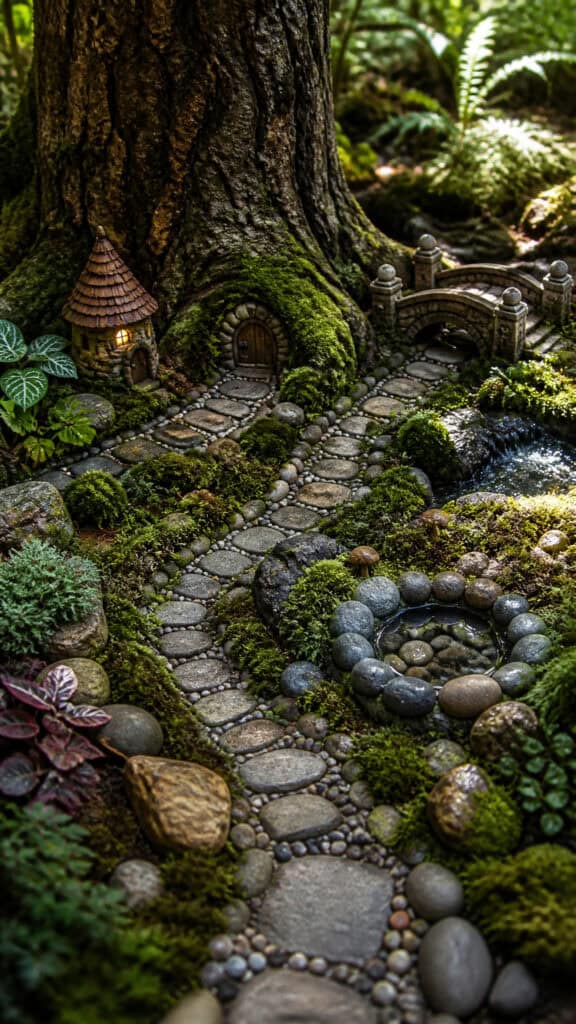
Creating pathways is essential for any fairy garden around tree because it helps define the space and guides the eye through all your adorable details! I’m obsessed with using small pebbles, flat stones, or even glass beads to create winding paths that meander around the tree base. The key is making them look natural and well-worn, like fairies have been walking these paths for years!
Start by laying out your pathway design using sand or flour to mark where you want it to go. Then press your pebbles or stones into the soil, making sure they’re level and stable. I like to edge the pathways with moss or tiny plants to make them look more established. You can create a main pathway that circles the tree with smaller paths branching off to different fairy garden areas – maybe one leading to the door, another to the mushroom village, and another to the garden beds!
My boys love collecting interesting pebbles from our walks to add to the pathways. Sometimes we use glow-in-the-dark pebbles for extra magic at night! You can also create patterns with different colored stones or arrange them in a stepping-stone style. These pathways really tie together all the elements of your fairy garden around tree and make it feel like a complete, cohesive little world!
Miniature Furniture Sitting Area
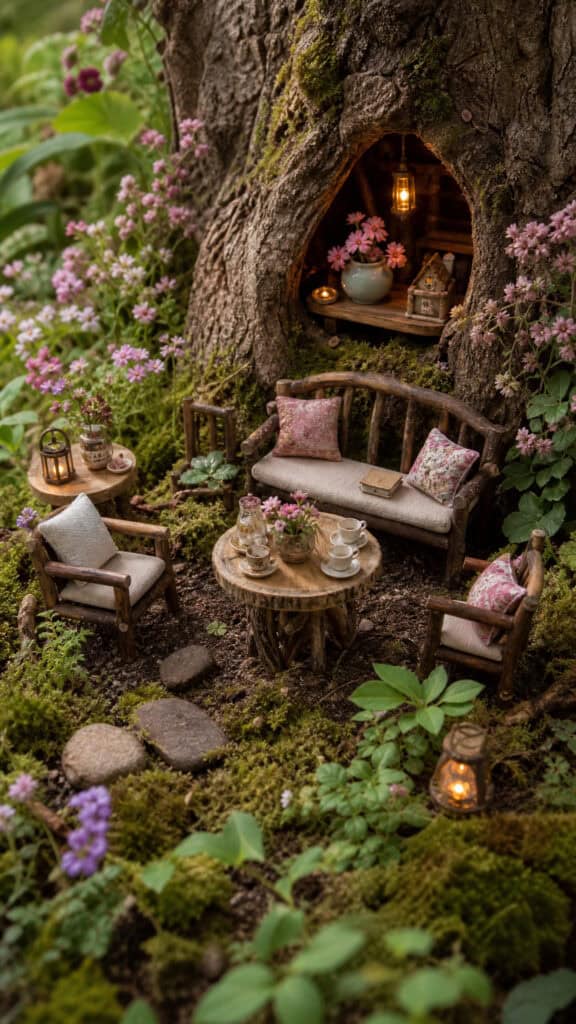
Creating a tiny sitting area is one of my favorite fairy garden around tree ideas because it adds such personality and charm! Picture this: a miniature bench, a tiny table, maybe even some itty-bitty chairs arranged in a cozy conversation area. You can find these adorable pieces at craft stores, or if you’re feeling creative, make them from twigs, bottle caps, and other natural materials!
Position your furniture in a shaded spot under the tree where fairies might naturally want to rest. I like to add a miniature tablecloth made from fabric scraps and set the table with teensy dishes and cups. Sometimes I’ll place a tiny book or newspaper on the bench, or a miniature knitting basket beside a chair. These little details make it look like the fairies just stepped away for a moment!
Don’t forget to create a floor for your sitting area – maybe a circle of flat stones or a piece of bark. Add some cushions made from buttons or fabric scraps to the chairs for extra coziness. My boys love rearranging the furniture and having their action figures visit the fairy garden around tree for tea parties. It’s become such a fun imaginative play space for them!
Moss Carpet Foundation
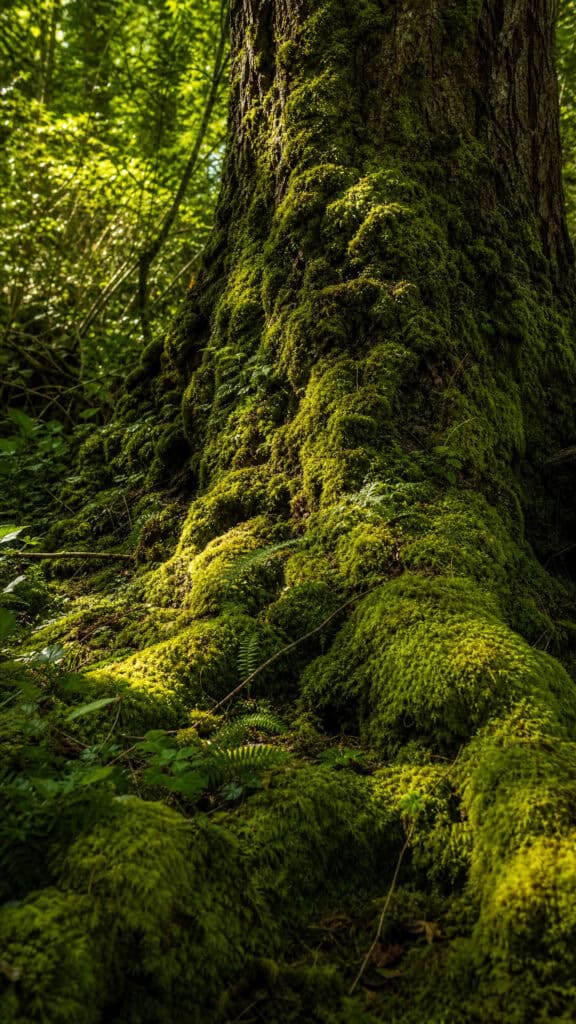
Okay, can we talk about moss for a minute? It’s absolutely the foundation of any amazing fairy garden around tree! Moss creates that lush, magical carpet that makes everything look like it belongs in an enchanted forest. I buy sheets of preserved moss from craft stores, but you can also transplant moss from other areas of your yard if you have it growing naturally!
Apply moss generously around the base of your tree, tucking it between roots and creating a soft green blanket for all your fairy accessories to sit on. The moss helps blend everything together and makes your garden look established and natural. Plus, it helps retain moisture for any living plants you’ve included! I press it firmly into the soil and mist it regularly to keep it looking fresh and green.
You can use different types of moss to create texture and interest – sheet moss for large areas, reindeer moss for accents, and mood moss for a fluffier look. Layer them together for depth! The moss also provides the perfect backdrop for all those tiny details in your fairy garden around tree. My boys think it looks like a miniature golf course, which honestly isn’t far off! It’s just so satisfying to see that vibrant green covering transforming the tree base into something truly magical!
Tiny Pond With Bridge
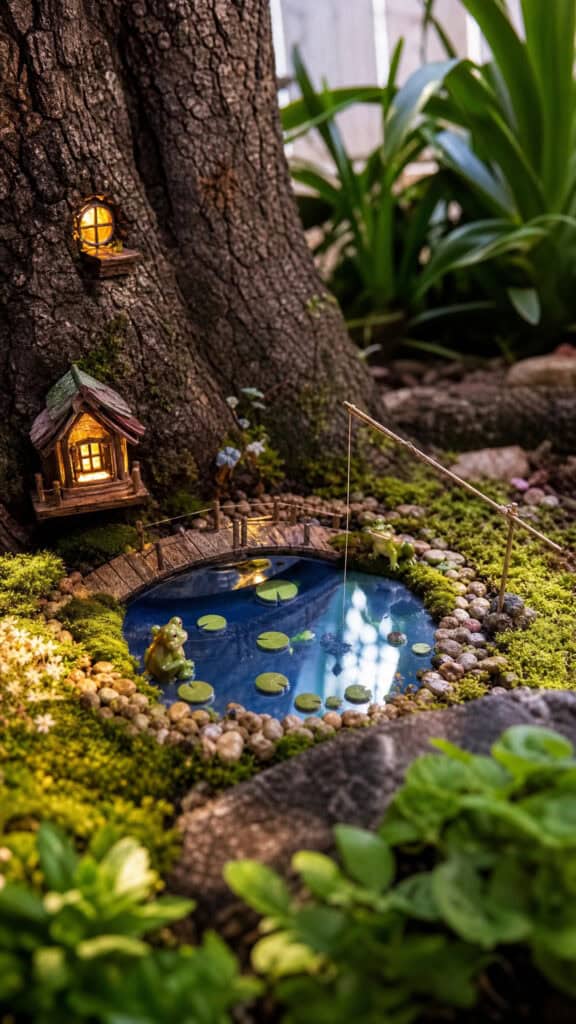
Adding a miniature pond to your fairy garden around tree is such a showstopper! I use a shallow dish, a small mirror, or even a piece of blue glass to create the water effect. Position it at the base of your tree and surround it with small rocks, moss, and maybe some miniature cattails or water plants. The reflection adds such a beautiful dimension to the whole garden!
Here’s where it gets really cute – add a tiny bridge over your pond! You can make one from popsicle sticks, small twigs, or buy a pre-made miniature bridge. My boys helped me build ours using hot glue and craft sticks, and they were so proud of the result! Position the bridge so it connects two areas of your fairy garden, maybe with pathways leading to and from it.
Decorate around your pond with miniature fishing poles, tiny lily pads (you can make these from green felt or foam), and maybe a small boat or two. I’ve even added miniature frogs and turtles! Some people use actual water in their ponds, but I prefer the mirror or glass approach because it’s lower maintenance and doesn’t attract mosquitoes. This element really elevates your fairy garden around tree to the next level of enchantment!
Seasonal Decoration Rotation
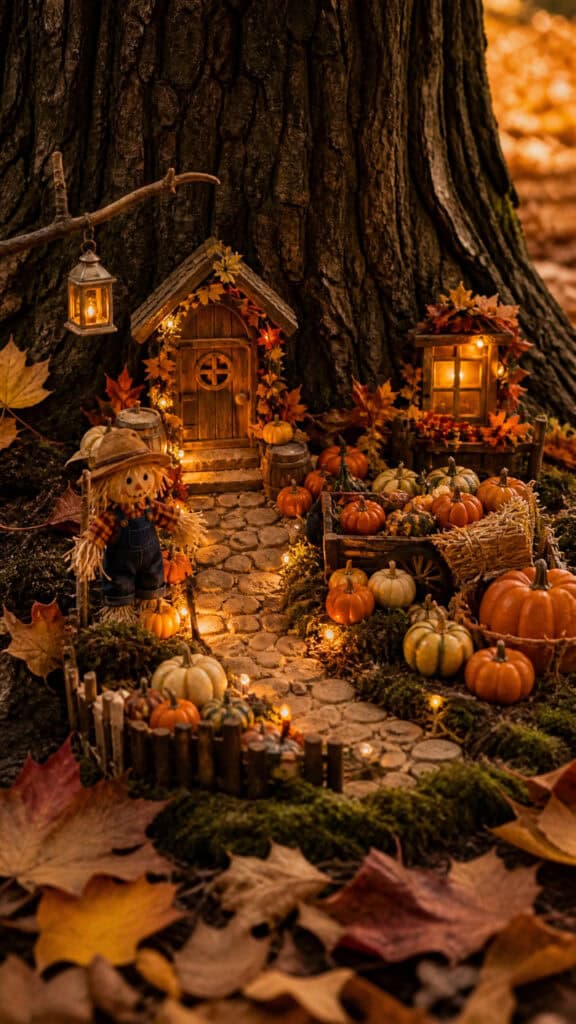
One thing I absolutely love about maintaining a fairy garden around tree is changing it up with the seasons! This keeps it fresh and exciting, and my boys look forward to helping me redecorate throughout the year. In spring, we add tiny Easter eggs, miniature bunnies, and fresh flowers. Summer brings beach chairs, tiny umbrellas, and bright colors everywhere!
Fall is my favorite season for fairy garden decorating – we add miniature pumpkins, tiny hay bales, a scarecrow, and autumn leaves. I’ve even created a tiny harvest festival scene with a miniature corn maze! Winter transforms our fairy garden around tree into a wonderland with fake snow, tiny evergreen trees, miniature sleds, and holiday lights. We’ve made tiny snowmen and even a miniature ice skating rink using a small mirror!
The key is storing your off-season decorations in labeled containers so you can easily rotate them. This approach means you’re always working with your fairy garden, keeping it maintained and loved. Plus, it gives you an excuse to keep shopping for adorable miniatures! My boys have started asking when we’re going to change the fairy garden for the next season, which means they’re actually paying attention to the changing world around them. That’s a parenting win in my book!
Climbing Vine Enhancements
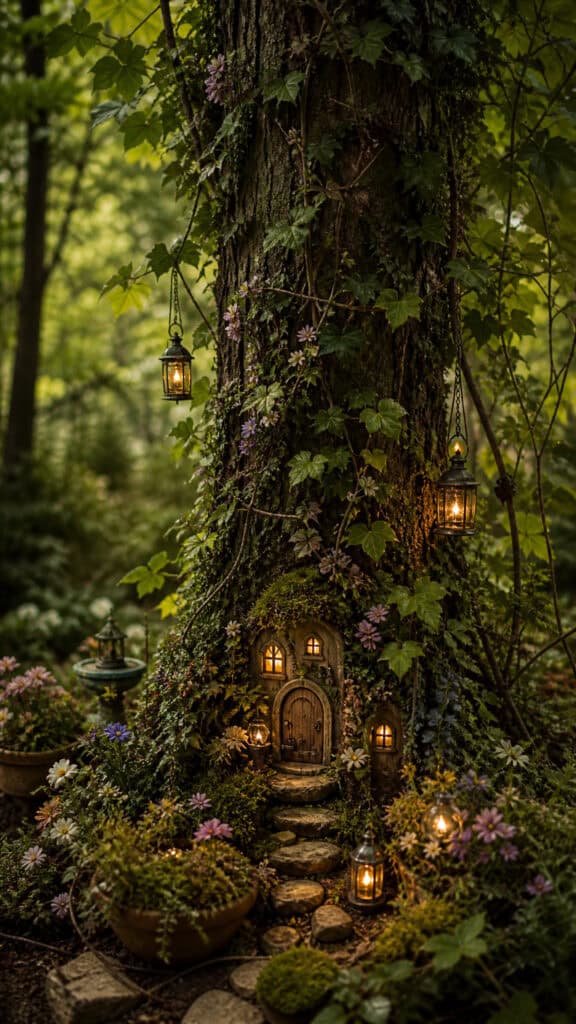
Using climbing vines in your fairy garden around tree adds such a natural, overgrown fairy tale look! I plant small, slow-growing vines like creeping fig or miniature ivy near the base and gently train them to climb up the trunk. You can also use artificial vines if you want more control over the look or if your tree isn’t suitable for planting around!
The vines create a gorgeous backdrop for all your fairy accessories and make the tree look even more magical and ancient. I like to weave tiny flowers into the vines or attach miniature lanterns that appear to be hanging from the foliage. You can also use the vines to help hide any mechanical elements like battery packs for lights or the edges of your moss!
For faster results, use artificial garlands designed for miniature gardens – they come in various styles from flowering vines to simple ivy. Wrap them around the trunk and secure them with small pieces of wire or fishing line. The combination of climbing vines with all the other elements creates such a lush, established look for your fairy garden around tree. It really makes it seem like fairies have been living there for generations!
Miniature Clothesline Charm
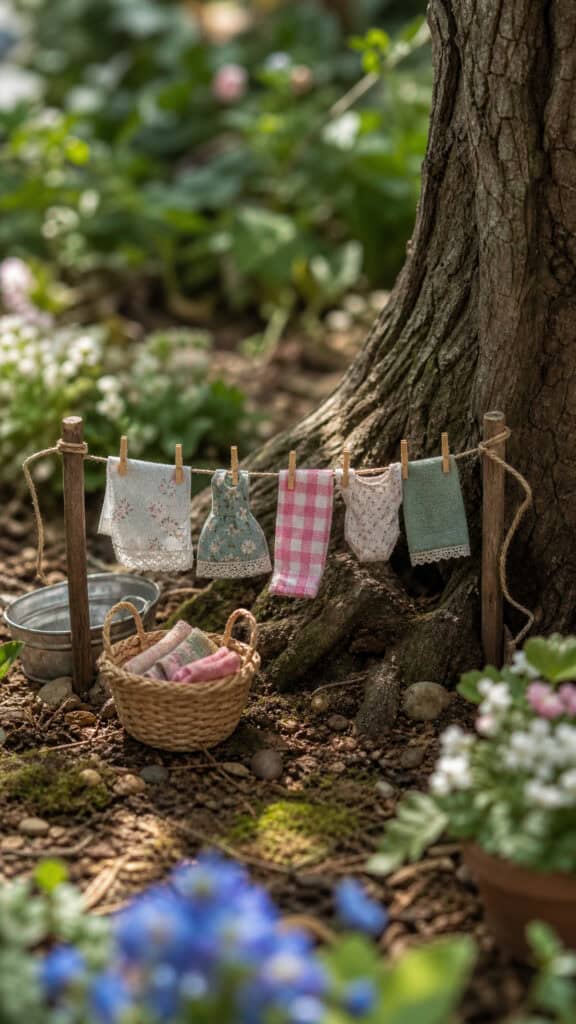
Oh my goodness, this detail is just too adorable! Adding a tiny clothesline to your fairy garden around tree brings such a homey, lived-in feel! String a piece of thin wire or thread between two small stakes or attach it from the tree to a nearby twig. Then hang miniature clothes using teensy clothespins – you can make the clothes from fabric scraps or buy them from dollhouse supply stores!
I love creating seasonal clothing for the clothesline – tiny swimsuits in summer, miniature sweaters in fall, and small scarves in winter. My boys think it’s hilarious and always want to know what the fairies are wearing! You can also hang tiny towels, a miniature quilt, or even fairy-sized bedsheets. These little details make your fairy garden feel like a real community!
Position the clothesline near the fairy door or sitting area so it looks like part of the fairy’s daily life. Add a small laundry basket at one end filled with moss (representing more laundry) and maybe a miniature iron or washing board nearby. The clothesline adds movement to your fairy garden around tree too, especially if the tiny clothes flutter in the breeze. It’s such a simple addition but it really brings the whole scene to life!
Rock Garden Accent Wall
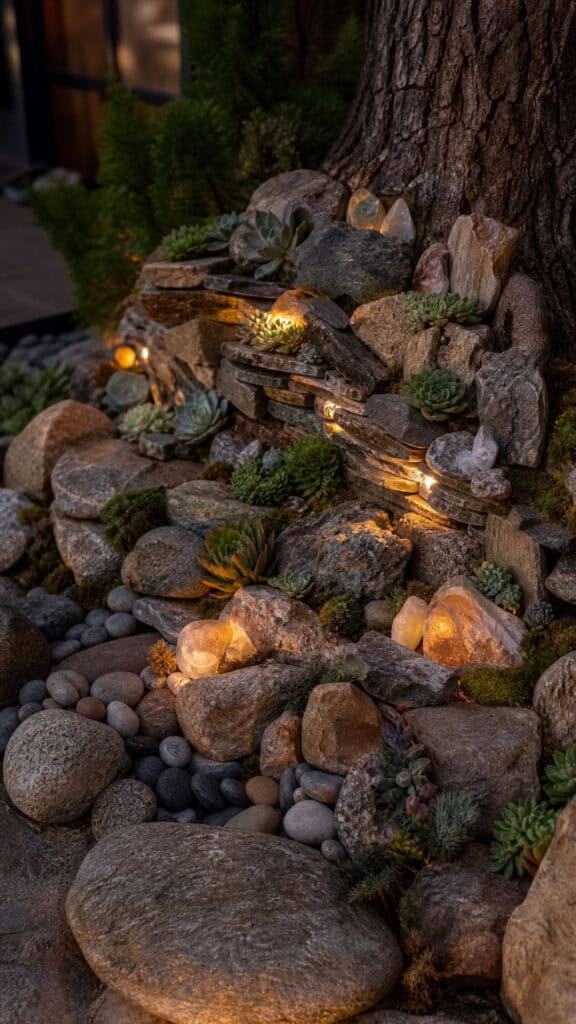
Creating a miniature rock garden or accent wall in your fairy garden around tree adds amazing texture and dimension! Stack small flat stones to create a tiny retaining wall or arrange interesting rocks in a decorative pattern. I love using stones with different colors and textures – some smooth river rocks, some rough granite pieces, and maybe some sparkly quartz for extra magic!
You can build your rock wall to create different levels in your fairy garden, which is especially helpful if your tree is on a slope. Tuck moss and tiny plants between the rocks for that aged, established look. Sometimes I hide small treasures in the rock wall – a tiny crystal, a small coin, or a miniature fairy figurine peeking out from between stones!
The rock garden area is also perfect for adding miniature succulents and cacti, which are super low-maintenance and look adorable at fairy scale! Arrange them in patterns or create a small rock garden section of your fairy garden around tree. My boys love searching for special rocks on our walks to add to the collection. We’ve even painted some rocks to look like ladybugs and bees to add more whimsy to the space!
Fairy Garden Signage
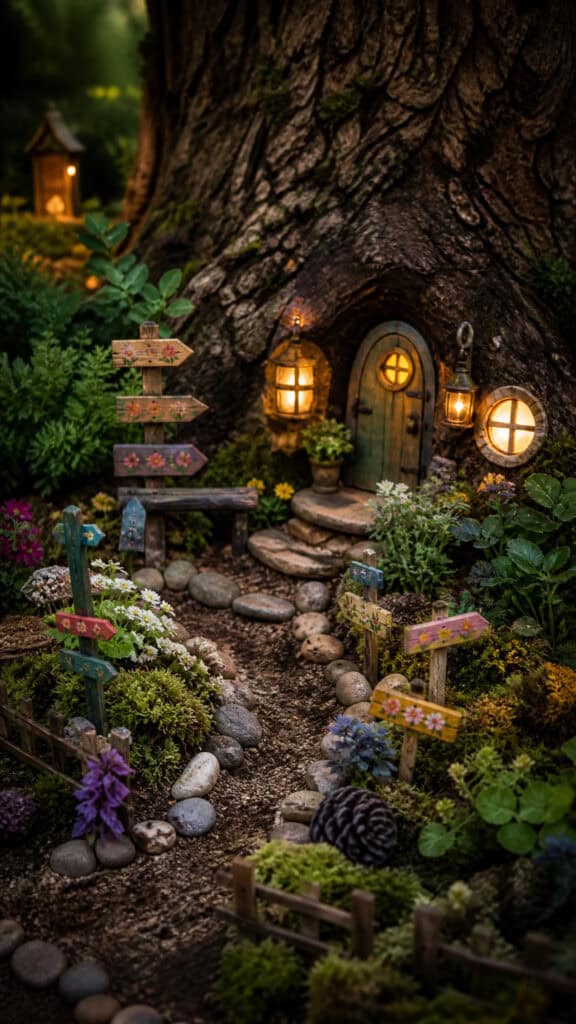
Adding tiny signs to your fairy garden around tree is such a fun way to add personality and humor! You can create directional signs pointing to different areas like “Fairy Cottage,” “Mushroom Village,” or “Enchanted Pond.” I make ours using popsicle sticks, toothpicks, and paint, but you can also buy adorable pre-made signs from craft stores!
Get creative with your signage – maybe add a “Welcome” sign near the door, a “Garden Rules” sign by the vegetable patch, or even a tiny “For Sale” sign as a joke! My boys love coming up with funny sign ideas, and we’ve included things like “Watch for Dragons” and “Fairy Crossing.” These little touches add so much character and give visitors something to discover as they explore your garden!
You can also add informational plaques, like a tiny historical marker explaining when the fairy village was established, or a small “Map of the Realm” showing all the different areas of your fairy garden around tree. Use weatherproof paint or seal your signs with clear coating so they last through the seasons. The signage really helps tell a story and makes your fairy garden feel like a complete, thought-out world!
Miniature Wheelbarrow And Tools
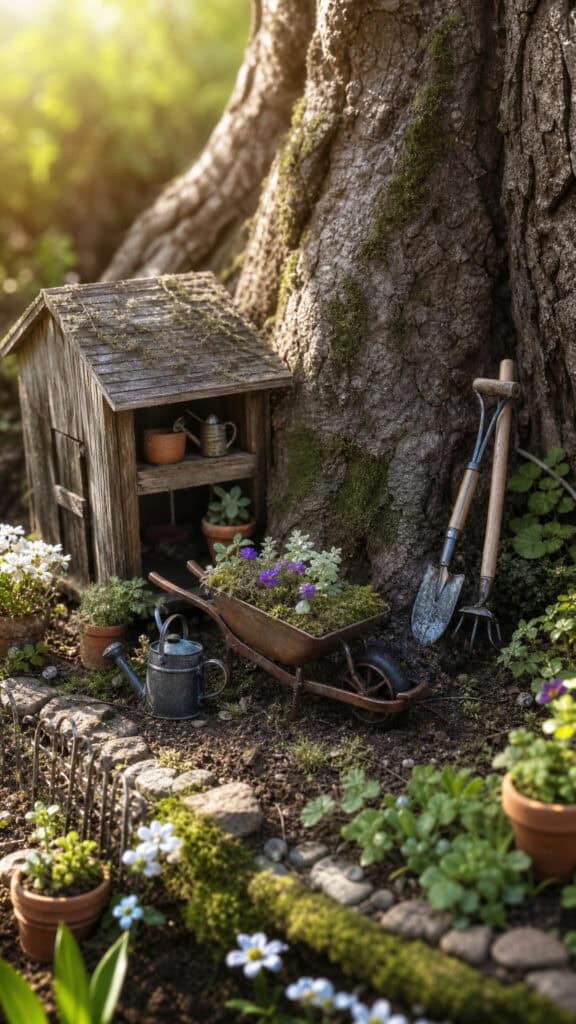
Every fairy garden around tree needs a working area, right? Adding miniature gardening tools and a tiny wheelbarrow creates such an authentic garden feel! You can find these adorable accessories at craft stores or online, and they’re usually pretty affordable. I’m talking about teensy shovels, rakes, watering cans, and a wheelbarrow that’s just too cute for words!
Arrange your tools leaning against the tree trunk or fence, or position them like they’re actively being used in the garden. Fill the wheelbarrow with moss, tiny flowers, or miniature vegetables. Sometimes I’ll add a small pile of pebbles nearby like the fairies are working on a landscaping project! These details make your fairy garden look lived-in and active.
You can also create a small tool shed using a wooden box or make one from popsicle sticks. My boys helped me build one, and we painted it red with white trim – it’s adorable! Store some of the tools inside and leave others scattered around the fairy garden around tree. Add a small garden hose made from string or thin rope, maybe some tiny plant pots, and definitely include a miniature broom for sweeping those fairy pathways. These working elements really complete the scene!
Hanging Basket Gardens

Don’t forget to use the vertical space in your fairy garden around tree! Hanging miniature baskets from the lower branches adds such a beautiful dimension and makes use of all that space above the ground-level garden. You can use tiny metal or wicker baskets filled with real or artificial flowers, or even create hanging planters from walnut shells or bottle caps!
I attach the baskets using fishing line so they appear to float, and I make sure they’re at different heights for visual interest. Fill them with trailing plants like string of pearls or baby tears that will cascade down beautifully. You can also use the baskets for fairy accessories – maybe one holds miniature bird feeders, another has tiny wind chimes, and another contains small lanterns!
The hanging baskets add movement to your fairy garden around tree, especially when they sway gently in the breeze. My boys love that they can see different details depending on where they’re standing! You can change out what’s in the baskets seasonally too – fresh flowers in spring, herbs in summer, and maybe miniature ornaments in winter. This vertical element really makes your fairy garden feel complete and fully realized!
Magical Fairy Figurines
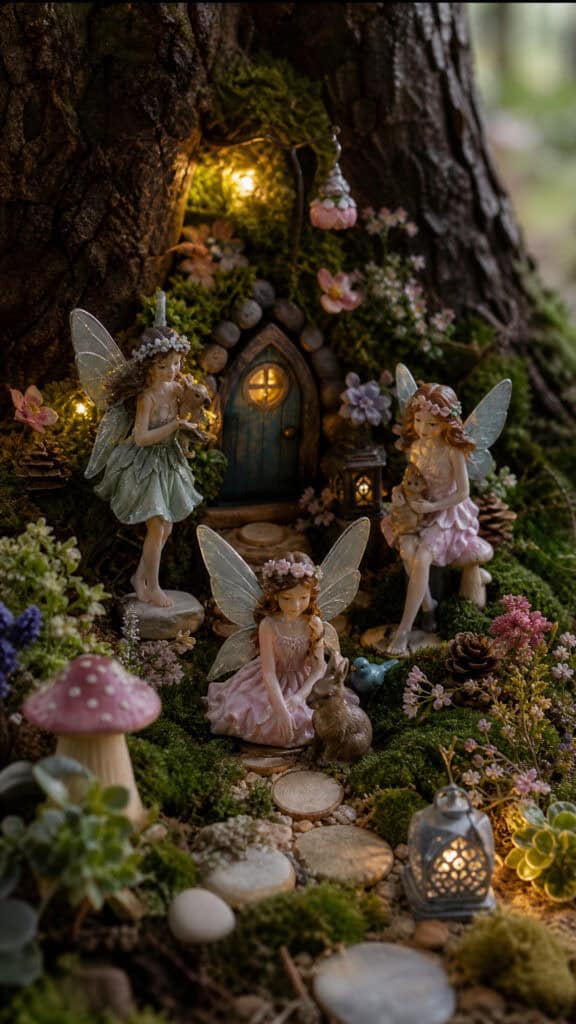
While your fairy garden around tree is beautiful on its own, adding actual fairy figurines brings the magic to life! I’ve collected several different fairy figures over time – some sitting, some standing, some with wings spread wide. My boys each picked out their favorite fairy to add to our garden, and they love checking to see if the fairies have “moved” to different spots!
Position your fairy figurines throughout the garden in natural poses – maybe one sitting on the bench reading, another tending the garden, and one peeking out from behind the mushrooms. You can also add other magical creatures like gnomes, unicorns, dragons, or woodland animals. The key is not overdoing it – you want the fairies to look like they’re naturally inhabiting the space, not like it’s overcrowded!
I like to rotate which fairies are “out” and which are stored away, so there’s always something new to discover in our fairy garden around tree. Sometimes we’ll add seasonal fairies – a fairy in a witch costume for Halloween or a fairy with a Christmas wreath in December. These little figures really complete the magical atmosphere and give the garden its personality. Plus, they’re just so darn cute that I can’t resist collecting them!
Bringing Your Fairy Garden Dreams To Life
Well, there you have it – eighteen absolutely enchanting ideas for creating your own fairy garden around tree! I hope you’re as excited as I am to get started on this magical project! The beauty of fairy gardens is that there’s no right or wrong way to do them – you can mix and match these ideas, add your own creative touches, and make it completely unique to your family. My boys and I have had so much fun building and maintaining our fairy garden, and it’s become a special place in our yard that we all treasure!
Remember, creating a fairy garden around tree doesn’t have to be expensive or complicated! Start with the basics – a door, some moss, a pathway, and maybe a few accessories – then build from there as your budget and inspiration allow. The most important thing is to have fun with it and let your imagination run wild! Your fairy garden will bring joy not just to your family, but to everyone who visits your yard. Now grab those kids, head outside, and start creating your own magical fairy world – I promise you won’t regret it!
This post may contain affiliate links. Read the full disclosure here.