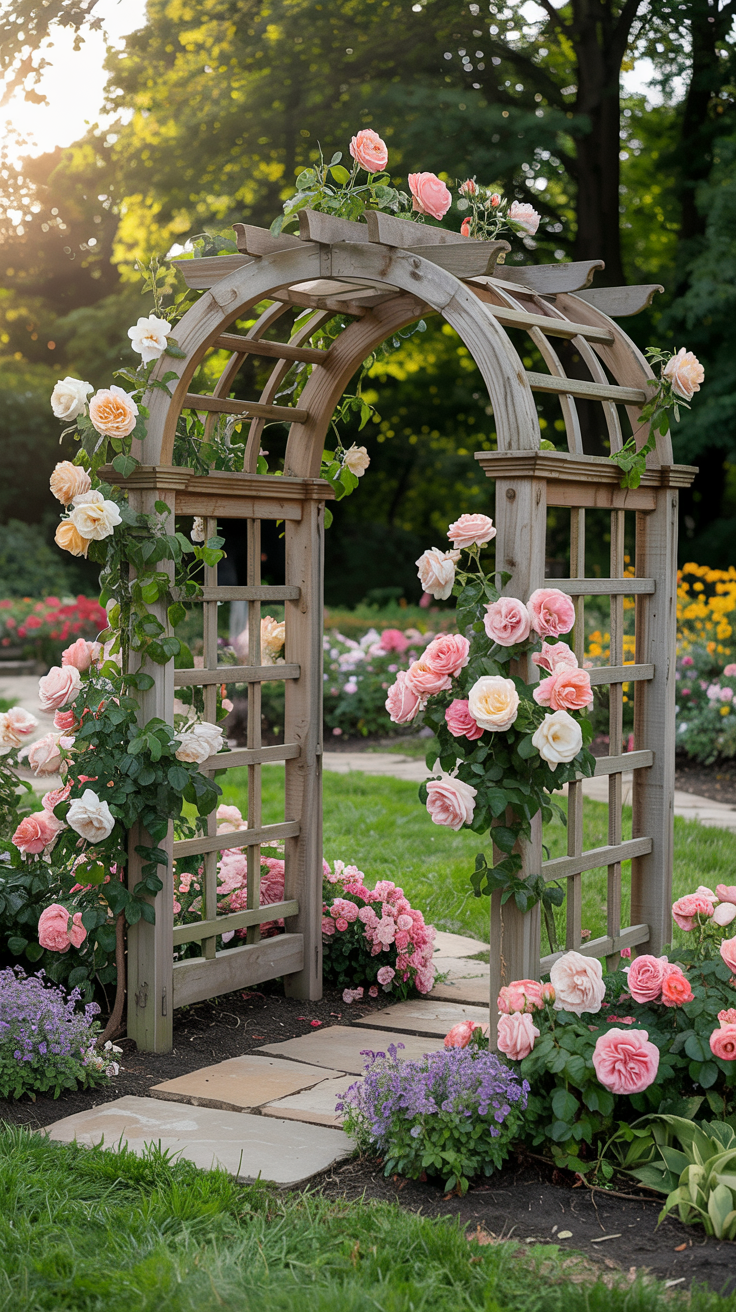
If you’re anything like me, you’re always looking for ways to make your backyard more fun and beautiful without breaking the bank or spending hours on maintenance. Between chasing my three boys around and trying to keep the house from looking like a tornado hit it, I’ve discovered that garden totems are absolute game-changers for adding personality to our outdoor space!
Garden totems are these amazing vertical art pieces that instantly transform any garden from boring to breathtaking! They’re like sculptures that reach for the sky, and the best part is they don’t take up much ground space (which means more room for the boys to run around!). Whether you’re into whimsical, modern, rustic, or colorful designs, there’s a garden totem style that’ll make your heart happy. Let me share some of my favorite ideas that’ll have your neighbors asking where you got them!
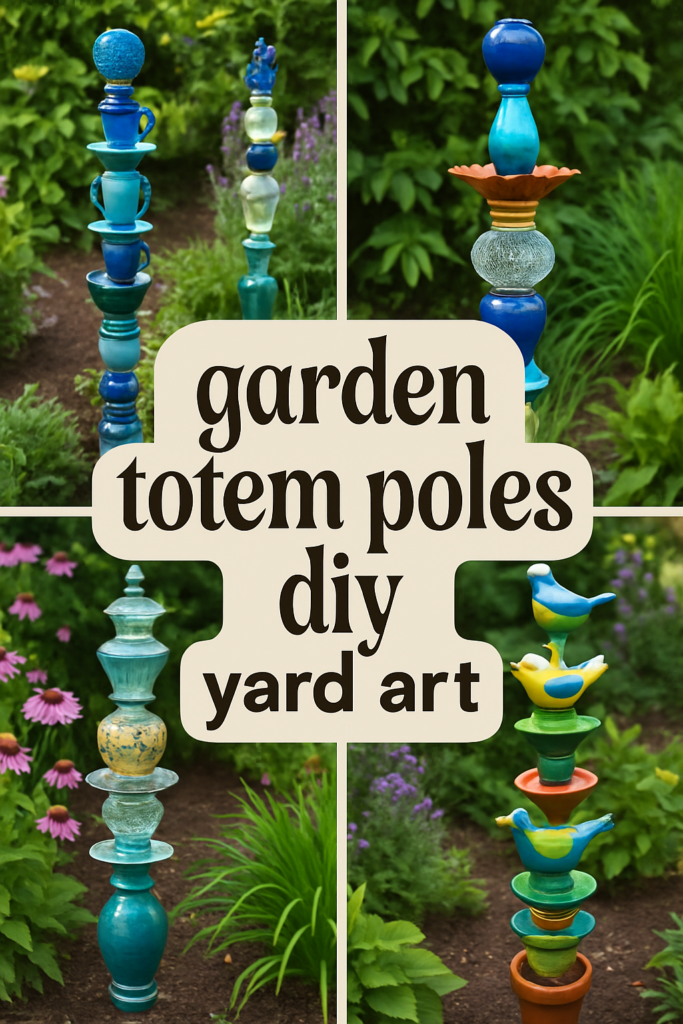
Stacked Glass Bowl Totem
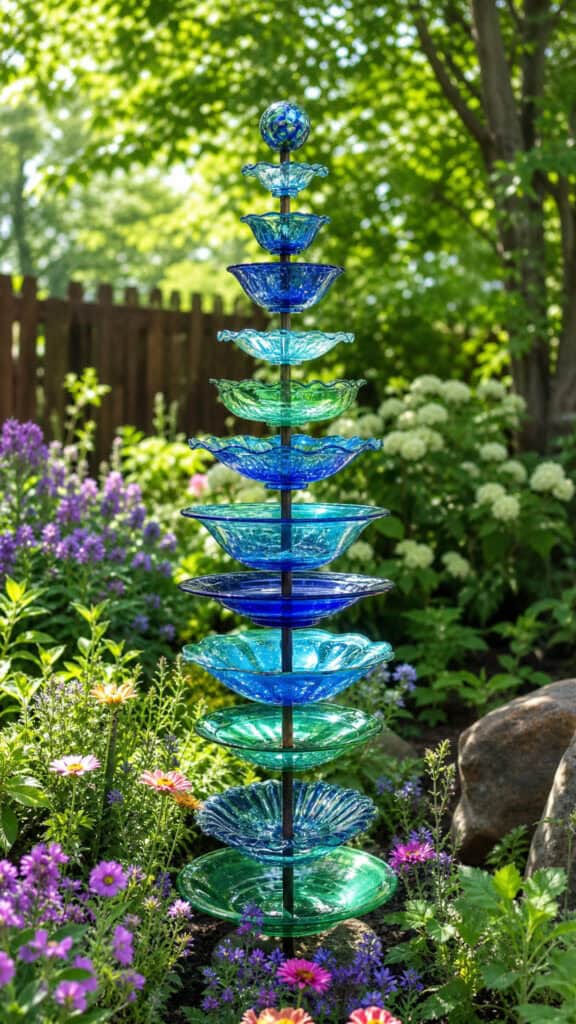
This is hands-down one of my favorite garden totem styles because it catches the sunlight so beautifully! You simply stack colorful glass bowls, plates, and vases on a metal rod or rebar, creating this stunning tower of color that sparkles throughout the day. I love hitting up thrift stores with my oldest son to hunt for unique glass pieces in blues, greens, and purples!
The best part about glass bowl totems is that they’re super forgiving for beginners. You don’t need any special tools beyond the metal rod and some strong adhesive or concrete base. My middle son loves helping me arrange the pieces before we secure them, and it’s become our special weekend project. Plus, when the morning dew hits the glass, it’s absolutely magical!
- Use weather-resistant adhesive to secure pieces permanently
- Mix different sizes and shapes for visual interest
- Consider adding glass gems or marbles between larger pieces
- Place in areas where sunlight will shine through the glass
Painted Terracotta Pot Tower
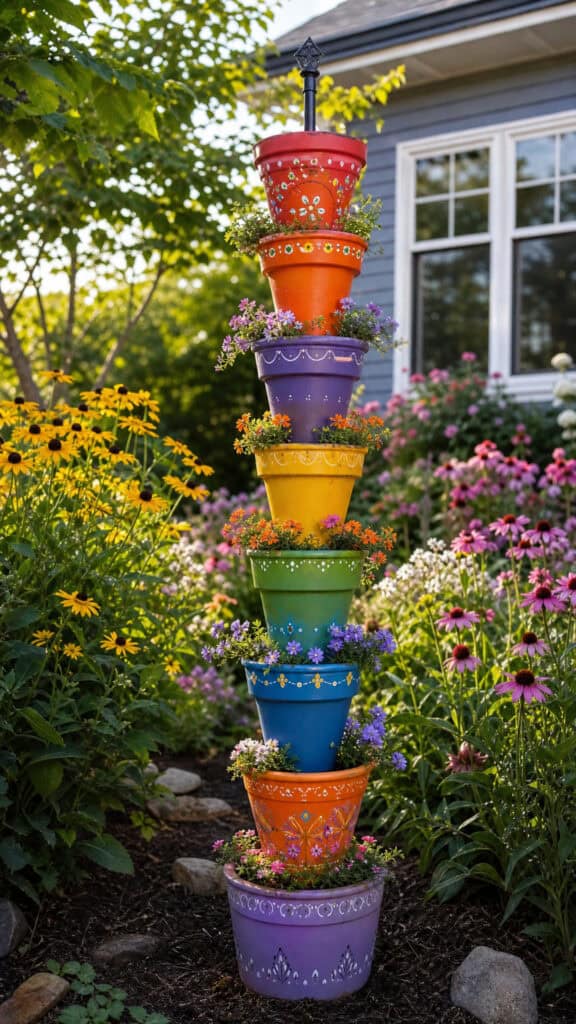
Talk about budget-friendly and kid-friendly! This garden totem idea uses terracotta pots of various sizes stacked upside down and right-side up to create an adorable tower. I let my boys go wild with outdoor acrylic paints, and honestly, their creative chaos turned out better than anything I could’ve planned! We did ours in rainbow colors, and it makes me smile every single time I look at it.
The construction is super simple too. You thread the pots onto a sturdy piece of rebar or a metal pipe, alternating the direction of each pot. The natural drainage holes in the pots make this process easy-peasy! We sealed ours with outdoor varnish to protect the paint job from our unpredictable weather, and it’s held up beautifully through rain and shine.
- Start with a variety of pot sizes from large to small
- Use outdoor-safe paints that won’t fade in sunlight
- Add decorative elements like beads or small ornaments between pots
- Seal with weatherproof varnish for longevity
Recycled Metal Garden Totem
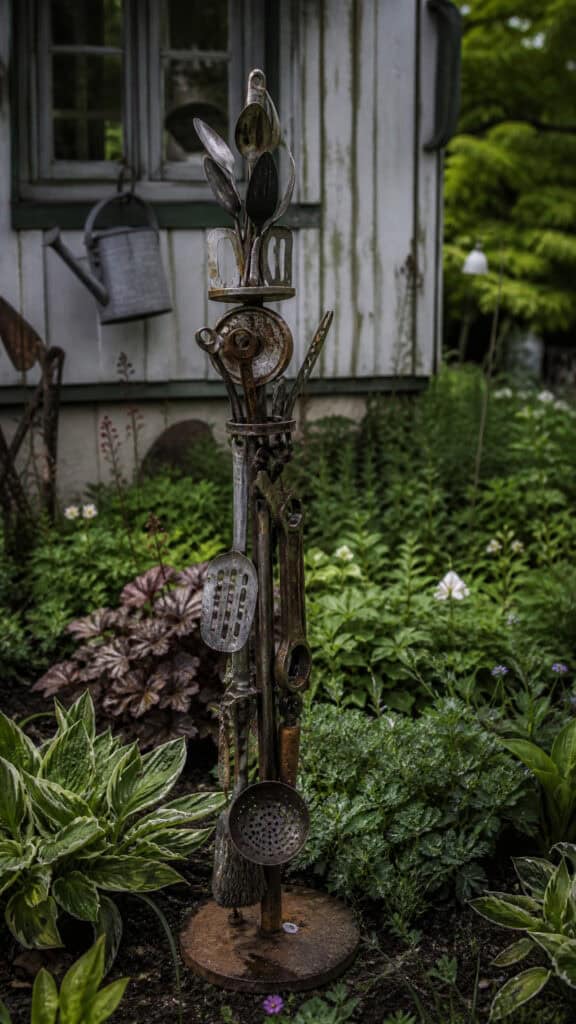
If you’ve got old metal items lying around your garage (and who doesn’t?), this is your chance to turn trash into treasure! I’ve created garden totems from old license plates, vintage kitchen utensils, metal lids, and even some rusty garden tools that were beyond repair. The industrial look adds such cool character to our backyard, and my husband was thrilled I finally cleared out some of his “I might need this someday” collection!
You can weld pieces together if you’re handy, or use strong outdoor adhesive and wire to secure everything. I’m definitely not a welder, so I went the wire-wrapping route, and it worked perfectly! The weathered, rusty patina that develops over time just adds to the charm. My youngest thinks it looks like a robot, which honestly makes it even better!
- Collect metal items with interesting shapes and textures
- Drill holes for wire wrapping if pieces don’t naturally connect
- Consider adding a coat of clear sealant to preserve desired rust levels
- Balance heavier pieces at the bottom for stability
Stone and Rock Stack Totem
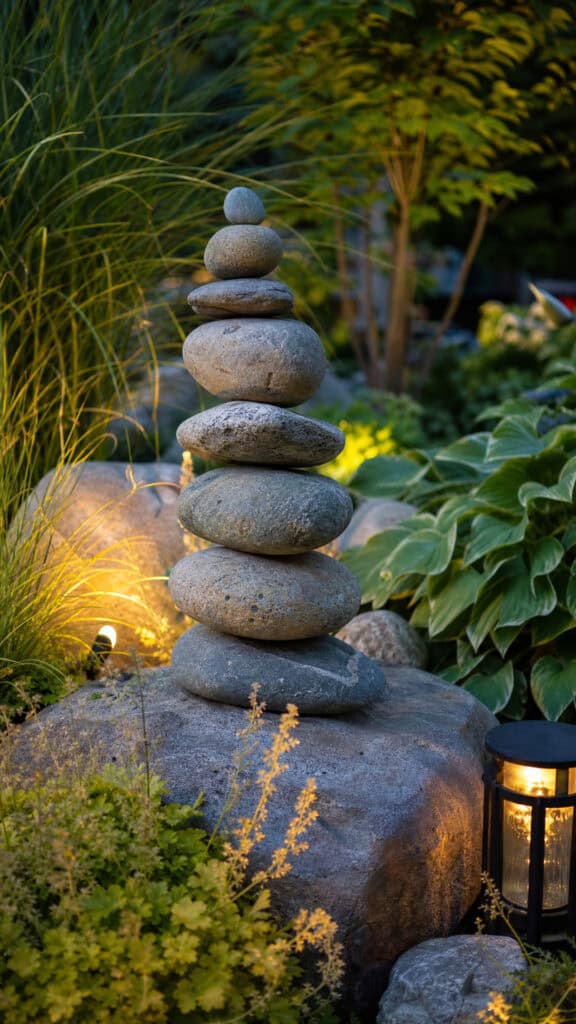
This garden totem idea is perfect if you love the natural, zen-like aesthetic! We’re lucky to have a creek nearby where the boys and I collect smooth river rocks during our nature walks. Stacking them into a totem creates this beautiful, earthy focal point that looks like it belongs in a meditation garden. It’s also been a great way to teach my kids about balance and patience (though let’s be honest, they knock it down as much as they help build it!).
The key to a stable stone totem is finding rocks with relatively flat surfaces and using construction adhesive designed for outdoor use. Some people prefer the temporary, Zen-like quality of unstacked stones, but with three energetic boys, I need mine permanently secured! You can also drill through softer stones and thread them onto a metal rod for extra stability.
- Choose stones with flat surfaces for better stacking
- Clean stones thoroughly before adhering
- Use outdoor construction adhesive rated for stone
- Create a stable base with your largest, flattest stone
Colorful Ceramic Totem Pole
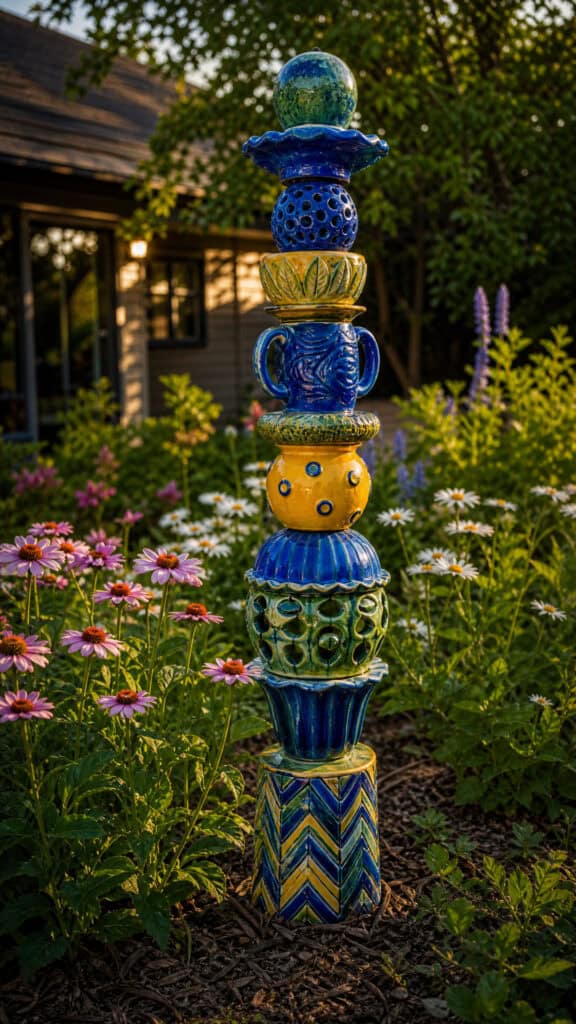
Oh my goodness, ceramic garden totems are absolutely stunning! These are usually handmade pieces that look like traditional totem poles but with a modern, artistic twist. I splurged on one for Mother’s Day (okay, I heavily hinted to my husband!), and it’s become the centerpiece of our garden. The glazed ceramic holds up incredibly well to weather, and the colors stay vibrant year after year!
If you’re crafty and have access to a kiln, you can make your own ceramic pieces and stack them. But honestly, supporting local artists by purchasing handmade ceramic totems is so worth it! Mine features whimsical faces and patterns that make me happy every time I water the plants. The boys named each face on our totem, which is adorable and also slightly concerning given their choice of names!
- Look for frost-resistant ceramic if you live in cold climates
- Choose glazed pieces for better weather resistance
- Support local artists at craft fairs and pottery studios
- Secure pieces with outdoor adhesive or mounting hardware
Driftwood and Natural Wood Totem

There’s something so organic and beautiful about a driftwood garden totem! We collected pieces during our beach vacation last summer, and I finally got around to creating this stunning natural sculpture. The weathered, silvery-gray wood has such amazing texture and character. Each piece tells its own story, and when stacked together, they create this gorgeous rustic focal point!
You can secure driftwood pieces with long screws, nails, or by drilling through them and using a threaded rod. I added some air plants and small succulents in the natural crevices, which took it to a whole new level! The boys love looking for interesting shaped wood pieces on our walks now, always asking if we can add them to our totem. It’s become a fun family treasure hunt!
- Select pieces with interesting shapes and natural holes
- Clean and treat wood to prevent pest infestation
- Use stainless steel hardware to prevent rust stains
- Add plants in natural crevices for extra interest
Bottle Tree Garden Totem

Bottle trees have such a cool history and make absolutely gorgeous garden totems! The tradition comes from African American folk art, where colored bottles were believed to trap evil spirits. Whether you believe in the folklore or just love the way sunlight dances through colored glass (like me!), these are show-stoppers! I’ve been collecting blue, green, and amber bottles for months, and our bottle tree is finally taking shape!
You can make a bottle tree totem by welding metal rods to a central pole, or by using a dead tree with multiple branches. I went with the metal rod approach because, well, I’m not chopping down any trees! The bottles slide onto the branches, and when the wind blows, they make the most beautiful tinkling sound. My boys think it’s like having wind chimes, but way cooler!
- Collect bottles in coordinating colors for cohesive look
- Ensure bottles are clean and labels removed
- Angle branches slightly upward to keep bottles secure
- Place where sunlight will shine through the glass
Mosaic Garden Totem Post
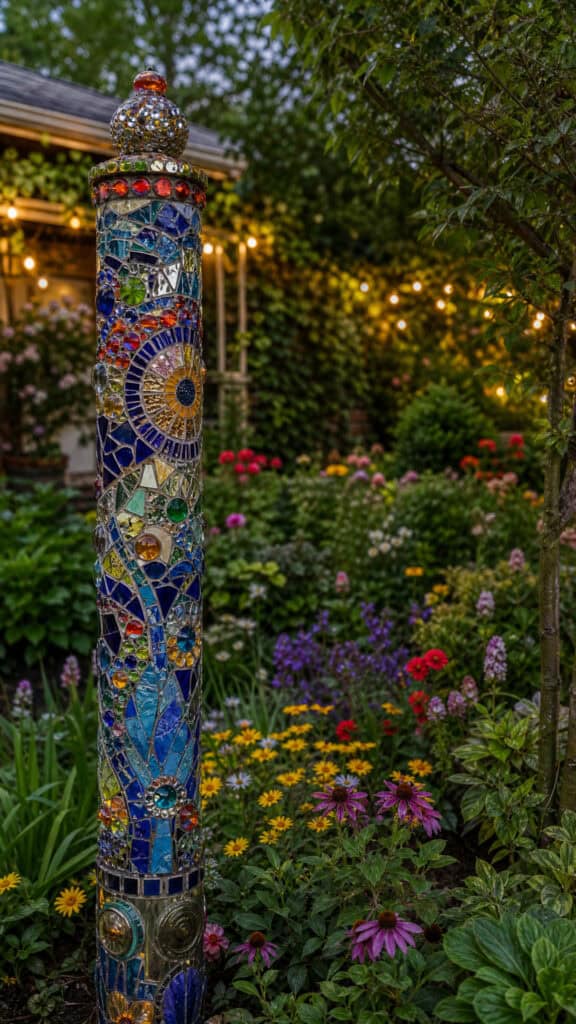
Mosaic art is having such a moment, and for good reason! A mosaic garden totem brings so much color and personality to your yard. I started with a simple wooden post and covered it with broken tile pieces, glass gems, and even some old jewelry that broke. It’s like creating a vertical canvas of memories and colors! This project took me several weekends (mom life, am I right?), but it was so therapeutic and totally worth it!
The great thing about mosaic totems is that there are no mistakes – it’s all about creative expression! I let each of my boys decorate their own section, and their personalities really shine through. We used outdoor tile adhesive and grout, and sealed everything to protect it from the elements. It’s held up beautifully, and I love that it’s a family art project we can enjoy for years!
- Use outdoor-rated adhesive and grout products
- Seal finished mosaic with penetrating sealer
- Mix different materials for texture and interest
- Plan your design roughly before adhering pieces permanently
Vintage Tool Garden Totem
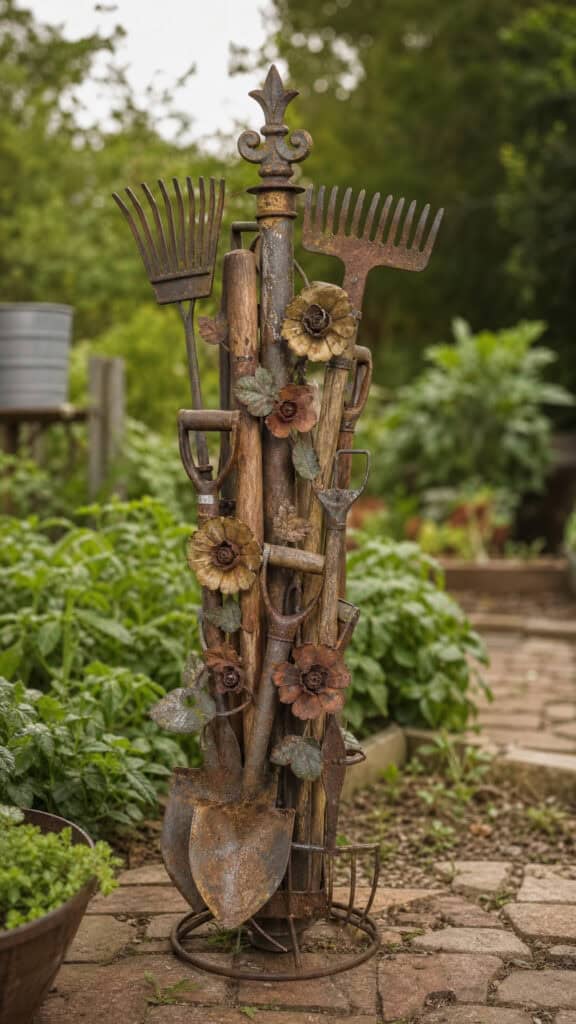
This is perfect for adding farmhouse charm to your garden! I raided flea markets and estate sales to find vintage garden tools, old shovels, rakes, and hand cultivators. When arranged vertically and secured together, they create this amazing rustic garden totem that celebrates gardening heritage. Plus, it’s a great conversation starter when guests visit!
My favorite part is that each tool has its own history and character. Some are rusty, some have wooden handles worn smooth from years of use, and they all tell a story. I secured mine by drilling through the handles and using a threaded rod, then added some vintage-style metal flowers between the tools for extra charm. It looks like it’s been in our garden forever!
- Look for tools with intact handles for easier assembly
- Clean tools but preserve the rustic patina
- Secure with bolts, wire, or threaded rod through handles
- Add decorative elements like metal flowers or garden ornaments
Copper Pipe Garden Totem
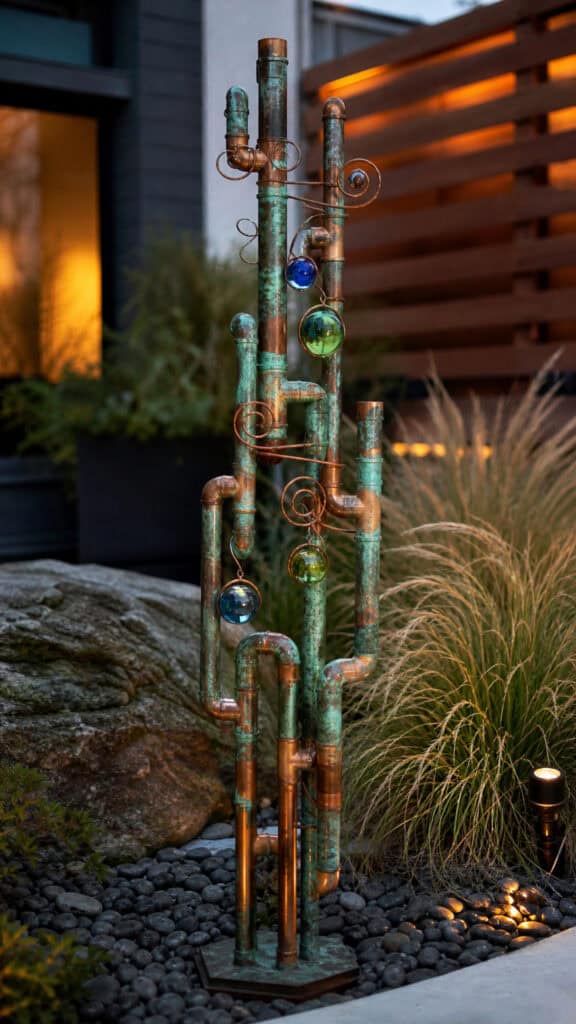
Copper pipe totems are so sleek and modern! I love how the copper develops this gorgeous green patina over time, going from shiny penny-colored to that beautiful aged verdigris. My husband had leftover copper pipes from a plumbing project (score!), and we created this stunning contemporary garden totem that looks like it came from an expensive garden center!
You can cut copper pipes to different lengths and connect them with elbow joints and T-joints to create interesting geometric shapes. We added some copper wire spirals and hung glass beads from some of the horizontal pieces. The whole thing moves slightly in the breeze, creating this dynamic sculpture that catches light beautifully. It’s definitely more grown-up looking than some of our other garden art, but the boys still think it’s cool!
- Use a pipe cutter for clean, straight cuts
- Connect pieces with copper fittings and solder or epoxy
- Add decorative elements like wire wrapping or beads
- Embrace the natural patina that develops over time
Painted Rock Totem
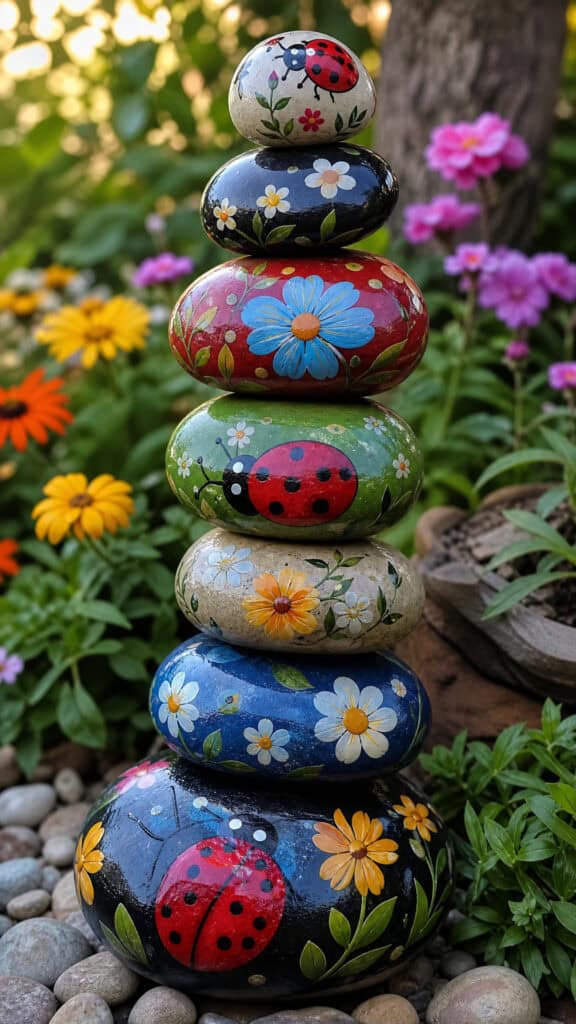
This is such a fun twist on traditional rock painting! Instead of just painting rocks and placing them around the garden, you stack painted rocks to create a colorful garden totem. My boys and I spent a rainy afternoon painting rocks with everything from ladybugs to abstract patterns, and then we stacked them into the cutest totem! It’s like rock painting meets sculpture!
We used acrylic paints and sealed each rock with outdoor varnish before stacking. Some people prefer to paint designs that flow from one rock to the next, creating a cohesive image when stacked, but we went for the eclectic look with each rock being its own little masterpiece. The boys love rearranging the order sometimes to create different looks!
- Choose rocks that stack well together
- Use outdoor acrylic paints for best results
- Seal each rock with UV-resistant varnish
- Use construction adhesive if you want permanent stacking
Metal Flower Garden Totem
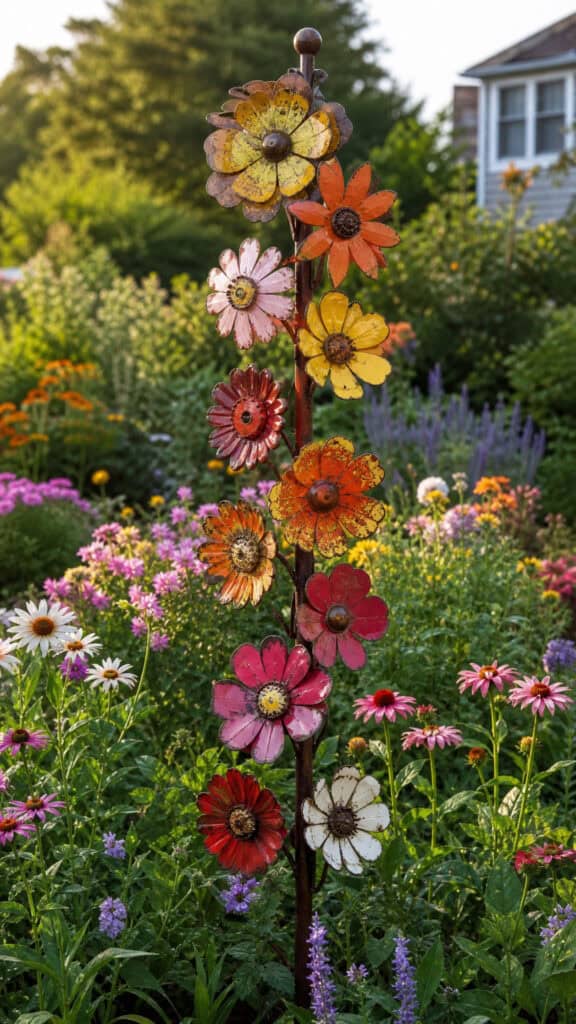
Metal flower garden totems are absolutely gorgeous and surprisingly easy to make! You can buy metal flower cutouts from craft stores or cut your own from sheet metal if you’re feeling ambitious. Stack them on a metal rod with spacers between each flower, and you’ve got this beautiful blooming tower that never needs watering! I love that mine “blooms” even in winter when everything else is dormant!
I painted mine in bright, happy colors – yellows, oranges, pinks, and reds – to add pops of color throughout the garden. Some people prefer the natural rusted metal look, which is also stunning! The flowers spin slightly in the wind, creating movement and interest. It’s become my favorite spot in the garden to photograph, and it makes me smile every single day!
- Use rust-resistant paint if you want to maintain colors
- Add washers or beads as spacers between flowers
- Vary flower sizes from large at bottom to small at top
- Secure with a concrete base for stability in wind
Bamboo Garden Totem
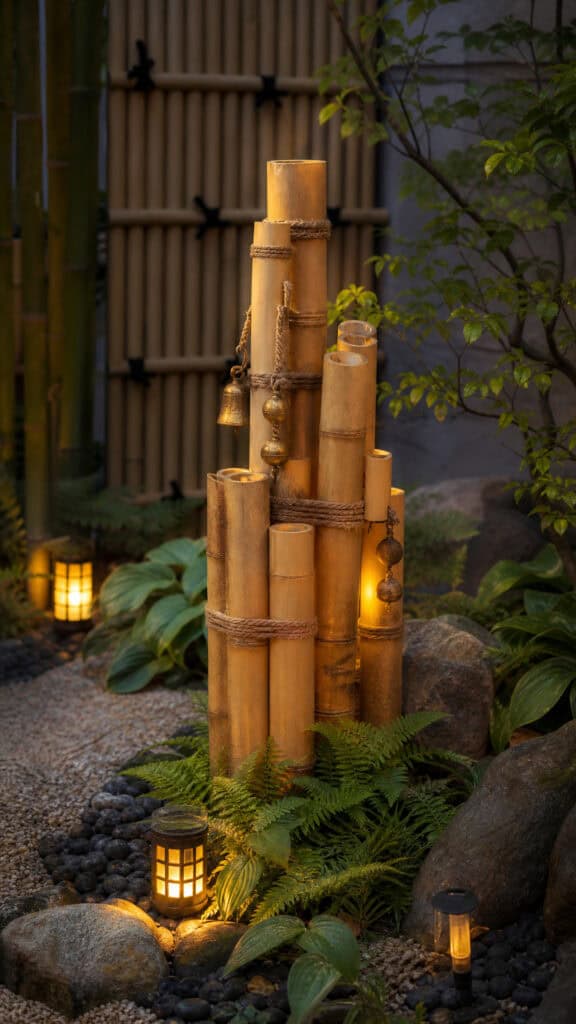
For an Asian-inspired or tropical look, bamboo garden totems are perfect! They bring such a zen, peaceful vibe to the garden. I used bamboo poles of varying heights and thicknesses, bundled and secured them together, and created this beautiful natural sculpture. Some people carve designs into the bamboo or burn patterns with a wood-burning tool, which looks amazing!
The natural golden color of bamboo is beautiful on its own, but you can also stain or paint it if you want. I added some small bells and chimes to ours, so it provides both visual and auditory interest. The boys love the sound it makes when the wind blows! Just make sure to seal the bamboo well to prevent it from splitting or rotting in wet weather.
- Choose bamboo poles with similar diameters for easier bundling
- Seal cut ends to prevent moisture damage and splitting
- Use natural twine or wire for securing bundles
- Add decorative elements like carved designs or chimes
Concrete Garden Totem

Concrete totems are super durable and you can get so creative with them! I made mine using different sized concrete molds – some were actual molds, others were just interesting containers I found around the house. You can embed decorative elements like stones, glass, or shells right into the wet concrete, which is so fun! My boys loved pushing their toy dinosaurs into the wet concrete to make impressions (which I quickly removed, but it was cute!).
Once the concrete pieces are cured, you stack them on a metal rod or secure them with construction adhesive. The weight of concrete makes these totems super stable, which is great when you have kids running around! I left mine natural gray, but you can paint or stain concrete to any color you want. It’s become such a substantial, permanent-feeling addition to our garden!
- Use a variety of mold shapes and sizes for interest
- Embed decorative elements while concrete is still wet
- Allow adequate curing time before stacking (at least 48 hours)
- Seal concrete to protect from moisture and staining
Gourd Garden Totem
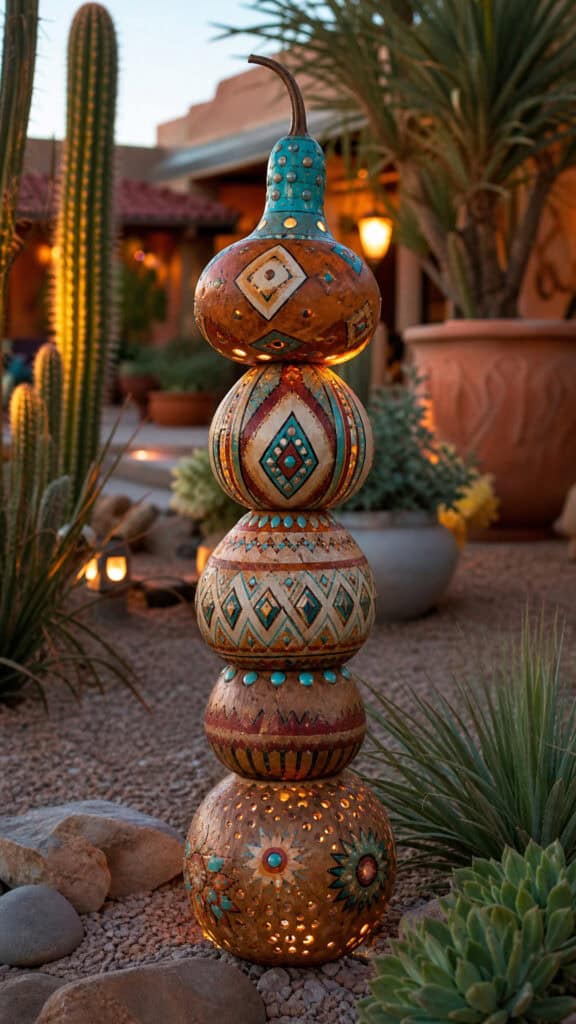
This is such a unique and natural option! Dried gourds can be carved, painted, or left natural and stacked to create an organic garden totem. I grew my own gourds last year (which the boys thought was hilarious because they look so weird!), dried them over winter, and created this amazing totem. The natural shapes are so interesting and sculptural!
You can drill through the gourds and thread them onto a rod, or secure them end-to-end with screws and adhesive. I painted mine with outdoor paint in a Southwest-inspired pattern with turquoise, coral, and cream colors. They’re surprisingly durable when properly dried and sealed! Just make sure they’re completely dry before assembling, or they might rot. Trust me, I learned that lesson the hard way with my first attempt!
- Ensure gourds are completely dry before use (several months)
- Clean and sanitize dried gourds before decorating
- Seal well with outdoor varnish to prevent moisture damage
- Use the natural neck of bottle gourds for easier stacking
Stacked Planter Garden Totem

This is probably my most functional garden totem because it actually holds plants! You stack planters of decreasing sizes, filling each with soil and flowers or herbs. It’s like a vertical garden and a sculpture in one! I planted trailing flowers and herbs in ours, and they cascade down beautifully. Plus, I can actually use the herbs when I’m cooking, so it’s pretty and practical!
The key is choosing planters that stack securely – some are specifically designed for stacking with built-in connectors, while others need a central rod for support. I love that I can change out the plants seasonally to keep things fresh and interesting. Right now we have petunias and herbs, but I’m planning to do ornamental kale and pansies for fall. The boys think it’s cool that our garden totem is also a salad bar!
- Choose planters with drainage holes in the bottom
- Use a central rod or stacking planters with built-in connectors
- Plant trailing varieties for cascading effect
- Consider weight when fully planted and watered
Glass Mushroom Garden Totem
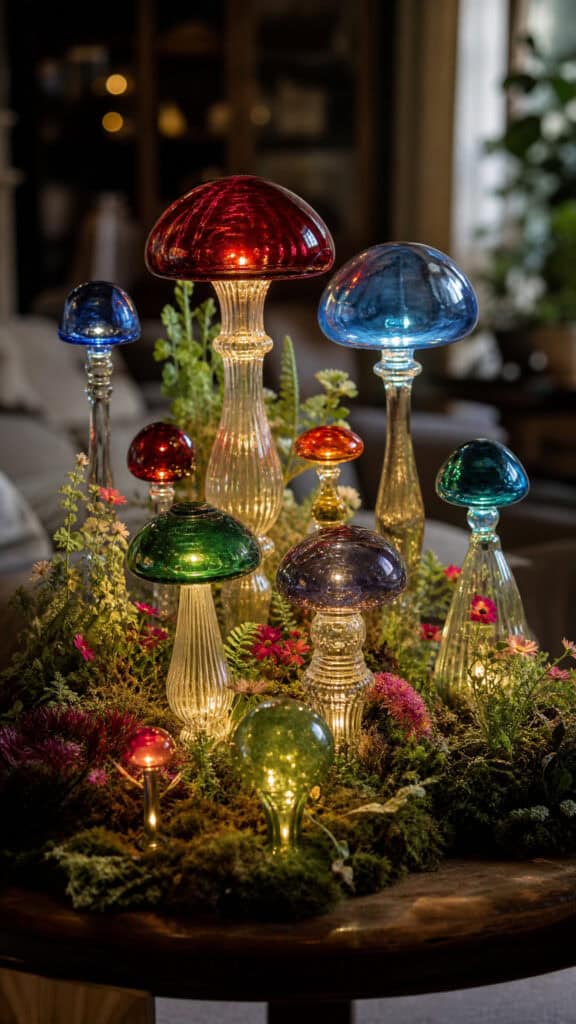
These whimsical glass mushroom totems are so enchanting! You create mushroom shapes using glass bowls for the caps and various glass pieces for the stems, stacking them at different heights. They look like something straight out of a fairy tale! I made several in different colors and heights, and grouped them together to create a magical mushroom garden. The boys absolutely love them and have created elaborate stories about fairies living underneath!
The glass catches light beautifully and creates these gorgeous color reflections on the ground. I used glass bowls from thrift stores (seriously, my favorite shopping spot now!), turning them upside down for mushroom caps, and stacked various glass vases and candlesticks underneath as stems. Some I made tall and thin, others short and stout. It’s become the most photographed spot in our yard!
- Use weather-resistant adhesive rated for glass
- Choose colorful glass for maximum visual impact
- Vary heights and sizes for a natural mushroom cluster look
- Place in areas with good sunlight for best effect
Wire and Bead Garden Totem
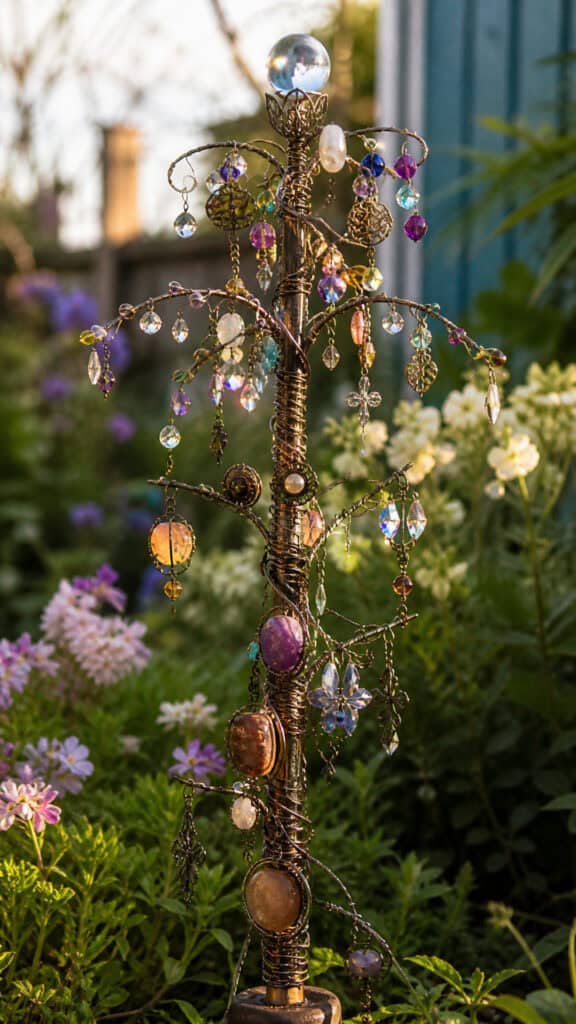
This delicate and sparkly garden totem is perfect for adding a touch of elegance! You create a wire framework and thread colorful beads onto wire branches that extend from a central pole. When the sun hits it, the beads sparkle like jewels! I used heavy gauge wire for the structure and thinner wire for the beaded branches. It’s like having a crystal chandelier in your garden!
This project was actually really relaxing to make during nap time (remember when those existed?). I used a mix of glass beads, crystals, and even some old jewelry pieces I repurposed. The beads catch the light and create beautiful rainbow reflections on nearby plants and pathways. It moves gently in the breeze, creating this magical, twinkling effect that’s especially beautiful in the evening light!
- Use galvanized or coated wire to prevent rust
- Mix bead sizes and colors for visual interest
- Secure wire branches firmly to central support
- Add extra beads at branch tips for weight and sparkle
Upcycled Window Frame Garden Totem
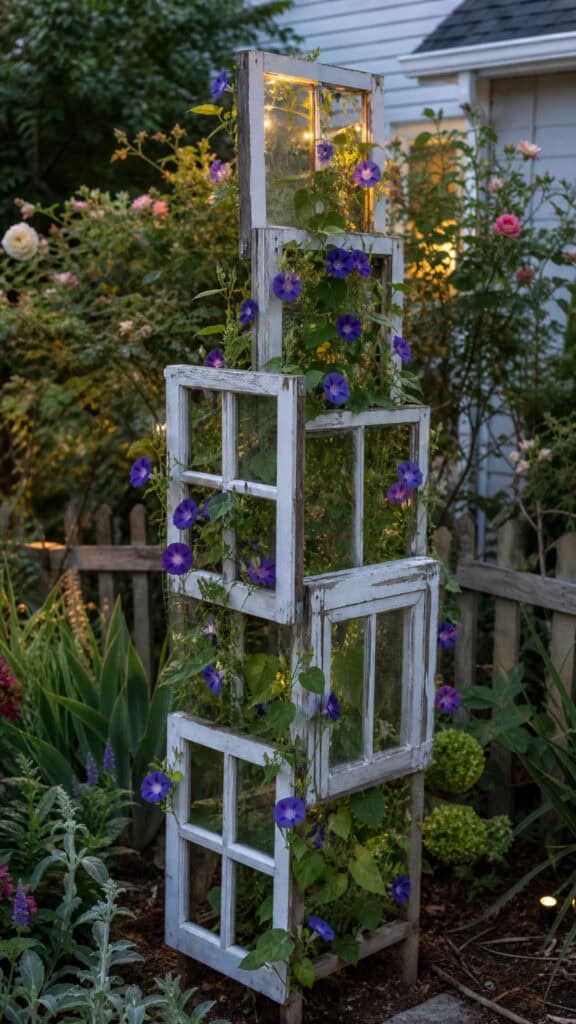
This is such a creative way to use old window frames! Stack vintage or salvaged window frames vertically to create an architectural garden totem. You can leave the glass in for a see-through effect, replace it with colored glass or mirrors, or remove it entirely and plant climbing vines to grow through the frames. I found old windows at a salvage yard, and this project turned out even better than I imagined!
The vertical windows create these beautiful framed views of the garden behind them, almost like living artwork. I planted morning glories to climb through the frames, and now it looks like a flowering tower! The boys love playing peek-a-boo through the different window panes. The weathered wood and old glass give it such character – it’s like bringing a piece of history into our modern garden!
- Check that old paint is lead-free or strip if necessary
- Secure frames with brackets, screws, or strong adhesive
- Consider replacing glass with acrylic for safety
- Plant climbers around the base for living artwork
Bringing It All Together
There you have it – nineteen amazing garden totem ideas that’ll transform your backyard into an artistic wonderland! Whether you’re drawn to the sparkle of glass, the rustic charm of metal and wood, or the whimsy of painted designs, there’s definitely a garden totem style that speaks to your personality. The best part is that many of these projects are totally doable even with kids “helping,” and they make wonderful family memories!
I love that garden totems add vertical interest without taking up precious ground space (which means more room for the boys’ soccer games and my sanity!). They’re conversation starters, they reflect your personal style, and honestly, they just make you happy every time you look at them! So grab some materials, maybe a glass of wine for after the kids go to bed, and start creating your own garden totem masterpiece. Your backyard will thank you, and you might just discover a new creative hobby! Happy crafting, mama!

This post may contain affiliate links. Read the full disclosure here.