Most nights I’m cooking for three hungry boys in a tiny kitchen, and I crave less clutter and more calm. I went hunting for remodel small kitchen ideas when snacks, lunch boxes, and soccer bottles started taking over the counters. If that sounds familiar, you’re in good company!
Here’s what I’m sharing to help you breathe again. Clear layout tips that open up traffic flow. Smart storage upgrades that hide the mess. Lighting and color tricks that make the room feel bright and bigger. A few smart appliances that earn their spot. Plus a simple plan that saves money and time, even with kids underfoot!
I’ve been there, and I made it work. I reshaped a tight layout, added better zones, and doubled our storage without a full gut, which is hard to believe but true. I’ll show you what matters first, what can wait, and how to stretch every dollar. Each section includes easy steps, family-safe choices, and realistic budgets, so you can get results fast without the stress.

Small Kitchen Layouts That Open Up Space and Cut Steps

When I plan a tiny kitchen, I think in steps saved and mess avoided. I use remodel small kitchen ideas that keep traffic clear, zones simple, and every inch working hard. If you want faster dinners and fewer bumps with kids running through, this section is your friend!
Measure Smart: Map doors, windows, and outlets before you move anything

Grab a tape, a pencil, and a calm ten minutes. Measure the room wall to wall, then measure again. Note the ceiling height too, since it controls cabinet options and vent choices.
Mark every window. Write down the height from the floor to the sill. This tells you how tall counters can be under the window. Note door width and how the doors swing. A door can block a drawer if you do not catch it early.
Find every outlet and switch. Measure from the nearest corner. Mark where water and gas lines enter. If you will move a sink or range, this helps you estimate costs.
I like a quick sketch on graph paper. One square equals six inches. Label appliances and add clearances. A free app works too, like Magicplan or RoomSketcher. The only rule is accuracy.
Watch for the gotchas that cause last minute stress:
- Fridge depth: many are deeper than cabinets, which can block a path.
- Oven door clearance: measure the door swing and space to stand and stir.
- Baseboard thickness: it steals depth from cabinets and shelves.
- Window trim: it cuts into counter space and backsplash layout.
- Radiators or vents: they need air space and cannot be covered.
- Bulkheads or beams: they limit cabinet height and hood size.
Before you order, measure the path from the front door to the kitchen. Check stair turns, hallway width, and low ceilings. Big appliances get stuck here, not in the kitchen. Ask me how I know!
Quick checklist:
- Room length and width, plus ceiling height.
- Window size, sill height, and trim depth.
- Door width and swing direction.
- Outlet, switch, plumbing, and gas locations.
- Appliance sizes, including handles and door swing.
- Fridge and oven clearance with doors open.
- Baseboard and radiator thickness.
- Delivery path from the curb to the kitchen.
Best tiny-kitchen layouts: galley, one wall, L-shape, and U-shape compared

What fits best depends on your room shape and family habits. Here is how I break it down for small homes with busy kids.
Galley kitchen
- Pros: super efficient, fewer steps, easy to zone. Great for two cooks if aisles are wide enough.
- Cons: tight with kids passing through, limited space for a table.
- Best for: long, narrow rooms.
- Tip: place the sink in the middle to balance prep on one side and cooking on the other. Put the trash under the sink for quick cleanups.
One-wall kitchen
- Pros: simplest and cheapest to install, leaves space for a small table or homework desk.
- Cons: shorter counter runs, fewer uppers unless you go tall.
- Best for: studio spaces, narrow rooms that open to a living area.
- Tip: add a slim island or rolling cart for prep and snacks. Use tall cabinets to the ceiling to regain storage.
L-shape kitchen
- Pros: open feel, natural corner for a coffee station or lunchbox bin. Easy to add a small island later.
- Cons: corner storage can be tricky, watch blind spots.
- Best for: square rooms or small eat-in spaces.
- Tip: keep the short leg of the L for cleanup and snacks, and the long leg for prep and cooking. It splits kid traffic from hot zones.
U-shape kitchen
- Pros: tons of counter space, great for solo cooking, everything is within reach.
- Cons: can feel tight if the opening is narrow, island rarely fits.
- Best for: small square rooms with one entry.
- Tip: keep at least 42 inches between facing runs. Use the center run for prep with a big cutting board and knife drawer.
Family choices matter too:
- Need a homework spot? One-wall or L-shape makes room for a small table.
- Constant snack traffic? Galley with a snack drawer near the entry keeps kids out of the hot side.
- Want two cooks? U-shape or wide galley with separate prep sinks feels calm and fast.
Work triangle vs work zones for families

The classic work triangle links the sink, fridge, and range. The idea is to place them in a loose triangle, keep each side a few steps apart, and avoid traffic through the middle. It is efficient for one cook.
For families, zones make more sense. I plan areas for the tasks we do most, so kids can grab what they need without crossing the stove. My go-to zones:
- Prep: big cutting board, bowls, knives, produce bins, trash.
- Cook: range, pans, utensils, oils, spices.
- Clean: sink, dishwasher, towels, soap, compost.
- Coffee: mugs, beans, filters, kettle, a small tray for spoons.
- Lunchboxes: containers, wraps, thermos, fruit cups, labels.
- Snacks: cereal, bars, cups, napkins, a low drawer for kids.
Example zone map for a small L-shape:
- Short leg by the window: sink and dishwasher for the clean zone.
- Corner cabinet: lazy Susan for snacks and plastic cups, easy grab for kids.
- Long leg near the entry: coffee and lunchbox station, plus the fridge.
- Long leg near the wall: prep area between fridge and range, with knives and cutting boards.
- Range at the far end: cook zone with pans and spices, out of the main traffic path.
This setup keeps hot work to the back, and kid jobs at the front. Fewer collisions, less stress, faster mornings.
Clearances, traffic flow, and kid-safe paths

A few numbers protect your sanity. They also prevent bruised hips and spilled pasta.
Key clearances:
- Aisle width: 42 inches is comfortable for one cook, 48 inches for two.
- Between island and range: at least 48 inches if kids pass behind you.
- Landing zones: 15 inches of counter on the handle side of the fridge, 12 to 18 inches on each side of the cooktop, 24 inches on one side of the sink.
- Dishwasher: leave 21 inches in front so you can load and step aside.
- Oven door open: 36 inches clear so you can pull a sheet pan safely.
- Counter height: standard 36 inches, bar seating 42 inches, stool leg space 12 inches deep under the counter.
- Toe kicks: 3 inches deep and 4 inches high for comfy prep time.
Set a no-go hot zone around the range. I teach my boys that the area two tiles wide in front of the stove is for grown-ups only. A small rug with a border can mark the spot.
Try this simple floor tape test:
- Tape where cabinets and appliances will sit.
- Add tape for door swings and open drawer fronts.
- Walk your morning routine with backpacks and a tray in hand.
- Adjust tape until traffic paths feel smooth.
- Once it works on the floor, lock in the plan.
Kid safety upgrades I love:
- Soft-close doors and drawers to prevent pinched fingers.
- Magnetic latches on the cleaning cabinet.
- A pull-out trash next to the sink so scraps go straight in.
- A low snack drawer with light bins, so kids do not climb counters.
Plan the flow first, then add style. When the paths are clear, the kitchen feels bigger, even when it is not. That is the magic we need on busy school nights!
Storage That Works Harder Than You Do

When space is tight, I want every shelf, rail, and drawer to pull its weight. I stick to remodel small kitchen ideas that add storage without crowding the room. Think up, inside, and behind. I promise, these tweaks make mornings smoother and cleanups faster!
Use your walls and ceiling: shelves, rails, and tall cabinets to the top

Walls do not only hold art. They hold dinner. Take cabinets all the way to the ceiling to capture that lost foot of storage. Use the top shelf for party platters, holiday mugs, and extra paper towels. Add simple crown to finish the look so dust does not settle up there.
I also like a small shelf above the window. It is perfect for plants, cookbooks, or jars of baking goods. It adds charm and frees a lower cabinet.
Rails are a lifesaver on a short wall. Try a sturdy rail above the backsplash with S-hooks for mugs, ladles, and measuring cups. Add a small cup for scissors and a pen. Move your daily tools off the counter so prep space stays clear.
Hooks work wonders:
- On the side of a cabinet for potholders and colanders.
- Under a shelf for mugs.
- On a rail for pans you grab every day.
I keep a small, stable step stool tucked in a skinny spot, like between the fridge and wall. It is the only way I can reach the top shelf fast with boys asking for cereal.
Ceiling pot racks are great in the right room. Install only if you can anchor into studs and head height is safe. Leave good clearance above your work zone so you do not bump a lid while serving pasta.
Inside-cabinet organizers that double capacity
The inside of your cabinets can work twice as hard with a few smart inserts. No tools for most of these, which I love on a busy weeknight.
- Pull-out trays: Slide-out trays in base cabinets bring pots and small appliances to you. No more crouching to the back.
- Tiered shelf risers: Stack canned goods, bowls, and plates so you can see the back row. It stops the stash from turning into a black hole.
- Pan and lid dividers: Stand pans on their sides. Store lids in a vertical rack. It saves space and keeps noise down when kids are asleep.
- 3 to 6 inch spice pull-outs: Slim pull-out racks fit next to the range or fridge. They hold spices, oils, and foil in a tiny footprint.
- Corner fixes: Blind-corner pull-outs glide all the way out, or add a Lazy Susan so nothing gets lost.
- Toe-kick drawers: That little strip at the floor can hide baking sheets, cooling racks, or cutting boards. It is secret storage that kids never notice.
Here is my mini plan to turn one base cabinet into a full pull-out pantry:
- Pick a 12 to 18 inch base cabinet near the fridge.
- Add full-extension slides and two to four pull-out shelves with a low rail.
- Group by height, tall bottles on the bottom, snacks and wraps up top.
- Label each pull-out with a simple word, Pasta, Snacks, Baking.
- Keep a small bin for refills so grocery day is fast.
This setup holds a week of dinners in one spot. It also stops the daily hunt for soy sauce and vinegar.
Clear countertops: appliance garages, magnetic strips, and rail systems
Counters are for prep, homework, and quick lunches. I keep only daily-use items out. Coffee maker, toaster, knife block if needed. Everything else gets a home behind a door.
An appliance garage in a corner is magic. Think of a small cabinet with a door that lifts or rolls up. Hide the blender, mixer, and toaster there. Add an outlet inside so cords stay put.
A magnetic knife strip frees a whole drawer. Mount it at least 18 inches from the stove and out of little hands. I place mine near the main prep board so chopping is quick.
A simple rail above the counter holds ladles, whisks, and measuring cups. Add a shallow shelf for salt, pepper, and olive oil. It turns one wall into a tidy prep zone.
My 10-minute tidy that keeps counters open:
- Clear trash and recycling first, 2 minutes.
- Load the dishwasher or soak, 3 minutes.
- Put tools back on the rail or in the garage, 2 minutes.
- Wipe counters and the sink lip, 2 minutes.
- Reset the hot spots, a cutting board and clean towel, 1 minute.
I do this after dinner while the boys pack lunches. It buys me a calm morning, which feels like gold.
Tiny pantry ideas: back-of-door, rolling carts, and toe-kick drawers
No pantry closet? I have three quick fixes that cost less than a new cabinet and work right away.
- Back-of-door rack: Hang a sturdy over-the-door rack on a closet or basement door. Store cans, sauces, and spices by size. Keep snacks up high if your kids are tiny, or low if you want them to self-serve after school.
- Slim rolling cart by the fridge: That 4 to 6 inch gap is prime space. A skinny cart holds oils, wraps, and extra condiments. Roll it out, grab what you need, slide it back, done.
- Labeled bins in a base cabinet: Use clear bins for breakfast, snacks, and baking. Labels make it easy for kids to help. It stops the avalanche of granola bars every time someone opens the door.
- Toe-kick pantry drawers: Add shallow drawers under two lower cabinets. Store sheet pans, cutting boards, or tortillas flat and out of sight.
Safety first, always. Anchor any tall rack to studs, and store heavy items low so nothing tips or falls. I keep flour, big juice bottles, and canned tomatoes on the bottom shelf. It keeps everyone safe and saves my back.
With a few focused upgrades, your storage will clock in and get to work. Less digging, more doing. Dinner on the table, counters clear, kids happy. That is the goal!
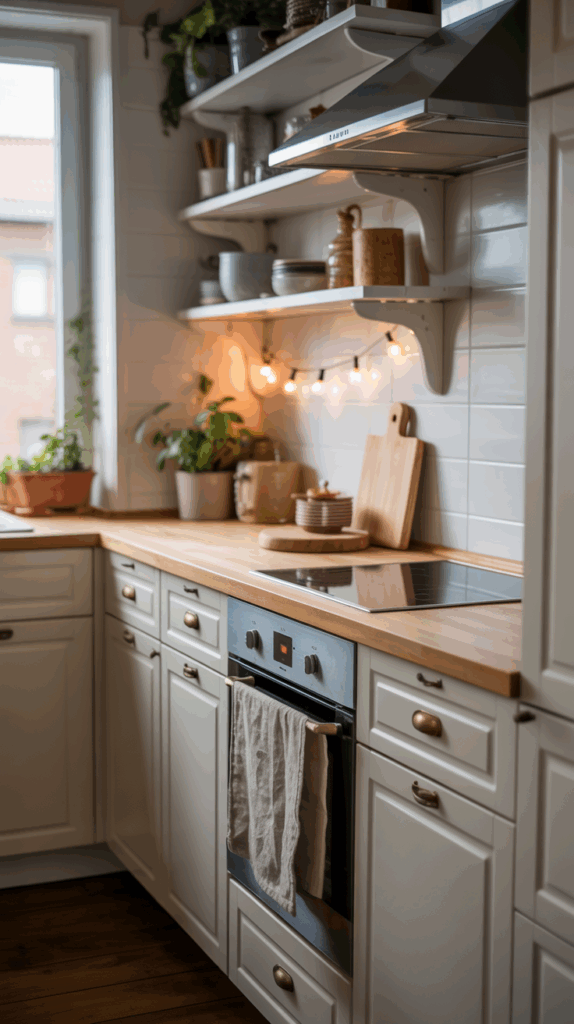
Light, Color, and Materials That Make a Small Kitchen Feel Bigger

Good light, soft color, and low-fuss materials change everything. I lean on simple remodel small kitchen ideas that brighten work zones, hide mess, and keep the room feeling open. Small kitchens can feel airy and calm with a few smart choices. Let’s make every surface do a little more!
Layered lighting: under-cabinet, ceiling, and task spots that banish shadows
Shadows make a room feel tight and cramped. They cut the counter into dark patches and slow you down at dinner. Layered light fixes this fast.
- Under-cabinet LED strips flood the countertops with clean, even light. Choose warm white (2700K to 3000K) so food looks natural. Stick-on, low-profile strips are perfect for rentals; hardwired bars give a seamless look.
- Ceiling lights carry the main load. A low-profile flush mount with a high CRI keeps colors true and the room bright.
- Task spots matter at the sink and range. Small directional lights focus right where you chop or stir.
I like dimmers for calm evenings and early mornings. Bright for lunch prep, soft for bedtime dishes. It helps kids wind down too.
- Budget: Plug-in LED strip kit with adhesive backing, plus a basic dimmer plug.
- Midrange: Hardwired under-cabinet bars with a wall dimmer, paired with a high-CRI flush mount.
Plan outlets where strips will live. If you hardwire, check local code and use a licensed pro. Safe wiring saves money and headaches.
Bright, calm color palettes that hide smudges
Shiny white can show every fingerprint. I pick satin or semi-gloss paint so walls and cabinets wipe clean. Doors and trim look best in semi-gloss. Walls in satin hide little scuffs but still wash well.
Here are three family-friendly palettes I love:
- Soft Warm White: Cabinets, warm white with a creamy base. Walls, gentle beige or greige. Hardware, brushed brass or champagne. Cozy, bright, and easy to touch up.
- Classic Green and Brass: Cabinets, muted sage. Walls, warm white. Hardware, brushed brass. Fresh and calm, great with wood floors.
- Gray-Blue and Black: Cabinets, light gray-blue. Walls, soft white with a cool base. Hardware, matte black. Clean lines and a modern farmhouse vibe.
Quick mom trick, keep a small jar of color-matched touch-up paint. I write the room name on the lid. After spaghetti night, I do a 30-second dab and done.
Backsplash and flooring tricks that stretch the room

Vertical lines pull the eye up and make the room feel taller. I run tile to the ceiling behind the range. It turns the stove wall into a focal point and hides splatter zones.
Big pieces on the floor reduce visual seams. That makes the room feel wide and open.
- Large-format tile (like 12 by 24) means fewer grout lines.
- Continuous plank flooring keeps boards running one direction through the kitchen and hall. The flow feels bigger and calmer.
Pick grout that does not show every spill. Mid-gray hides sauce, crumbs, and kid art projects. Sanded grout for floors wears well.
Safety tip for busy feet, choose slip-resistant finishes. Look for a light texture or a matte finish on tile. Wipe up splashes fast, then you are back in business.
Cabinet doors and hardware: clean lines, easy cleaning
Small kitchens look cleaner with simple fronts. Fewer grooves means less dust and faster wipe downs.
- Shaker doors: classic and family friendly. The frame adds a light shadow line, which gives depth. They do take a minute to clean in the inner edge.
- Slab doors: flat and sleek. Zero grooves, fastest to wipe. They show smudges more on glossy finishes, so I like matte or satin.
For hardware, pick slim, rounded pulls that do not snag pockets or sleeves. Brushed finishes hide fingerprints better than polished ones. Keep sizes consistent for a tidy look.
I always add soft-close hinges and slides. Kids can push hard and nothing slams. In tight corners, tip-on or push-to-open doors save knuckles and space.
Keep it simple, keep it sturdy, keep it wipeable. That is the sweet spot for a small, busy kitchen filled with hungry boys and lots of love!
Right-Sized Appliances and Multiuse Furniture for Tiny Kitchens

I want every piece in my small kitchen to earn its keep. The best remodel small kitchen ideas start with right-sized appliances and a few clever furniture moves. When space is tight and kids need snacks, the gear has to be safe, quiet, and easy to clean. Let’s make smart choices that fit, work hard, and keep the room calm!
Small but mighty appliances: what to choose and what to skip
Compact appliances can cook like the big guys without crowding the room. I pick pieces that match our family’s real habits, then skip the extras that steal storage.
- 24 inch ranges: Plenty of power for weeknight dinners. Look for at least one high-output burner or strong oven heat for sheet-pan meals. Check the full depth with handle so doors still open wide.
- 18 inch or drawer dishwashers: A narrow built-in or a double-drawer unit saves space and still handles daily plates, lunch boxes, and sippy cup lids. Drawers are great for half loads, which cuts water and time.
- Counter-depth fridge: Flush fronts keep aisles open. A 24 to 28 inch deep unit gives a clean line and fewer hip bumps. French doors help when the island is close.
- Induction cooktops: Fast heat, a cool-to-the-touch surface around the pan, and no open flame. Safer with curious kids. Many models simmer like a dream and are easy to wipe.
What I skip when storage is tight:
- Unitaskers that hog a shelf, like giant slow cookers, bulky bread makers, or oversized popcorn machines. I reach for multi-cookers, or use a Dutch oven for slow recipes.
- Extra blenders and mixers if we do not use them weekly. Borrow for holidays, or pick one high-quality tool that can handle several jobs.
Power and plug basics so breakers do not trip:
- Induction ranges usually need a dedicated 240V circuit. Countertop plug-in induction burners use 120V but still need their own outlet when cooking at high heat.
- Drawer dishwashers and compact ranges often need dedicated 120V or 240V circuits. Check the spec sheet before you buy.
- Do not run the microwave, toaster, and space heater on the same small circuit. I learned that lesson on a cold morning with waffles in progress.
- If in doubt, ask an electrician to map your circuits and add a dedicated line for the range or dishwasher. It saves headaches later.
Pro tip, measure the delivery path and door swings before you order. Small appliances can still get stuck in a narrow hall.
Islands, carts, and fold-down tables that add prep space

A tiny kitchen still deserves a proper landing zone. I like flexible pieces that move when I need to mop, host, or chase a soccer ball across the floor.
Smart options that work:
- Rolling islands with drawers: A 24 to 30 inch wide top adds real prep space and a place for sheet pans. Drawers hold wrap, towels, and knives. Locking casters keep it steady when chopping.
- Slim carts: A 12 to 16 inch wide cart slides beside the fridge or a tall cabinet. Store oils, lunchboxes, or breakfast bins. Pull it out for prep, tuck it in for dinner time.
- Wall-mounted drop-leaf tables: Perfect for breakfast, homework, or a quick coffee. Fold down when you need to sweep. Use two sturdy brackets and hit studs for safety.
- Space-saving bench with storage: A narrow bench against a wall creates a mini dining nook and hides lunch bags, water bottles, and craft supplies.
Keep walkways open so the room stays calm and safe. These sizes help:
- Aisle target, 36 inches clear, 42 inches if you can.
- Rolling island, 24 to 36 inches wide, 18 to 24 inches deep.
- Drop-leaf table, 30 inches tall, 12 inches deep folded, 24 to 30 inches deep open.
- Bench depth, 14 to 16 inches, with a low-hinged seat for hidden storage.
Quick size guide for easy scanning:
| Piece | Ideal Size Range | Clearance Goal |
|---|---|---|
| Rolling island top | 24–36 in W, 18–24 in D | 36–42 in around |
| Slim cart | 12–16 in W, 18–24 in D | Tuck beside fridge |
| Drop-leaf table (open) | 24–30 in D, 30 in H | 30 in knee room |
| Dining bench | 14–16 in D, 18 in H | Push tight to wall |
If your kitchen is narrow, use a cart the same height as your counters. It acts like a portable counter extension, which feels like a magic trick on meal prep nights.
Sinks and faucets that earn their keep

The right sink setup turns cleanups into a quick routine. I pick tools that multitask, then let me hide the mess fast.
- Single-bowl sink: One big basin holds sheet pans, stock pots, and the air fryer basket. No center divider to fight. It is easier to soak big items and keeps splashes down.
- Workstation sinks: Built-in ledges hold a cutting board, colander, and roll-up drying rack. Chop, rinse, and dry without moving three steps. The cutting board saves counter space on busy mornings.
- Pull-down faucet: A strong spray cuts through oatmeal bowls and sticky pans. Look for a magnetic dock so the head snaps back in place. A pause button on the wand is handy with kids.
- Water filter tap: A small filtered-water faucet frees up fridge door space. Fewer plastic bottles, fewer jugs, more room for yogurt and fruit.
If you are replacing the sink, check base-cabinet width and plumbing placement. A 30 to 33 inch single bowl fits most small kitchens. Add a deep basin if you hand wash big pots, or a mid-depth basin for less splash on short kids.
My sink station basics:
- Pull-out trash and compost on the right.
- Sponge and brush in a small caddy on the inner ledge.
- Roll-up rack for drying water bottles and snack lids.
Everything lives in one zone, which keeps traffic smooth and fast.
Quiet venting and easy-clean ideas for busy homes
Noise wears on everyone, especially during homework and bedtime dishes. I look for quiet ratings and smooth surfaces that wipe clean in seconds.
- Range hood, properly sized: Vent outside if you can. Match the hood width to the cooktop, and pick a model with a quiet sone rating on low. Under 2 sones on low is comfortable for everyday cooking. Use the low setting for simmer, bump to medium for searing.
- Dishwasher noise: Under 50 dBA feels calm during dinner. Under 45 dBA is whisper quiet. My boys can still chat about math without yelling.
- Fridge hum: Modern counter-depth fridges are better, but placement matters. Keep it level, leave space behind for airflow, and the hum stays low.
Easy-clean upgrades I love:
- Enamel-on-steel backsplash panels: Smooth, glossy, and tough. A quick spray and wipe after tacos, then spotless.
- Tempered glass behind the stove: Sleek, heat safe, and grout free. Use color film behind it if you want a pop.
- Full-height splash behind the range: Fewer seams mean fewer crumbs and splatters hiding out.
Final sanity savers:
- Use LED lights in the hood so bulbs last.
- Wash or replace hood filters on a monthly schedule if you cook daily.
- Choose sealed-burner ranges or a flat induction surface for faster wipe downs.
Quiet, safe, and simple to clean. That trio keeps my tiny kitchen running while three boys ask for seconds and I keep my smile.
Budget, Timeline, and Real-Life Planning Without the Stress
I built this section to make planning simple and calm, even with three boys grabbing snacks behind me. You will find real numbers, a clear schedule, and easy choices you can make without second-guessing. If you want practical remodel small kitchen ideas that feel doable, you are in the right place!
Set a real budget: where to splurge and where to save
Money stress melts when you see the full picture. Here is a quick guide I use to set expectations and stop surprises.
| Scope | Typical Range | What It Covers |
|---|---|---|
| Cosmetic refresh | $2,000 to $5,000 | Paint, hardware, lighting swaps, small storage fixes |
| Partial remodel with some DIY | $8,000 to $15,000 | New counters or sink, a few appliances, RTA cabinets |
| Full small-kitchen gut | $20,000 to $40,000 | Cabinets, layout shifts, pro trades, finishes |
I add a 10 percent buffer for the little curveballs, like a surprise valve or drywall repair. That cushion keeps me calm.
Smart splurges that pay off every day:
- Cabinets and storage hardware: Quality boxes, soft-close slides, and pull-outs last longer and work better.
- Lighting: Good under-cabinet lights change how the whole room feels and functions.
Easy places to save without regret:
- Classic hardware: Simple knobs and pulls in brushed finishes look timeless and clean well.
- Ready-to-assemble cabinets: Pick sturdy boxes with plywood sides and upgrade the hinges. Great value with the right install.
- Backsplash: Standard subway tile with a pretty layout pattern saves cash and still looks fresh.
- DIY paint: A weekend, a gallon of satin, and you will feel brand new.
I group costs by priority. Storage first, then light, then pretty details. That order keeps me on budget and still proud of the finish.
Plan the timeline: keep meals flowing and kids safe
A simple timeline lowers stress and keeps dinner moving. I block my weeks like this, then flex as needed.
- Design and quotes, 2 to 3 weeks. Measure, plan zones, collect bids, pick finishes.
- Order period, 3 to 6 weeks. Cabinets, hardware, lights, sink, and faucet.
- Prep and demo, 2 to 4 days. Set dust barriers, protect floors, haul out debris.
- Rough-in work, 3 to 7 days. Electrical, plumbing, venting. Inspections if needed.
- Cabinets and flooring, 3 to 7 days. Level bases, hang uppers, lay flooring.
- Counters and sink, 1 to 2 weeks lead time. Template day, install day, then plumbing hookup.
- Tile and paint, 2 to 4 days. Grout cures, touch-ups done.
- Appliances and trim, 1 to 2 days. Final fits, caulk, and hardware.
- Punch list, 1 to 3 days. Adjust doors, fix nicks, seal grout, clean.
Meals still need to happen, so I set a temp kitchen in the dining room:
- Hot plate, microwave, toaster, and an electric kettle.
- Paper plates and compostable bowls for peak demo days.
- A dish bin and a roll-up rack by the bathroom sink.
Food plan that saves sanity:
- Prep freezer meals on the weekend, like taco meat and pasta sauce.
- Schedule slow cooker nights and one picnic dinner a week.
- Stock fruit, yogurt, tortillas, cheese sticks, and bagged salad for fast lunches.
Safety is nonnegotiable with kids around:
- Use zippered dust barriers at doorways and tape seams.
- Cover vents during demo so dust does not spread.
- Lock tool storage every night. I use a bin with a padlock.
- Sweep and vacuum daily, especially around nails and screws.
With a plan like this, you keep the family fed, the house tidy enough, and your mood steady.
DIY vs pro: when to call help and what to tackle yourself
I love a good DIY day, but I also love safe wiring and dry floors. Here is my line in the sand.
Great DIY wins:
- Painting walls and cabinets.
- Swapping hardware and installing simple pulls.
- Hanging simple shelves with proper anchors.
- Caulking and touch-up paint for a crisp finish.
Call a pro for:
- Electrical work and new circuits.
- Plumbing moves or any supply-line changes.
- Gas lines and venting.
- Structural walls, beams, and anything load-bearing.
Permits may be required for electrical, plumbing, gas, and structural work. Check your city website or call the building department before you start.
Hire with confidence using this short checklist:
- Ask for a license number and verify it.
- Request proof of insurance and workers’ comp.
- Get three references, then call them.
- Review a detailed scope with dates and payments.
- Confirm permit handling and inspection timing.
- Put changes in writing with clear costs.
I treat pros like partners. Clear plans, fast replies, and a tidy site keep jobs smooth and on time.
Quick wins you can do this weekend
Small moves add up fast. Pick two or three and enjoy the boost by Sunday night.
- Add under-cabinet lights: Stick-on LED strips brighten prep zones in ten minutes.
- Install a magnetic knife strip: Free a drawer and keep blades safe and handy.
- Swap cabinet hardware: Fresh pulls make old doors feel new.
- Add shelf risers: Double vertical space for plates and pantry cans.
- Mount a rail: Hang ladles, measuring cups, and a small herb pot.
- Add a rolling cart: Park it by the fridge for oils and lunchboxes.
- Declutter 20 items: Expired snacks, chipped mugs, and duplicate spatulas, gone.
- Reset a snack zone at kid height: Clear bins, small bowls, napkins, and a water bottle caddy.
Keep it fun. Turn on music, set a timer, and take a before photo. When the counters clear and the lights glow, the whole kitchen feels calmer, which makes dinners and homework so much nicer!

Conclusion
As a mom of three boys, I made a tiny kitchen work with simple moves that add up. The path is clear, start with layout, then boost storage, brighten with light and color, pick right-sized appliances, and follow a realistic plan. These remodel small kitchen ideas keep traffic calm, counters clear, and weeknights easier!
Now it is your turn. Pick one change to do this week, maybe install under-cabinet lights or set up a snack drawer. Choose one project to plan for next month, like a pull-out pantry or a workstation sink, and put it on the calendar. Small steps build momentum and save money. You will feel the difference fast.
Next steps checklist:
- Measure the room and mark clearances.
- Map zones, prep, cook, clean, snacks, and coffee.
- Add one organizer, pull-out tray, shelf riser, or rail.
- Improve light, plug-in LED strips or a brighter ceiling light.
- Make a quick budget, set a 10 percent buffer, and list must-haves.
I am cheering you on, one smart choice at a time, and your small kitchen will work harder, feel bigger, and finally fit your busy life!
This post may contain affiliate links. Read the full disclosure here.